June 20, 2014

Remotely monitor temperature and humidity with a Raspberry Pi

After experiencing weather-related damage in a holiday home, Instructables member wpnsmith decided that this could have been avoided if a remote-monitoring system was available. So after some experimenting they have created and documented a neat solution based around a Raspberry Pi.

The sensor used is a typical temperature/humidity combined unit which easily interfaces with the Pi. This in turn captures the weather data and stores it in a MySQL database which can then be access remotely over the Internet connection between the local and remote site. 

Although this sounds complex, the process of setting up the required operating system, python code for the sensor, the web server and more is detailed so you can do it yourself.

Furthermore this project can be used as an easy framework for your own remote-monitoring station with other sensors or data as well. So to get started, check out the project Instructable page. And for more, we're onfacebooktwitter and Google+, so follow us for news and product updates as well.

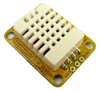
If you're looking for a sensor to measure temperature and humidity - check out our HUMID: humidity and temperature sensor module. Designed around the DHT22 sensor, it only requires one digital pin and power - and is easy to use with out Quick Start guide. With a temperature range of -4°C to +125°C with +/-0.5°C accuracy, and humidity at 0-100% with 2-5% accuracy you're ready to measure. For more information and to order, click here.


June 20, 2014

Hacking an old iPod with Arduino and Android

Old iPods don't die (well most of them ...) they just become obsolete and end up in the bottom drawer or the car glovebox. However this is a waste of perfectly good technology and can still be quite useful in the right circumstances. Trevor Lewis also had the same thought and has documented how to use old iPods as a remote-control music player using Bluetooth and an Android device. 

By hacking an iPod audio/video cable it is connected to an Arduino board with a Bluetooth module - which then communicates with the Android device running a free application (or perhaps one that you have written yourself. And thus you have an Android-controlled iPod "dock" - with the iPod connected to your stereo or hifi system a new lease of life is given to the music player as a remote jukebox. A quick run-through is demonstrated in the following video:

Kudos to Trevor for such a useful project, of which you can read about here. And for more, we're on facebookGoogle+, and twitter - so follow us for news and product updates as well. 

Have you been reading about Arduino and would like to understand more so you can work with projects like the example above, but not sure where to start? Then order one of our Experimenter's Kit for Arduino: 

The package includes a wide variety of parts, sensors and modules including: a servo motor, lights, buttons, switches, sound, sensors, breadboard, wires and more. Furthermore a Freetronics Eleven Arduino-compatible board is included to make this an extensive hobby experimenter, inventor and starter kit. 

However we don't leave you alone to figure it all out, included is a great project and instruction booklet, plus access to a supporting web page and software examples. In other words - this is everything you need to get started for a fun range of electronics and Arduino related projects! So to get started or for more information and to order, check out the product page.

June 19, 2014

An Arduino-powered home notification centre

Once again Peter Dalmaris has documented an interesting Arduino-based project - this time an Arduino-powered home notification centre. At the home end an Ethernet-enabled Arduino, Freetronics DMD, and a buzzer await messages passed from a web page that is hosted on Heroku, a cloud-based application host. The web page is coded in Ruby, using the Sinatra web app framework, and the Redis key-value store.

That sounds complex but can be done yourself without too much effort. Once completed you can send text messages with a nice buzz from any web browser - great for getting the message across to those at home or elsewhere. Peter runs through the device and the implementation in the following video:

Kudos to Peter for something so useful which we can reproduce ourselves. To get started, check out his interesting websiteAnd for more, we're on facebookGoogle+, and twitter - so follow us for news and product updates as well. 

As used in the project mentioned above, check out our Freetronics Dot Matrix Displays. They're simple to use, yet very bright for indoor and outdoor situations. Available in various colours, the 32 x 16 LED matrix can display text and graphics quite easily - and can be daisy-chained together for extended displays. For more information, see our range of Dot Matrix Displays here

June 19, 2014

Have fun with a Raspberry Pi-driven Smart Target

If you're looking for fun and interesting ways to waste time at the office, or a fun Raspberry Pi project - then the Smart Target project by Noel Portugal will fit hte bill. It's a target device that one attempts to throw objects at from a distance - and contains an LCD to tell you how good your shot was, along with a webcam which take a snapshot of the moment and posts it to a social media site. 

The software is based around some Java code to control the RPi which also runs some python to operate the target system. If making your own it would be recommended to build a very strong target, as the participants can get quite competitive - as shown in the following video:

That has the potential to be a whole lot of fun, so check out the project website to get started. And for more, we're on facebookGoogle+, and twitter - so follow us for news and product updates as well.

If you're looking for a more permanent way to mount circuitry to your Raspberry Pi, check out our new PiBreak - the prototyping board for the Raspberry Pi. It provides labelled breakout pins for all GPIOs, a large prototyping area with solder pads, and power rails for easy power connection:

Furthermore the PiBreak also includes mounting hardware to firmly attach it to your Raspberry Pi using a nut, bolt, and spacer - and is compatible with all revisions of both model A and B Raspberry Pi computers. For more information about our new PiBreak board, our Getting Started guide, and to order - visit the product page

June 18, 2014

Make your own "Snake" game with Arduino

Some games never die, they just reappear in new formats - such as the classic "Snake" found on Nokia phones in the late 20th century. And here we find it resurrected with the Arduino platform by MrMase who uses some LED matrix display boards and an inexpensive game controller.

Furthermore as a coding exercise the software has been written in a much stricter, object-oriented form which is an interesting read in itself. However it's worth it as you can see in the following short video:

You can review the code from the project's Google Code page. And for more, we're on facebookGoogle+, and twitter - so follow us for news and product updates as well.

If you're looking for an Arduino Uno-compatible board for various projects, choose what tens of thousands of others have done and use our Freetronics Eleven - the Arduino-Uno compatible with low-profile USB socket, onboard prototyping space and easy to view LEDs: 

June 18, 2014

Build a neat LED clock with Arduino

As an exercise to learn more about the world of Arduino, Chris Gunawardena has come up with a simple yet useful project in his desktop LED clock. Instead of using LED or LCD displays, his clock uses individual LEDs in a ring formation - one for each hour and another for each five minute interval. This offers a readable yet classy level of minimalism that is often lacking these days. 

To control all those LEDs Chris has used 74HC595 shift registers which are easy to control and can deal with the required current. And as the display isn't down to the minute, by using the Arduino time library the expense of a real-time clock IC isn't justified. Furthermore, to reduce hardware complexity the final clock is using a smaller ATtiiny microcontroller. Finally Chris has made a simple folded enclosure for his clock which is neat and tidy, for example:

Another great project that anyone can recreate - so to get started visit Chris' interesting website. And for more, we're on facebookGoogle+, and twitter - so follow us for news and product updates as well

To make inserting a 74HC595 shift register into your prototypes easy and fast, use our EXPAND: shift register module:

It makes adding more outputs to your microcontroller simple - with a labelled breakout board and blue power LED, you can't go wrong. And if you're not sure how they work, our Quickstart guide will have you up and running in no time. For more information and to order, click here

June 17, 2014

An Arduino-powered Reflow Oven Controller

There are many reflow ovens on the market, all of which are quite a temptation to the surface-mount soldering enthusiast. However some may have good heating hardware but terrible controllers, so more enthusiasts are taking things one step further and making their own controller for the oven. This has been demonstrated very well by Karl Pitrich based on work by Ed Simmons - whose controller is user-friendly and quite detailed. 

Unlike other designs that rely on a hodge-podge of modules and breakout boards, Karl has provided design files for a mains-rated PCB that keeps the controller neat and much safer than usual home-made efforts, while still being able to control loads of up to 600V at 8A. Finally the user interface is well done and uses an inexpensive display as shown below:

For complete details including the sketch, schematics and PCB files, visit Karl's gitub page. And for more, we're on facebooktwitter and Google+, so follow us for news and product updates as well.

Looking for a small yet useful OLED display for your Arduino (or Raspberry Pi)? You can get a lot more detail with an OLED - such as our 128x128 pixel OLED Module. With a diagonal size of 1.5" and 16,384 colours to select from, so almost anything is possible. Furthermore there's a microSD card socket, and removable tabs on each side which can hold LEDs and buttons:


And using the module is made simple - we have tutorials and drivers for both the Arduino and Raspberry Pi platforms - great for experimenters or those who use both systems. Furthermore, check out the forum where members are already creating modified drivers to rapidly increase the display speed. For more information including our Quickstart guides - and of course to order - visit the OLED Module product page.

June 17, 2014

Create an email notification system with Raspberry Pi

If you're looking for a more permanent use for a Raspberry Pi, one useful example has been created by Instructables member Aleator777 - a simple device that alerts you to new Google-hosted email. The Pi runs python code that checks for new email over regular periods, and then triggers a GPIO pin which in turn controls an N-MOSFET which illuminates LEDs. However thanks to the code you could control all manner of things - lights, sound, relays and more. A quick demonstration is shown in the following video: 

You can find all the details, code and the files for the enclosure in the project Instructable page. And for more, we're on facebookGoogle+, and twitter - so follow us for news and product updates as well.

If you're looking for a more permanent way to mount circuitry to your Raspberry Pi, check out our new PiBreak - the prototyping board for the Raspberry Pi. It provides labelled breakout pins for all GPIOs, a large prototyping area with solder pads, and power rails for easy power connection:

Furthermore the PiBreak also includes mounting hardware to firmly attach it to your Raspberry Pi using a nut, bolt, and spacer - and is compatible with all revisions of both model A and B Raspberry Pi computers. For more information about our new PiBreak board, our Getting Started guide, and to order - visit the product page

June 16, 2014

Build a retro touch lamp with Arduino

Not every Arduino (or electronics) project needs to look out of place in the home environment - with some thought a very nice piece can be created. One example of this is the touch lamp created by Instructables member bowlen199 whose LED touch lamp works well and looks great. By modifying an existing desk lamp into a work of minimalist design, there was still room for an Arduino-compatible circuit that used the hardware as a touch sensor to control a strip of LEDs in the housing.

It's a neat design and with the provided instructions you can create your own with a little study, and example of which is shown below:

For complete details, visit the project Instructable page. And for more, we're on facebookGoogle+, and twitter - so follow us for news and product updates as well.

If you're looking for an Arduino Uno-compatible board for various projects, choose what tens of thousands of others have done and use our Freetronics Eleven - the Arduino-Uno compatible with low-profile USB socket, onboard prototyping space and easy to view LEDs: 

June 16, 2014

Turning old hard drives into binary clocks with Arduino

We never tire of interesting clock projects, and the following example published on the x2jiggy website will appeal to the IT or mathematically-included enthusiast. They've taken the typical binary clock project to the next level by fitting it inside an old hard drive enclosure. With some effort the facing surface has been polished for a great effect.

Furthermore with the use of an external real-time clock IC the time will stay accurate and offers other options such as dates, alarms and more. To save space and funds a whole board wasn't used - instead a bare Arduino-compatible circuit based around an ATmega328P with Arduino bootloader. Overall it's a great clock that would look good on any desk or make a nice gift, for example:

For complete details including the code and instructions, check out the project website. And for more, we're on facebooktwitter and Google+, so follow us for news and product updates as well.

The most important part of any clock project is the inclusion of an accurate real-time clock IC. Here at Freetronics we have the Maxim DS3232 real-time clock IC module:

Apart from keeping accurate time for years due to the temperature-controlled oscillator and having a tiny coin-cell for backup, it is very simple to connect to your Arduino project. A driver library allows your program to easily set or read the time and date. Perfect for clock projects, dataloggers or anything that needs to know the date and time. Furthermore it contains a digital thermometer and 236 bytes of non-volatile memory to store user settings and other data. For more information, check out the module page here