June 13, 2014

An Arduino-powered Fibonacci number generator with 8-bit binary display

For the mathematically-inclined, various numbering sequences are of interest and a more popular one is the Fibonacci sequence. For the uninitiated, Fibonacci numbers may start with zero, then follow on with 1, 1, 2, 3, 5, 8, 13, 21, 34, 55, 89, 144 and so on. Each number is calculated by adding the two numbers before it, for example 8 = 5 + 3, 55 = 34 + 21, and so on. You can learn more about these here and here

The generation of these are a classic programming challenge, and one taken by Caleb from the Hobby Hobbyist blog. He's used an Arduino to calculate the number sequence and display them in binary form using eight LEDs, as shown in the following video:

Caleb provides the sketch to recreate this yourself on his website, which leaves it open for performance enhancement and experimenting. And for more, we're on facebookGoogle+, and twitter - so follow us for news and product updates as well. 

Have you been reading about Arduino and would like to understand more so you can work with projects like the example above, but not sure where to start? Then order one of our Experimenter's Kit for Arduino: 

The package includes a wide variety of parts, sensors and modules including: a servo motor, lights, buttons, switches, sound, sensors, breadboard, wires and more. Furthermore a Freetronics Eleven Arduino-compatible board is included to make this an extensive hobby experimenter, inventor and starter kit. 

However we don't leave you alone to figure it all out, included is a great project and instruction booklet, plus access to a supporting web page and software examples. In other words - this is everything you need to get started for a fun range of electronics and Arduino related projects! So to get started or for more information and to order, check out the product page.

June 13, 2014

Build a tiny altimeter for RC aircraft with Arduino

Although making and flying your own model aircraft, quadcopters and so on is a lot of fun, part of that fun is understanding the performance and limits of the equipment. One parameter of interest is the maximum altitude, and to track this you can make a simple logging altimeter as described by Instructables member qubist

They've squeezed a tiny Arduino-compatible board, an even smaller LiPo battery, altitude sensor and a retro 7-segment LED display into a tiny box which can be fitted to the aircraft in question. It can be programmed to display the current altitude, and also of course log the time of flight, altitude history or any other parameter you can realise. A quick demonstration is shown in the following video:

That's useful, simple and very well done - so to learn how visit the project Instructable pageAnd for more, we're on facebooktwitter and Google+, so follow us for news and product updates as well. 

If you're creating portable electronic projects and work with Lithium-Polymer or Lithium-Ion batteries, it can be difficult to build a safe and simple charger. Instead save time and risk by using our USB LiPo charger module:

It's the convenient smart charger for 3.7V cells: just plug in your cell and a USB power source such as a mobile phone charger or computer, and you're done. And it includes a smart LiPo management chip that regulates the charge rate and detects when the cell is charged. Maximum charge rate current limit can be set using solder jumpers to suit your particular LiPo cell. For more details and to order, visit the module home page

June 12, 2014

Driving many RGB LEDs with Arduino using shift registers

Having fun with RGB LEDs and an Arduino can be somewhat limited due to the number of PWM (pulse-width modulation) pins available on the board. There are several ways around this, such as using TLC5940 or other LED driver ICs - which can get expensive. However it's possible to use inexpensive 74HC595 shift registers instead, and this has been made possible by Elco Jacobs and his ShiftPWM Arduino library.

Doing so is quite easy and with the library and included demonstration schematics, you can control eight RGB LEDs (that's 24 individual LEDs) with PWM with only three shift registers. However you can use less or more shift registers. 

You can download the library and view some other interesting items from Elco's websiteAnd for more, we're on facebookGoogle+, and twitter - so follow us for news and product updates as well.

If you're interested in experimenting with RGB LEDs as demonstrated above, we're offering large and bright 8mm diameter RGB LEDs:

They're in the common-anode format and look great when lit up. Ideal for colour-mixing and creating displays of all sorts. For more information and to order, visit the product page

June 12, 2014

Build an interactive 3D position-sensing device with Arduino

And now for something totall different is the following 3D position-sensing device by Instructables member birdyberth. By using five inexpensive ultrasonic distance sensors mounted onto brackets controlled by servos, the distance between an object (for example a human hand) and the device can be determined.

Thus by using multiple sensors at different angles, the object's location in space (at the desk, not outer...) can also be determined and the resulting output used for various tasks, one of which as a mouse for a PC. This is easily done using an Arduino Leonardo or compatible board thanks to the simplicity of the HID interface on these boards. The creator takes the device for a test run in the following video:

Absolutely fantastic, something that could have been out of a science fiction movie can now be made at home, so visit the Instructable to get started. And for more, we're on facebookGoogle+, and twitter - so follow us for news and product updates as well.

Need an Arduino Leonardo-compatible for use with your own projects? Then check out out our LeoStick. It's the Arduino Leonardo-compatible board that's cheaper and smaller than the original:

 Apart from being one of the smallest Arduino-compatibles on the market with USB, it also has an onboard RGB LED and piezo which can be used a knock sensor and various tune and sound effects. Plus you can add extra circuitry with the matching protostick! For more information and to order, click here.

June 11, 2014

Generate 640x480 colour VGA video with an Arduino

Generating video output with an Arduino or compatible board is generally limited - by the speed of the microcontroller, the I/O and of course the amount of memory available to the application. However there are some very good attempts, from basic composite video and so on. However a new method has been demonstrated by the folks of the "Don't Quit Your Day Job" website. 

Their method involves several stages, including some interesting timer code by Nick Gammon and external digital logic circuits that are used to increase the clock rate for the video signal, which does work but due to the difference in the generated and required clock rate - does have a margin of error. However it's a fascinating experiment and an example of the results are shown in the following video:

For complete details on this method including code and hardware details, visit the DQYDJ website. And for more, we're on facebookGoogle+, and twitter - so follow us for news and product updates as well.

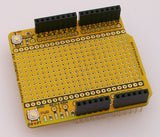
If you need to add external hardware or devices to your next Arduino project, you'll need a protoshield to mount the external circuitry. In doing so, consider our range of ProtoShields. From the tiny LeoStick to the Mega we have a wide range to suit your application. 

June 11, 2014

Using a Freetronics Dot Matrix Display as an MQTT message client

Our range of LED dot matrix displays are used for all sorts purposes, and one new example we'd like to share is by Toby Robb who uses the DMD as an MQTT message client. In other words, the DMD can display text messages from an MQTT server via an Ethernet-enabled Arduino-compatible board or Arduino with an Ethernet shield. 

For the curious, MQTT stands for...

... MQ Telemetry Transport. It is a publish/subscribe, extremely simple and lightweight messaging protocol, designed for constrained devices and low-bandwidth, high-latency or unreliable networks. The design principles are to minimise network bandwidth and device resource requirements whilst also attempting to ensure reliability and some degree of assurance of delivery. These principles also turn out to make the protocol ideal of the emerging “machine-to-machine” (M2M) or “Internet of Things” world of connected devices, and for mobile applications where bandwidth and battery power are at a premium.

And with the code and sketch provided by Toby, the DMD works using open-source software as a display unit in the following example video:

You can download the required information from Toby's github pageAnd for more, we're on facebookGoogle+, and twitter - so follow us for news and product updates as well. 

As used in the project mentioned above, check out our Freetronics Dot Matrix Displays. They're simple to use, yet very bright for indoor and outdoor situations. Available in various colours, the 32 x 16 LED matrix can display text and graphics quite easily - and can be daisy-chained together for extended displays. For more information, see our range of Dot Matrix Displays here

June 10, 2014

Broadcast digital TV signals with Raspberry Pi

Space engineer and amateur radio enthusiast Alexandru Csete has published an interesting series of work on using inexpensive digital TV USB modulators with Linux - and thus to work with a Raspberry Pi. His latest example demonstrates how to broadcast video captures with the Raspberry Pi camera as a DVB-T (digital TV) signal. 

Not designed for setting up your own TV station, instead a way to broadcast realtime video from rockets, balloons and other places that you'd like to get a view from, such as the rocket refuelling in the following example video:

There's an amount of work to create a successful setup, however Alexandru runs through what is required, so check out his interesting website to get started. Furthermore please be aware of the broadcasting, spectrum use and licensing regulations in your region. And for more, we're on facebookGoogle+, and twitter - so follow us for news and product updates as well.

If you're looking for a more permanent way to mount circuitry to your Raspberry Pi, check out our new PiBreak - the prototyping board for the Raspberry Pi. It provides labelled breakout pins for all GPIOs, a large prototyping area with solder pads, and power rails for easy power connection:

Furthermore the PiBreak also includes mounting hardware to firmly attach it to your Raspberry Pi using a nut, bolt, and spacer - and is compatible with all revisions of both model A and B Raspberry Pi computers. For more information about our new PiBreak board, our Getting Started guide, and to order - visit the product page

June 10, 2014

Build an Arduino-powered Stewart Platform

With some effort a wide range of robotics devices can be recreated using the Arduino platform, and one example of this is by Instructables user ThomasKNR who demonstrates his own successful version. A Stewart Platform is one that can be moved in six axes, and requires six matching actuators (or in this case servos) in order to move the platform to any angle or height possible.

It's a neat device that can be used to position a camera, or in an opposite manner and provide the hardware behind a self-levelling system with the appropriate sensors. However this example is controlled by infra-red remote control yet leaves itself open for various modifications. 

To learn more about the platform, including the required design files and Arduino sketch - visit the project Instructable page. And for more, we're on facebooktwitter and Google+, so follow us for news and product updates as well. 

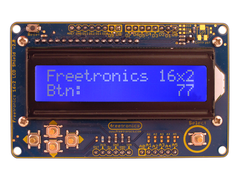
Looking for a rapid-use LCD for your Arduino projects? Save time and move forward with the Freetronics LCD & Keypad shield which contains a bright 16x2 character LCD and five buttons that can be read from only one analog input pin:

June 06, 2014

Build a handheld "Tetris" game with Arduino

It's hard to believe Tetris has been around for over 25 years, yet is still an engaging and playable game. You can now recreate this with Arduino-comaptible boards and some inexpensive LED matrix kits as described by Instructables member jollifactory. They use common MAX7219-driven LED matrix kits, and two units provide enough pixels for a playable game. With the addition of a few buttons and a neat enclosure - the game is ready, and a quick demonstration is shown in the following video:

That's pretty cool, and the code could be translated for other display types - perhaps a DMD for a larger display? In the meanwhile, check out the project Instructable for complete details. And for more, we're on facebookGoogle+, and twitter - so follow us for news and product updates as well.

If you need to add external hardware or devices to your next Arduino project, you'll need a protoshield to mount the external circuitry. In doing so, consider our range of ProtoShields. From the tiny LeoStick to the Mega we have a wide range to suit your application. 

June 06, 2014

Controlling DHT22 Sensors via a PC and python

Although it's possible to monitor data captured via an Arduino-connected sensor with a PC, directly manipulating it in real time can be an issue if your programming skills are lacking. However an interesting example has been published by Arduino forum member alina who demonstrates how to read the data from a DHT22 temperature/humidity sensor connected to an Arduino via python on a PC. Doing so gives you the framework to understand how python code and capture Arduino serial data, and then work with it to meet your requirements. 

To get started, log in to the Arduino forum. And for more, we're on facebooktwitter and Google+, so follow us for news and product updates as well.

If you're looking for a sensor to measure temperature and humidity - check out our HUMID: humidity and temperature sensor module. Designed around the DHT22 sensor, it only requires one digital pin and power - and is easy to use with out Quick Start guide. With a temperature range of -4°C to +125°C with +/-0.5°C accuracy, and humidity at 0-100% with 2-5% accuracy you're ready to measure. For more information and to order, click here.