June 05, 2014

Turn water into a musical instrument with Arduino

Here at Freetronics we often talk about how an Arduino can be the heart between many types of musical instruments - and another example we've found by Bonnie Eisenman is another interesting way of making music. 

A mug of water is used via some simple circuity to the Arduino as the interface for the instrument, which is used as a touch interface. Data gathered by the Arduino is then send back to a PC and interpreted via ChucK music programming software. This is an interesting demonstration of turning everyday objects into touch sensors, and demonstrated in the following video:

If you're interested in making your own touch-sensitive musical instrument, visit Bonnie's Instructable page. And for more, we're on facebookGoogle+, and twitter - so follow us for news and product updates as well. 

Have you been reading about Arduino and would like to understand more so you can work with projects like the example above, but not sure where to start? Then order one of our Experimenter's Kit for Arduino: 

The package includes a wide variety of parts, sensors and modules including: a servo motor, lights, buttons, switches, sound, sensors, breadboard, wires and more. Furthermore a Freetronics Eleven Arduino-compatible board is included to make this an extensive hobby experimenter, inventor and starter kit. 

However we don't leave you alone to figure it all out, included is a great project and instruction booklet, plus access to a supporting web page and software examples. In other words - this is everything you need to get started for a fun range of electronics and Arduino related projects! So to get started or for more information and to order, check out the product page.

June 05, 2014

Build an Arduino-powered Electronic Load

An electronic load is a useful device to have - with it you can draw fixed amount of current through a circuit, an ideal method for testing the limits of various devices such as power supplies and other items under question. Making your own is a good way to save money, and engineer Jasper Sikken has documented a version that also can control power and resistance.

Based around a small Arduino compatible, the rest of the circuit is assembled on a custom PCB, however Jasper has provided the design files, BOM and sketch so you can recreate your own version. The user interface is via the Arduino serial monitor - however with a little work you could add your own LCD and control devices. 

Another great example of what can be done with an Arduino, so visit Jasper's interesting website to get started.  And for more, we're on facebookGoogle+, and twitter - so follow us for news and product updates as well.

Need a tiny Arduino-compatible for use with your own projects? Then check out out our LeoStick. It's the Arduino Leonardo-compatible board that's cheaper and smaller than the original:

 Apart from being one of the smallest Arduino-compatibles on the market with USB, it also has an onboard RGB LED and piezo which can be used a knock sensor and various tune and sound effects. Plus you can add extra circuitry with the matching protostick! For more information and to order, click here.

June 04, 2014

Simple home automation with Arduino and Raspberry Pi

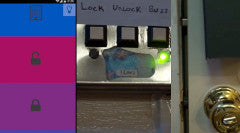
After being disappointed with various connected and home automation products on the market, Daniel Nordness created his own system based on open-source hardware and software that easily allows for control of door locks, WiFI-enabled light bulbs and power outlets.

The electronics interfacing with the devices under control is wired to an Arduino which in turn communicates with a Raspberry Pi that takes care of the web front-end and control from afar. This runs the open-source Flask microframework for python which makes the system completely customisable. 

For complete details including schematics and the required code, start with Daniel's interesting website. And for more, we're on facebookGoogle+, and twitter - so follow us for news and product updates as well.

If you're looking for an Arduino Uno-compatible board for various projects, choose what tens of thousands of others have done and use our Freetronics Eleven - the Arduino-Uno compatible with low-profile USB socket, onboard prototyping space and easy to view LEDs: 


June 04, 2014

Convert twitter feeds to audio with a Raspberry Pi

After some time studying physical computing, William Lindmeier has created a device that takes data from twitter feeds and converts them to audio to be heard through a "twitter radio". The device uses a Raspberry Pi to receive and interrogate the twitter feed, and send the audio to a powered speaker - and also harnesses an Arduino to take care of user input. The whole lot fits inside a neat enclosure, and is demonstrated in the following video:

Although this may seem frivolous, it's a neat way to send messages to the visually-impaired - or anyone, by having the radio tuned to a private feed. However to get started you can find the details on William's project page. And for more, we're on facebookGoogle+, and twitter - so follow us for news and product updates as well.

If you're looking for a more permanent way to mount circuitry to your Raspberry Pi, check out our new PiBreak - the prototyping board for the Raspberry Pi. It provides labelled breakout pins for all GPIOs, a large prototyping area with solder pads, and power rails for easy power connection:

Furthermore the PiBreak also includes mounting hardware to firmly attach it to your Raspberry Pi using a nut, bolt, and spacer - and is compatible with all revisions of both model A and B Raspberry Pi computers. For more information about our new PiBreak board, our Getting Started guide, and to order - visit the product page

June 04, 2014

A quick audio synthesiser with the Arduino Due

One again the team over at the RCarduino blog have published another interesting tutorial about working with digital audio and an Arduino - but this time with the 32-bit Due board. Their demonstration uses three counters, each of whose speed is determined by a value returned from three analogue inputs.

Two of the counters generate ramp waveforms, and a third waveform is created from the sum of the first two.  It is an interesting demonstration of the possible audio that can be generated with an Arduino Due or compatible.

Furthermore they've provided details of a small amplifier circuit to connect to the DAC pins on the Due - and heed their notes about sinking and sourcing current from the Due's I/O. Nevertheless, for more explanation and demonstration code visit the website. And for more, we're on facebookGoogle+, and twitter - so follow us for news and product updates as well. 

Looking for an Arduino Due-compatible board with more connectivity possibilities and options than the original? Then check out our new EtherDue board:

It's the Arduino Due-compatible board with the Freetronics additions including Ethernet network connectivity, MAC address chip, microSD storage, optional PoE, upgraded power supply and more - while retaining the simplicity and ease of the Arduino IDE (with 100% compatibility). And you still have a full USB interface for uploading sketches and direct programming. For more information on this powerful board, check out the EtherDue product page

June 03, 2014

Build an LCD Master Clock to synchronise others

The drive to have all your clocks set to exactly the same time can be difficult, however not impossible - and demonstrated by Brett Oliver with his master clock system. Brett has modified a large analogue clock with an LCD and circuitry to pass timing pulses to secondary clocks.

The pulse and time data is shown on a large LCD, and for our readers within range of the DCF77 atomic clock transmitter in Germany the master clock receives the accurate time data from that transmitter. Brett has provided the required circuitry, Arduino sketches and some detailed images of the clock assembly, which is shown operating the following video:

You can learn about this amazing timing system in Brett's website. And for more, we're on facebooktwitter and Google+, so follow us for news and product updates as well.

If you need an accurate real-time clock IC for your own master clocks, consider our RTC: module based on the Maxim DS3232 real-time clock IC module:

Apart from keeping accurate time for years due to the temperature-controlled oscillator and having a tiny coin-cell for backup, it is very simple to connect to your Arduino project. A driver library allows your program to easily set or read the time and date. Perfect for clock projects, dataloggers or anything that needs to know the date and time. Furthermore it contains a digital thermometer and 236 bytes of non-volatile memory to store user settings and other data. For more information, check out the module page here

June 03, 2014

The "infraHarp" - an Arduino-powered eight-tone arpeggiator

Creating musical instruments with an Arduino has never been difficult, however the resulting sound quality hasn't been the best due to the limited processing power and storage space in the microcontroller. However with the use of an inexpensive MP3 file playback shield these limits are broken and you can playback some excellent sounds.

With this in mind the folks at the Musik Tech hackerspace have developed their "infraHarp" - an detailed instrument which plays in the keys of A, B, C, D, E, F, G in major, minor melodic and harmonic scales, with two octave choices. The name is also a nod to the main interface, which uses eight infra-red beams which are used as keys, as you can see in the video below:

And with the final enclosure, the infraHarp can be used in almost any situation. For complete details and more to make your own, visit the project website. And for more, we're on facebookGoogle+, and twitter - so follow us for news and product updates as well.

If you're enjoying working with Arduino projects but find the Uno-sized boards somewhat constricting - it's time to move up to the Freetronics EtherMega:

Quite simple the EtherMega is the fully-loaded Arduino-compatible board on the market today. Apart from being completely Arduino Mega2560-compatible, it includes full Ethernet interface, a microSD card socket, full USB interface, optional Power-over-Ethernet support and still has a circuit prototyping area with extra I2C interface pins. So if your project is breaking the limits, upgrade to the EtherMega today. 

June 03, 2014

Control almost anything with Apple's Siri and an Arduino

Owners of contemporary Apple devices will be aware of how useful the Siri voice-recognition function can be, and how it (she?) can be used to do all sorts of things at the sound of your voice. However this has been limited by Apple's rules, until now. A clever hack has been refined and published by the MYO website which uses a clever HTTP proxy service to interrogate Google searches requested through Siri. 

The proxy can then detect your commands received via Siri and then control an Ethernet-enabled Arduino board to complete the command - and thus voice-controlled hardware is possible from an iPhone or iPad. The process is demonstrated neatly in the following video:

For more information including the required software and services, visit the MakeUseOf website. And for more, we're on facebookGoogle+, and twitter - so follow us for news and product updates as well.

When putting together your next Internet-enabled Arduino project - save time, space and money with the Freetronics EtherTen. Apart from being fully Arduino Uno-compatible, it has onboard Ethernet, microSD socket, full USB interface (so you don't need a costly FTDI cable just to upload a sketch!) and supports optional Power-over-Ethernet.

June 02, 2014

Experimenting with Arduino and magnetic levitation

Levitating almost anything is still quite exciting, and a good test of the hardware and software skills of any maker. However doing so isn't out of reach, and is demonstrated by Erik Månsson who uses an Arduino-compatible board that controls the current through the coil with an N-MOSFET and uses a hall effect sensor to detect the object. The code includes calibration and a clever PID control-loop feedback mechanism to ensure the system runs smoothly, with a quick demonstration in the following video:

To review the code and other notes, visit Erik's github page. And for more, we're on facebookGoogle+, and twitter - so follow us for news and product updates as well.

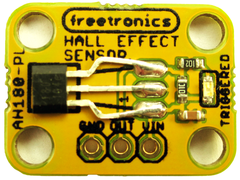
If you're interested in detecting changes in magnetic fields with your Arduino, you'll need a hall effect sensor and we have a convenient module just for the purpose - our HALL: Hall Effect Magnetic and Proximity Sensor Module. It operates on both 3.3 and 5V boards, can detect both north and south pole magentic polarity and shows when triggering is successful with a convenient LED. 

To learn more about the HALL: module, read our Quick Start Guide and to order, visit out HALL: product page

June 02, 2014

Remote control devices using a web browser and Raspberry Pi

The Raspberry Pi computer is an inexpensive way to find control between external hardware and all manner of software, and thanks to the inbuilt networking that extends to control via HTML. One interesting example of this has been demonstrated by Lasse Christiansen in the form of a joke on a co-worker... they created a networked interface to the worker's electronic desk height adjustment.

By hacking relays into the control line between the legitimate desk control unit the Raspberry Pi can control them and thus the desk - remotely. And thus the joking can begin by altering the desk height through a small HTML page that runs on the computer, for example:

Although some fun can be had moving the desk and making the relays click when least expected, the project is a neat demonstration of controlling hardware over a network, so visit the project website to start learning. And for more, we're on facebookGoogle+, and twitter - so follow us for news and product updates as well.

If you're looking for a more permanent way to mount circuitry to your Raspberry Pi, check out our new PiBreak - the prototyping board for the Raspberry Pi. It provides labelled breakout pins for all GPIOs, a large prototyping area with solder pads, and power rails for easy power connection:

Furthermore the PiBreak also includes mounting hardware to firmly attach it to your Raspberry Pi using a nut, bolt, and spacer - and is compatible with all revisions of both model A and B Raspberry Pi computers. For more information about our new PiBreak board, our Getting Started guide, and to order - visit the product page