April 14, 2015

Experimenting with Arduino-powered Capacitance Meters

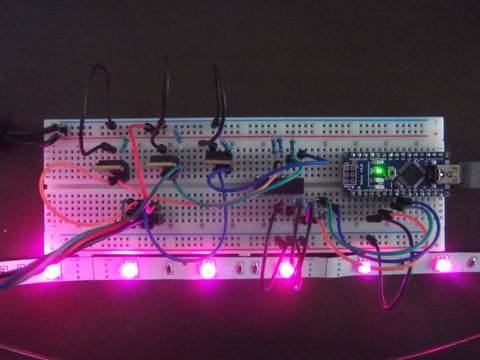
Making your own test equipment is always a fun and educational process - as you can not only create something that is useful, along with learning a lot more about the targets of the equipment. A good example of this is a series of Arduino-based capacitance meters which have been documented by Scott Campbell.

The reason for offering a series of meters is that not one could cover the range of capacitors that are commonly used by enthusiasts, and Scott's testing has shown which value ranges are best measured with different techniques. Furthermore the theory behind maesuring a capacitctor is also explained so you can expand with your own versions.

Even if you're not interested in making your own meter, Scott's tutorial is a good read on theory and capacitor discharge rates, so head over to his website to get started. And for more, we're on facebookGoogle+, and twitter - so follow us for news and product updates as well.

If you need to add external hardware or devices to your next Arduino project, you'll need a protoshield to mount the external circuitry. In doing so, consider our range of ProtoShields. From the tiny LeoStick to the Mega we have a wide range to suit your application.

April 13, 2015

Build an Internet-connected Robot Guitar with Arduino and Raspberry Pi

After being inspired by a guitar-playing robot during World Expo '88, Ben Reardon decided to harness the available technology to make his own version and improve upon the original. Ben's example can not only play chimes or tunes, but also convert firewall logs into sounds and thus created a different type of interactive guitar.

The project relies on synergy between a Raspberry Pi and an Arduino - with the Pi taking care of the networking side of things and communicating with the Arduino, which is ideal for controlling servos and other hardware interaction. The automated guitar is a great success and demonstrated in the following video:

You can learn about the hardware and software required to bring the guitar to life through Ben's interesting website. And for more, we're on facebookGoogle+, and twitter - so follow us for news and product updates as well.

For more complex Raspberry Pi projects that require interaction between an Arduino and a Raspberry Pi for enhanced hardwre control you can save time and space by using our new PiLeven board:

The PiLeven is an Arduino-compatible board based on the Arduino Uno, but with a few changes. Obviously it's a bit of a strange shape! The PiLeven fits right on top of a Raspberry Pi (either model B or B+) using the Raspberry Pi expansion headers.

The PiLeven also has a high-current switchmode power supply, so you can plug in anything from 7V to 18Vdc using the standard 2.1mm jack. The PiLeven can power the Raspberry Pi, so you don't need a regulated 5V USB connection anymore.

Serial communications on the PiLeven is linked through to the Raspberry Pi, so your Pi can upload new sketches straight to the PiLeven or send/receive data and commands. We've included level shifters so the 3.3V Pi can talk safely to the 5V PiLeven. And you can plug standard Arduino shields right into the PiLeven, giving your Raspberry Pi access to the huge range of shields already available. For more information about the PiLeven, including our tutorials - and to order yours today, visit the PiLeven webpage.

April 13, 2015

The interactive Arduino-powered LED Table

Now and again we see an Arduino-based project that has moved from the desk to a finished product - and in the following example to something that any constructor would be proud of. Tumblr user shnatko had experimented with RGB LEDs in various patterns and took it to the next level with their interactive RGB LED table.

This is a piece of furniture that contains a 16 x 32 RGB LED matrix mounted under a sheet of glass, and between these LEDs are a matching grid of infra-red LEDs and phototransistors that can detect changes in light, and in effect become a form of user input for the table. All the LEDs are mutiplexed back to an Arduino Due board, which offers the CPU speed and also memory to allow for a wide range of visual effects and even games such as Tetris.

The table is controlled by a classic Nintendo console controller which is used to select and control the visual effect on the table. A demonstation of this can be seen in the following video:

Certainly one of the more inspiring projects we've seen in a while, and you can follow its progress through the project blog. And for more, we're on twitter, facebook and Google+, so follow us for news and product updates as well.

If you're looking to learn about Arduino development platform and how it interacts with external devices -  you can't go past "Arduino Workshop -  A Hands-On Introduction with 65 Projects” by John Boxall.

Arduino Workshop takes the reader from having zero knowledge about the Arduino platform, electronics and programming and leaves them with the know-how and instructions on everything from blinking an LED, to robotics, wireless data, cellular communications, motor control, sensors, Internet connected systems and more. For more information including a sample chapter and table of contents, visit the book page.

April 10, 2015

Using Arduino and ESP8266 as a Thingspeak Node

Now that the ESP8266-based modules are increasing in popularity, many interesting uses are being demonstrated by various enthusiasts. One example is by Instructables member AdiM3 who has built an Arduino-based project which captures temperature and humidity data, which is sent back to the online service Thingspeak for analysis via the ESP8266 (which has inbuild WiFi) and a WiFi access point.

The weather data is captured using a common DHT22 temperature and humidity sensor, and the use of a level shifter between the ESP8266 and Arduino is also required due to the differing logic voltages. Finally if you're making this yourself don't forget to employ a separate 3.3V power supply for the ESP8266 module. 

For complete details on making your own version, and to learn more about this interesting development check out the project's Instructable page. And for more, we're on facebookGoogle+, and twitter - so follow us for news and product updates as well.

If you're starting out with ESP8266 WiFi serial modules, save time and eliminate risk by using our new ESP-01 WiFi Module shield for Arduino:

Our new shield has a socket that's perfect for the ESP-01 module, and addresses all the needs of the ESP8266 - such as:

  • 3.3V regulator dedicated to the module to ensure sufficient current capacity
  • Logic level shifters on TX/RX lines: compatible with both 3.3V and 5V Arduino models
  • Selectable TX/RX pins: use D0/D1 for hardware serial, or D2 - D7 for software serial
  • CH_PD pin on ESP-01 module pre-biased for correct operation mode
  • Extra ESP-01 pins broken out for your own connections
  • Prototyping area with 5V and GND rails
  • All Arduino headers broken out for easy connections
  • Stacking R3-style Arduino headers including the ICSP header

So don't fiddle with jumper wires or sub-standard power supplies - order your the Freetronics ESP-01 WiFi Module Shield today. They're in stock right now for only $14 including GST.

April 10, 2015

Browse the web using the Raspberry Pi terminal

In an interesting throwback to computing daya gone by, the HowToGeek website explains how you can browse various websites with a Raspberry Pi using the terminal as the browser. This is accomplished by using the W3M browser which is available with most Pi Linux distrubutions. What took me by surpise is that you can also view images in limited detail, making this method of web browsing slightly more usable.

We also though that this was a good demonstration of "what things were like" in the last century. For these reasons and more, you can find instructions on how to do this with your own Pi from the tutorial page. And for more, we're on facebook, twitter and Google+, so follow us for news and product updates as well.

If you're really trying to keep things small with your Raspberry Pi display, consider our 128x128 pixel OLED Module. With a diagonal size of 1.5" and 16,384 colours to select from, so almost anything is possible. Furthermore there's a microSD card socket, and removable tabs on each side which can hold LEDs and buttons:

And using the module is made simple - we have tutorials and drivers for both the Arduino and Raspberry Pi platforms - great for experimenters or those who use both systems. Furthermore, check out the forum where members are already creating modified drivers to rapidly increase the display speed. For more information including our Quickstart guides - and of course to order - visit the OLED Module product page.

April 09, 2015

Experimenting with C# to control Arduino hardware

One interesting use of an Arduino or compatible board is to act as a bridge between a personal computer and hardware that otherwise couldn't be directly connected to it, from LEDs to stepper motors, actuators and other devices. You can of course create simple control systems using the Serial Monitor with text-based controls, however there are several options.

One of these has been demonstrated by Ritik Bhardwaj who uses a C# application running on a Windows-based computer whose example has a neat GUI to control LEDs connected to the Arduino's digital output. The C# code sends serial text commands out via the USB port, which are then interpreted by the Arduino and acted upon. You can see this in action through the following video:

An interesting framework for further PC-based Arduino control. You can download the code and learn more from Ritik's project page. And for more, we're on facebookGoogle+, and twitter - so follow us for news and product updates as well.

If you're interested in experimenting with LEDs as demonstrated above, we're offering large and bright 8mm diameter RGB LEDs:

They're in the common-anode format and look great when lit up. Ideal for colour-mixing and creating displays of all sorts. For more information and to order, visit the product page


April 09, 2015

Make an Arduino-powered fortune-telling Snarky Swami

And now for something completely different - the "Snarky Swami" by Instructables member paulindallas. This is a clever Arduino-powered take on the mythical fortune-teller ... by waving your hand over the crystal ball, your fortune or other random advice will be dictated by the Swami.

However in reality this project is an Arduino-compatible board that can play simple audio files stored on an SD card. With the aid of a light sensor, the Arduino can detect when your hand is over the ball above the sensor and randomly play one of the pre-recorded audio files. A demonstration of this is shown in the following video:

Even if you're not interested in a fortune-teller, this project is a good example of audio file playback without extensive external hardware. For all the details to make your own Snarky Swami, head over to the project page. And for more, we're on facebook, twitter and Google+, so follow us for news and product updates as well.

Looking for a small Arduino-compatible board to embed into final projects? Consider our LeoStick - it's the Arduino Leonardo-compatible board that's cheaper and smaller than the original:

Apart from being one of the smallest Arduino-compatibles on the market with USB, it also has an onboard RGB LED and piezo which can be used a knock sensor and various tune and sound effects. Plus you can add extra circuitry with the matching protostick! For more information and to order, click here.

April 08, 2015

DAN64 - an AVR-based 8-bit microcomputer

April seems to be the month of the home-made computer, earlier we showed you the Apple II emulator based on an Arduino and today we discovered the "DAN64" by Juan Martínez. The DAN64 is a home-brew computer based on the Atmel ATmega328 as used in our Arduino and compatible boards.

However it is true to the systems we used in the 1980s, the DAN64 emulates a 6502-based computer and includes video output as shown below, input with a PS/2 keyboard and a simple method of saving and retrieving data and code via an audio/cassette interface. Furthermore the use of external SRAM negates the requirement of trying to squeeze too much into the ATmega's limited RAM. 

For much more information, design files and links to code please visit Juan's excellent project page. And for more, we're on facebooktwitter and Google+, so follow us for news and product updates as well.

If you're prototyping Arduino projects on solderless breadboards, blown the MCU on your board, or making your own such as the exposure board mentioned above - save time and hassle with our new ATmega328 microcontroller pre-loaded with the Arduino Uno bootloader:

It's the same one as found on our Eleven, KitTen and the original Arduino Uno, plus it has a very useful pinout sticker attached to save confusion when wiring it up. So for more information and to order, click here. And we also sell the stickers!


April 08, 2015

Controlling high-current LED strips with Arduino

Although it's easy to control various LEDs with your Arduino or compatible board, when it comes to driving more interesting higher-current LEDs - and LED strips - you can't just connect them to a digital output and hope for the best. 

In this case you need to switch higher currents and voltage to drive the LEDs, and this can be done with MOSFETs - a type of transistor used for switching higher currents and voltages. This process has been demonstrated by Ronny Simon who explains how to wire up MOSFETs to be controlled by an Arduino, and also shows an Arduino library useful for controlling LED strips. 

To get started, check out Ronny's interesting website. And for more, we're on twitter, facebook and Google+, so follow us for news and product updates as well.

Need to control up to six high-current signals from your Arduino? Save time and space with our N-Drive Shield for Arduino:

With the N-Drive Shield you can directly control up to 6 separate high-power loads such as high-intensity LEDs, lamps, motors, and relays. Incorporates 6 N-channel MOSFETs, each capable of switching up to 60Vdc at 20 Amps. That's enough to drive massive loads such as 30W and 60W RGB LEDs capable of burning your eyeballs right out of year head!

Each MOSFET is connected to an Arduino pin with PWM capability, so you can vary the power delivered to each load individually. For much more information, tutorial and to order - check out the N-Drive product page.


April 07, 2015

Create a magnetic combination lock with Arduino

There are many methods of creating an Arduino-powered lock, such as using a numeric keypad or a sequence of knocks as the "key" - however an interesting and simple method has been documented by Instructables member thallmls. This system is a combination lock without any visible buttons or keys - instead reed switches are mounted in random positions underneath the surface of the item to be locked.

These can be treated as normally-open buttons, and are activated when a magnet is placed above the top surface. Therefore by programming a sequence of "presses" - that is, passing the magnet over the reed switches in a particular order - the lock can be opened.

This system offers a neat and secret method of creating a digital lock - and with a few reed switches could be made into a fun game.To get started visit the project's Instructable page. And for more, we're on twitter, facebook and Google+, so follow us for news and product updates as well.

If you're looking to learn about Arduino development platform and how it interacts with external devices -  you can't go past "Arduino Workshop -  A Hands-On Introduction with 65 Projects” by John Boxall.

Arduino Workshop takes the reader from having zero knowledge about the Arduino platform, electronics and programming and leaves them with the know-how and instructions on everything from blinking an LED, to robotics, wireless data, cellular communications, motor control, sensors, Internet connected systems and more. For more information including a sample chapter and table of contents, visit the book page.