October 14, 2015

Monitoring temperature and humidity data from afar with Raspberry Pi and blynk

One of the newer cloud-based Internet-of-Things platforms - blynk.cc - offers a simple way to use two-way communication between a smartphone and an Internet-enabled single board computer or micrcontroller.

A neat example of this in action has been created by Instructables member vshymanskyy who shows us how to monitor the data from a DHT22 temperature and humidity sensor using blynk and a Raspberry Pi.

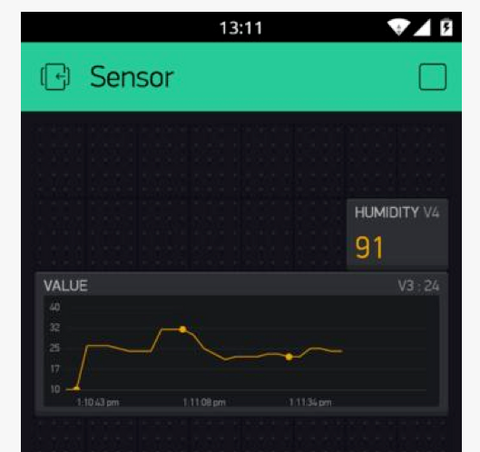
After installing the appropriate libraries and Javascript on the Pi, it's a simple matter to setup the smartphone interface for the sensor - which is done right inside the app. And in a few moments you can then connect to the Raspberry Pi and receive the data back into your phone in basically real-time, for example:

Freetronics Blynk DHT22

The blynk system is easy to use and works on may platforms (for example, Arduino). However to learn more about this implementation, check out the project page. And for more, we're on facebook, twitter and Google+, so follow us for news and product updates as well.

If you're looking for a sensor to measure temperature and humidity - check out our HUMID: humidity and temperature sensor module. Designed around the DHT22 sensor, it only requires one digital pin and power - and is easy to use with out Quick Start guide. With a temperature range of -4°C to +125°C with +/-0.5°C accuracy, and humidity at 0-100% with 2-5% accuracy you're ready to measure. For more information and to order, click here

October 12, 2015

Build an infra-red remote control sniffer with Arduino

With a few simple components your Arduino or compatible board can send commands via infra-red - to mimic existing remote controls and give you interest automation options. However determining the codes to be sent for a particular device can be difficult if not published, and thus an infra-red sniffer is required.

This is a device that can receive signals from an infra-red remote control, determine the particular codes received when a button is pressed on the remote - and also send the codes off to a device if required. However by noting the codes you can use them in your projects to allow your Arduino to control these devices.

Thanks to Alan Zucconi you can easily make your own version, with a protoshield, an IR receiver and a transmitter. Alan's sketch lets you see the IR codes in the serial monitor, so they can then be used in your own IR control sketches.

For complete details on how to make your own IR sniffer, visit Alan's project page. And for more, we're on facebookGoogle+, and twitter - so follow us for news and product updates as well.

If you need to add external hardware or devices to your next Arduino project, such as an IR sniffer described above - you'll need a protoshield to mount the external circuitry. When doing so, consider our range of ProtoShields. From the tiny LeoStick to the Mega we have a wide range to suit your application.

October 06, 2015

Decoding and sending 433MHz RF codes with Arduino

Controlling mains-powered devices safely and easily allows all sorts of possibilties with regards to home automation, remote device control - and just having fun. One method of doing this is to harness wireless remote-control mains outlets which can be found at almost any hardware or electonics store.

From this point most users have wired the buttons from the included remote control to Arduino digital outputs via optocouplers, allowing control of the outlets. However, Instructables member liwenyip shows us how the rcswitch library for Arduino can be used to directly control the wireless receiver via inexpensive 433 MHz modules.

This makes things a lot easier, and removes the need to carefully hack into the small and delicate remote controls usually associated with these projects. This system in action can be seen int the following video:

To learn how to do this yourself, visit the project's Instructable page. And for more, we're on facebookGoogle+, and twitter - so follow us for news and product updates as well.

If you're looking to work with your own RF wireless hardware, but don't want to make your own receiver circuit - check out our range of  315/433 MHz receiver shields:

Apart from being idea for working with the various low-cost data links on the market, the shield can also be used to capture wireless weather station data, as described in the book "Practical Arduino". For more information and ideas, check out the product page.

October 05, 2015

Rayuelomatic - the Raspberry Pi-powered novel reading machine

And now for something different.. the Rayuelomatic by Roni Bandini. This is a device built around a Raspberry Pi which is used to read the experimental novel "Hopscotch" by Argentine writer Julio Cortázar.

The novel was written in a way that allows for the reader to choose the sequence of chapters to be read, and this is facilitated by the Rayuelomatic - it will select a chapter for you to read and also keep track of your progress in the book - for example:

For more information on this project and others that mix literature and technology, visit Roni's project page. And for more, we're on facebookGoogle+, and twitter - so follow us for news and product updates as well.

A neat way to interface your Raspberry Pi with external hardware such as inexpensive LCDs and other devices is to use an Arduino-compatible board - and one neat example is the Freetronics PiLeven board:

The PiLeven is an Arduino-compatible board based on the Arduino Uno, but with a few changes. Obviously it's a bit of a strange shape! The PiLeven fits right on top of a Raspberry Pi (either model B or B+) using the Raspberry Pi expansion headers.

The PiLeven also has a high-current switchmode power supply, so you can plug in anything from 7V to 18Vdc using the standard 2.1mm jack. The PiLeven can power the Raspberry Pi, so you don't need a regulated 5V USB connection anymore.

Serial communications on the PiLeven is linked through to the Raspberry Pi, so your Pi can upload new sketches straight to the PiLeven or send/receive data and commands. We've included level shifters so the 3.3V Pi can talk safely to the 5V PiLeven. And you can plug standard Arduino shields right into the PiLeven, giving your Raspberry Pi access to the huge range of shields already available. For more information about the PiLeven, including our tutorials - and to order yours today, visit the PiLeven webpage.

September 29, 2015

Safe and easy home automation using infra-red and Raspberry Pi

Full home automation is the goal for many technology enthusiasts (for example the SuperHouse) however not everyone has the skills or desire to work with mains-rated wiring. However a variety of devices and appliances can still be used - if they have an infra-red remote control.

If that is the case, the specific code from an applicance's infra-red remote can be emulated by a Raspberry Pi and an IR transmitter circuit. Then these appliances can be controlled either locally or from afar thanks to the networking capability of the Raspberry Pi

Alexis Matelin has done just that, which has resulted with a web-controlled array of appliances such as the television, audio system, HVAC and more. Devices that don't have IR control can also be used in conjunction with an IR-controlled power strip.

To learn more about this, review code and hardware examples - visit Alexis's interesting website. And for more, we're on facebookGoogle+, and twitter - so follow us for news and product updates as well.

If you're looking for a neat way to add external circuitry to your Raspberry Pi model A+, B+ or 2 model B then check out our new PiBreak Plus Raspberry Pi Prototyping Board:

This is a great way to add your own electronic components, circuitry, sensors or other devices to your Raspberry Pi model A+, B+ or 2 Model B - any of the current Raspberry Pis with a 40 pin GPIO header. The PiBreak Plus also includes a GPIO female header to solder yourself, and a pair of nuts, bolts, washers and spacers to ensure a a great fit.

And in the Freetronics fashion we've used a quality gold-plated (ENIG) PCB for durability, brought out all the power rails along with the GPIO next to the prototyping area to make adding circuits a breeze. Furthermore the pinouts are labelled on both the top and bottom of the PCB to save time referencing the right GPIO pins. For more information and to order - visit the PiBreak plus page now!


September 28, 2015

Build an Arduino-controlled Time-Lapse Panorama Controller

Panoramic photography can create fascinating exposures of the area around the user - to the point of producing professional output that can be sold (and often is). However creating a perfectly-aligned exposure can be a challenge in some situations.

With this in mind Brett Oliver has created an Arduino-controlled solution that uses a stepper motor to rotate the camera bracket - which allows for a customised level of speed, number of steps and exposures. This allows for all manner of experimenting and even creating 360-degre panoramas. Check out the video below for a demonstration of the interface and a resulting time-lapse panoramic video:

For more information on making your own version of this controller, head over to the project's Instructable page. And for more, we're on facebookGoogle+, and twitter - so follow us for news and product updates as well.

If you're looking to develop projects based on an Arduino that use stepper motors, or even CNC machines and much more - simplify the process with our Freetronics StepDuino board:

The StepDuino is a complete, self-contained Arduino-compatible board with 2 onboard stepper motor drivers, 2 servo outputs, a 20x4 LCD, a micro SD card slot, and more! It's a fantastic general purpose board for any project that uses stepper motors. You can use it as the brain of your next robotics project!

The StepDuino uses the same processor architecture as the common Arduino Uno, so you can program it right from the Arduino IDE simply by selecting "Arduino Uno" as the board type. Everything simply works out of the box, just as it would with a regular Arduino - but now you can also drive steppers directly and display feedback on the huge LCD. For more infromation, tutorials and to order - visit the StepDuino page.


September 25, 2015

Make your own two-player Pong game with Arduino

Retro games never seem to go away, instead they just get brought back to life with various contemporary development platforms - and the greatest example is the first arcade game "Pong". Rob Cai demonstrates a two-player version based around an Arduino or compatible board that replicates the original very well.

Apart from the gameplay using paddles (potentiometers or variable resistors) for input just like the original, Rob's version uses VGA video output instead of the more common composite video that can easily be generated by an Arduino.

The external circuitry is quite minimal, and the end result is quite playable, as shown in the following video:

For more information, discussion and the sketch to make your own - head over to the Arduino forum.  And for more, we're on facebookGoogle+, and twitter - so follow us for news and product updates as well.

If you need to add external hardware or devices to your next Arduino project, such as the circuit described above - you'll need a protoshield to mount the external circuitry. When doing so, consider our range of ProtoShields. From the tiny LeoStick to the Mega we have a wide range to suit your application.

September 23, 2015

Build the PiTank - a web-controlled tank with video streaming

What's better than a remote-control robot based around a Raspberry Pi? One with a cannon and real-time video streaming so you can control and watch the action from a web browser. The PiTank has all this and more thanks to synergy between the Pi and an Arduino.

Motor and servo control is taken care of with the Arduino, which communicates with the network-connected Raspberry Pi via the I2C bus. This is a neat solution as each platform works to their own strengths. A BBQ ignited is used for the cannon - giving a realistic effect as shown in the video below:

Apart from being a lot of fun, this project gives you the framework for a web-controlled robot with your Raspberry Pi. So to learn how, visit the project's Instructable page. And for more, we're on facebookGoogle+, and twitter - so follow us for news and product updates as well.

Looking to work with Raspberry Pi and Arduino in the one project? Then consider the Freetronics PiLeven board:

The PiLeven is an Arduino-compatible board based on the Arduino Uno, but with a few changes. Obviously it's a bit of a strange shape! The PiLeven fits right on top of a Raspberry Pi (either model B or B+) using the Raspberry Pi expansion headers.

The PiLeven also has a high-current switchmode power supply, so you can plug in anything from 7V to 18Vdc using the standard 2.1mm jack. The PiLeven can power the Raspberry Pi, so you don't need a regulated 5V USB connection anymore.

Serial communications on the PiLeven is linked through to the Raspberry Pi, so your Pi can upload new sketches straight to the PiLeven or send/receive data and commands. We've included level shifters so the 3.3V Pi can talk safely to the 5V PiLeven. And you can plug standard Arduino shields right into the PiLeven, giving your Raspberry Pi access to the huge range of shields already available. For more information about the PiLeven, including our tutorials - and to order yours today, visit the PiLeven webpage.

September 22, 2015

Experimenting with Arduino and IKEA DIODER LED Strips

Wandering about IKEA you can find all sorts of interesting things to work with, such as photo frames to use as enclosures, neat storage units, and also a growing range of lighting products. Thanks to a lot of these using low-voltage LEDs they can be hacked and controlled with an Arduino, and this has been demonstrated on on the tronixstuff website.

Their example uses an IKEA DIODER RGB LED strip, which works well with our MOSFET shield for Arduino - as each output can control one of the LED colours and thus allow for a range of lighting effects generated by the Arduino sketch. Furthermore they've also demonstrated how to control them remotely using an Android phone. A quick demonstration of the lights is shown in the following video:

To learn how you can do this yourself, visit the tronixstuff project page. And for more, we're on twitter, facebook and Google+, so follow us for news and product updates as well.

Need to control up to six high-current signals from your Arduino? Or add high-powered LEDs to your own lamp project? Save time and space with our N-Drive Shield for Arduino:

With the N-Drive Shield you can directly control up to 6 separate high-power loads such as high-intensity LEDs, lamps, motors, and relays. Incorporates 6 N-channel MOSFETs, each capable of switching up to 60Vdc at 20 Amps. That's enough to drive massive loads such as 30W and 60W RGB LEDs capable of burning your eyeballs right out of year head!

Each MOSFET is connected to an Arduino pin with PWM capability, so you can vary the power delivered to each load individually. For much more information, tutorial and to order - check out the N-Drive product page.

September 21, 2015

Make an Arduino-controlled "Teenage Mutant Ninja Turtles" Pumpkin

If your household celebrates Halloween, now is the time to consider some decorations, and one Arduino-powered example has been described by Bobbi Stromier with their TMNT pumpkin.

After carving out the face of the required character into the pumpkin, an Arduino controlling an RGB LED is fitted inside - and will run the whole night from an external battery. Although this is a simple project, it's perfect for sharing with younger children and exposing them to the world of electronics. Plus it looks great, as shown in the video below:

To learn more about these illuminated pumpkins, visit the project page. And for more, we're on facebook, twitter and Google+, so follow us for news and product updates as well.

If you're looking to make your own colourful LED-based project, consider our Freetronics RGBLED: full colour module. It includes a bright RGB LED on the top of the board and a WS2801 constant-current, addressable, multi-channel LED driver on the back. This smart module can be daisy-chained, so you can connect a number of these together in a string and drive each of the module colours individually from your microcontroller. For more information and to order, visit the product page.