January 18, 2016

Make an Arduino-controlled Syringe Pump

Home scientists and others who could use an accurate syringe pump will know that a commercial unit can be quite expensive, and thus out of reach. However with some time and effort you can make your own version based around Arduino and compatible circuitry and a 3D printer.

Instructables member isotope32 has demonstrated how this can be possible, and the results are quite successful. An Arduino can easily control a stepper motor, and with this in mind the controls can be customised to suit your own purposes - including your own user interface.

All the part files and other details have been provided, so visit the project Instructable page to get started. And for more, we're on twitter, facebook and Google+, so follow us for news and product updates as well.

If you're looking for an Arduino Uno-compatible board for various projects, choose what tens of thousands of others have done and use our Freetronics Eleven - the Arduino-Uno compatible with low-profile USB socket, onboard prototyping space and easy to view LEDs: 

January 13, 2016

Experimenting with data capture using Raspberry Pi and Microsoft Azure

There are a plethora of cloud-based services that can be used to receive and analyse data, and the following example uses Microsoft's Azure to receive data from a Raspberry Pi. In order to demonstrate this, Instructables user cgaine has two DS18B20 temperature sensors that are connected to a Raspberry Pi which captures the data and sens it to Azure.

Both hardware and software sides are explained, including the python code for the Pi, using the Azure API and also setting up the Azure database and event hub.

For complete details on this interesting application - visit the project's Instructable page. And for more, we're on facebookGoogle+, and twitter - so follow us for news and product updates as well. 

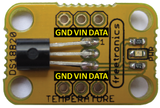
If you're interested in measuring temperature with a reliable sensor - consider using our DS18B20-based temperature sensor module:

The Freetronics temperature sensor modiule uses the Dallas DS18B20 1-wire digital temperature sensor, with a wide measurement range of -55 to +125°C at an accuracy of +/- 0.5°C. For more information, tutorials and to order - visit the product page

January 11, 2016

Make your own classic "Breakout" video game with Arduino

Making your own video games may seem difficult, however nothing could be further than the truth. And your Arduino or compatible board has enough processing power to run a wide variety of classic video games that are quite enjoyable - so why not make your own?

A great example of doing so has been documented by Samarth Artweaver who built his own Arduino-compatible on protoboard, which uses the simple yet effective TVout library for monochrome composite video output in order to play "Breakout". This offers a real 1970s-style gameplay as showin in the video below:

Although this is quite simple, it shows that can you can generate reasonable video for gaming or information from your Arduino. For all the information and sketches required to make your own, visit the project instructable page. And for more, we're on facebookGoogle+, and twitter - so follow us for news and product updates as well.

If you need to add external hardware or devices to your next Arduino project, such as the Breakout game described above - you'll need a protoshield to mount the external circuitry. When doing so, consider our range of ProtoShields. From the tiny LeoStick to the Mega we have a wide range to suit your application.

January 07, 2016

Experimenting with electronics? Build the Companion IC

One of the great features of the Arduino development platform is that you can make your own test equipment without too much effort, and the following project by Srijal Poojari is an excellent example of what is possible.

His "Companion IC" offers not only a neat desktop clock, but also offers an ohmmeter, capacitance meter, diode tester and could also be expanded for other uses. Not only is this easy to reproduce, Srijal also explains the theory and concepts behind the measurement functions which makes interesting reading as well. A demonstration is showin in the following video:

To learn more and make your own, visit Srijal's instructable page. And for more, we're on twitter, facebook and Google+, so follow us for news and product updates as well.

If you're looking for an Arduino Uno-compatible board for various projects, choose what tens of thousands of others have done and use our Freetronics Eleven - the Arduino-Uno compatible with low-profile USB socket, onboard prototyping space and easy to view LEDs: 

January 06, 2016

Tracking the true cost of meetings with Arduino

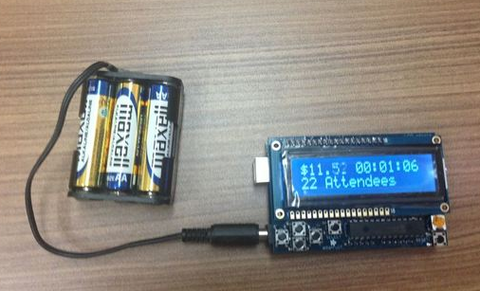
Returning to the office after the holiday period may find some of our readers stuck in meetings of incredulous lengths, and more often than not you'd rather be getting on with the job instead of dealing with a talkfest. Robert Korn had the same issues and has come up with a creative and fun solution - the Arduino-based meeting cost display.

This unit displays the increasing cost of his time using an LCD - so the longer the meeting, the more it will cost his employer. This could also be used on your desk - when approached by people you'd rather not talk to, start the timer and show them that time is money! Building your own is simple - just add an LCD keypad shield to a Freetronics Eleven or compatible and you're set.

(C) MIT License Robert Korn

To get started on your own version, check out Robert's project page. And for more, we're on facebookGoogle+, and twitter - so follow us for news and product updates as well.

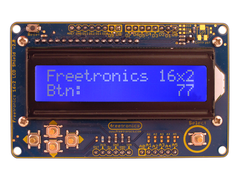
Looking for a rapid-use LCD for your Arduino or compatible development boards such as the example above? Save time and move forward with the Freetronics LCD & Keypad shield which contains a bright 16x2 character LCD and five buttons that can be read from only one analogue input pin:

January 04, 2016

Build an Arduino-powered motion detector alarm

With a little effort you can create all sorts of useful devices based around an Arduino, and one great example is the following motion alarm by Instructables member milcarlsandover. After identifying a need for a simple baggage alarm - that is, when the bag is moved an alarm sounds - a neat solution was designed and built. 

Motion is detected via an accelerometer - a neat choice as this allows your alarm to be aware of false positive movements caused by vibration, and once a suitable movement has been detected - the alarm sounds. It can then be deactivated by entering a sequence of presseses on a small keypad. A demonstration is shown in the following video:

For complete details on this project and a review of how to make PCBs at home, click here to visit the alarm's Instructable page. And for more, we're on facebook, twitter and Google+, so follow us for news and product updates as well.

If you're looking to recreate such a project, a good start would be with the AM3X accelerometer module:

This tiny 3-axis accelerometer module can operate in either +/-1.5 g or +/-6 g ranges, giving your project the ability to tell which way is up. Ideal for robotics projects, tilt sensors, vehicle data loggers, and whatever else you can dream up. For more information and to order, click here


December 15, 2015

Experimenting with the Freetronics OLED Display and ESP8266

Thanks to the ability of programming an ESP8266 WiFi-enabled microcontroller with the Arduino IDE, it is now possible to create all sorts of higher-performance Arduino-compatoble projects with this interesting new chipset. And thanks to the increase in CPU speed, hardware I/O has also seen a relative increase in speed as well - such as the SPI bus.

One Freetronics forum member took advantage of this speed kick and has demonstrated how to use our OLED display with hardware SPI at 20 MHz. This allows for a much greater frame rate and smoother image display and animation on the OLED. You can see a demonstration of this in the following video:

Our kudos and thanks to Freetronics forum member mikehains, and you can learn more about this through his forum post. And for more, we're on facebook, twitter and Google+, so follow us for news and product updates as well.

If you're looking for a neat and colourful display to use with your Arduino or Raspberry Pi - and now the ESP8266 - consider our 128x128 pixel OLED Module. With a diagonal size of 1.5" and 16,384 colours to select from, so almost anything is possible. Furthermore there's a microSD card socket, and removable tabs on each side which can hold LEDs and buttons:

And using the module is made simple - we have tutorials and drivers for both the Arduino and Raspberry Pi platforms - great for experimenters or those who use both systems. Furthermore, check out the forum where members are already creating modified drivers to rapidly increase the display speed. For more information including our Quickstart guides - and of course to order - visit the OLED Module product page.

December 11, 2015

Make a unique Arduino-powered Marble Desk Clock

Thanks to the simplicity of the Arduino development platform there is almost an infinte range of clock projects you can make, and we love this example by Instructables member klraabe. Not only does it function as a normal clock, there is a motorised marble run on the top.

This can be activated when required at the press of a button, or move about as an alarm identifier - or even randomly for some extra fun. The enclosure was created with a 3D printer and also holds a line of LEDS which can blink in unison with the marble run.

Certainly something differenet and an excellent example of what can be done with a 3D printer and the world of Arduino. For complete details visit the clock's project page. And for more, we're on facebookGoogle+, and twitter - so follow us for news and product updates as well.

If you need to add external hardware or devices to your next Arduino project, such as the Simon game described above - you'll need a protoshield to mount the external circuitry. When doing so, consider our range of ProtoShields. From the tiny LeoStick to the Mega we have a wide range to suit your application.

December 07, 2015

Create an automated LEGO train decoupler with Arduino

Next in the series of ongoing tutorials for the beginner from the Arduino LEGO Trains YouTube channel is a neat explanation of how to make an Arduino-controlled decoupling unit. This is a great idea as thanks to the strengh of the magnets in LEGO train couplers, decoupling can be a two-handed or difficult affair.

The system uses an motor to raise a bar which can block the reverse passage of a wagon - and as part of the automation system on this layout the use of a light sensor ensures it can only operate when the wagons are in the right spot. Although this project is specific to a certain track layout, it can be used in your own and offers some inspiration for your own layouts. Check out the video for the latest demonstration:

The sensors used in the demonstration can also be used for other applications, such trackside detection or adding collision-avoidance to other devices. For more interesting LEGO train videos, subscribe to their YouTube channel. And for more, we're on twitter, facebook and Google+, so follow us for news and product updates as well.

If you're looking for an Arduino Uno-compatible board for various projects, choose what tens of thousands of others have done and use our Freetronics Eleven - the Arduino-Uno compatible with low-profile USB socket, onboard prototyping space and easy to view LEDs: 

November 30, 2015

Build a huge 8x8x8 Arduino-controlled LED Cube

Making your own LED cube is not only a most satisfying project, but also results with something you can display with pride to your friends - or an awesome gift. One awesome example of this has been described by Instructables member fangdoc whose 8 x 8 x 8 single-colour LED cube is a work of art and also easily controlled with an Arduino or compatible board.

The key to any good cube is planning, planning and more planning - which is documented well by the use of a jig to help bend the LED leads, and also align them correctly when soldering into rows. The host PCB is a custom effort which can be recreated with some effort, however the results would be more than worth it - for example:

To learn more about this fantastic cube, visit the project website. And for more, we're on facebook, twitter and Google+, so follow us for news and product updates as well.

If you're interested in building your own full RGB LED cube - check out our CUBE4: RGB LED cube kit:


It's easy to construct and use, and with an onboard Arduino-compatible board the cube can be used to display all sorts of data or create visual effects. It's easily controlled via simple text commands via the USB port - or write your own Arduino sketch. It's incredibly customisable and there's so much more. For more information and to order, visit the CUBE4 page