


Created as a gift for the technically-inclined, Paul Swider's morse code word clock is an interesting and fun example of the kinds of clocks you can easily make with the Arduino development platform. The clock not only displays the time in words using an LCD, is is also played back in morse code.
To keep the user's sanity, the clock only announces the time when a hand is waved in front of an infra-red distance sensor - however those who enjoy a joke may like to modify the sketch so this happens at random intervals. Nevertheless the project is a success and Paul demonstrates this for us in the following video:
For complete details on how to make your own version, click here to visit the product page. And for more, we're on facebook, twitter and Google+, so follow us for news and product updates as well.
The most important part of any clock project is the inclusion of an accurate real-time clock IC. Here at Freetronics we have the Maxim DS3232 real-time clock IC module:
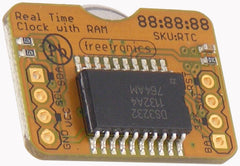
Apart from keeping accurate time for years due to the temperature-controlled oscillator and having a tiny coin-cell for backup, it is very simple to connect to your Arduino project. A driver library allows your program to easily set or read the time and date.
Perfect for clock projects, dataloggers or anything that needs to know the date and time. Furthermore it contains a digital thermometer and 236 bytes of non-volatile memory to store user settings and other data. For more information, check out the module page here.


