July 20, 2015

Blinky's Brother - A Colourful Arduino-controlled Clock

Next in the subject of interesting clock projects is "Blinky's Brother" by Paul Swider. This is a neat clock that displays the time with blinks and colours instead of numbers. An RGB LED is used to glow inside a sphere which creates a neat effect and can be also quite mesmerising.

And thanks to the core being an Arduino or compatible board - you can customise the visual effects to suit your needs. For example, reducing the brightness during late hours, or blinking furiously to indicate an alarm.

Either way, for complete details to make your own version - visit Paul's Instructable page. And for more, we're on facebooktwitter and Google+, so follow us for news and product updates as well.

The most important part of any clock project is the inclusion of an accurate real-time clock IC. Here at Freetronics we have the Maxim DS3232 real-time clock IC module:

Apart from keeping accurate time for years due to the temperature-controlled oscillator and having a tiny coin-cell for backup, it is very simple to connect to your Arduino project. A driver library allows your program to easily set or read the time and date. Perfect for clock projects, dataloggers or anything that needs to know the date and time. Furthermore it contains a digital thermometer and 236 bytes of non-volatile memory to store user settings and other data. For more information, check out the module page here

July 17, 2015

Experimenting with the Freetronics Dual-Channel I/R Reflectance Sensor

We're great fans of the MrHobbyelectronics' YouTube channel, and in the latest update they show us how easy it is to use the Freetronics Dual-Channel I/R Reflectance Sensor. This module contains two infra-red reflectance sensors which return analogue values.

These can then be used to determine the difference between a dark and light surface - ideal for line-following robots or other devices. You can see this in action through the following video:

For more interesting videos like this, subscribe to the MrHobbyElectronics YouTube channel. And for more, we're on facebooktwitter and Google+, so follow us for news and product updates as well.

As shown in the video above, the Freetronics Dual-Channel I/R Reflectance Sensor is an incredibly easy method of sensing light and dark surfaces:

Furthermore you can split the module into two - which allows you to spread the sensors further apart. Each sensor returns a varying signal which can be read by an analogue input pin. The sensor is fully supported with design files and our great Getting Started guide, so to learn more and order please visit the sensor home page.

July 15, 2015

Measuring temperatures with Raspberry Pi and multiple DS18B20 Sensors

The DS18B20 temperature sensor is easy to use, inexpensive and has a repeatable level of accuracy which makes it a top choice for measuring temperatures in all sorts of environments. However using multiple units with a Raspberry Pi may have seemed too difficult - until now. 

Thanks to the efforts of Malcolm Maclean the process is quite simple. Only one GPIO pin is required as each DS18B20 has a unique 1-wire bus address, and with the example code running under Raspbian you can poll all the sensors in one hit and receive the temperature in Celsius along with the individual sensor's address.

Fore more information, visit Malcolm's interesting website. And for more, we're on facebookGoogle+, and twitter - so follow us for news and product updates as well. 

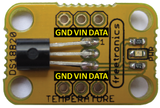
If you're interested in measuring temperature with a reliable sensor - consider using our TEMP: DS18B20-based temperature sensor module:

The TEMP: uses the Dallas DS18B20 1-wire digital temperature sensor, with a wide measurement range of -55 to +125°C at an accuracy of +/- 0.5°C. For more information, tutorials and to order - visit the TEMP: page

July 13, 2015

Monitor temperature and humidity using Thingspeak and NodeMCU

One of the benefits of the ESP8266-based NodeMCU development boards is the ease of getting local data onto the Internet thanks to the onboard WiFi system and the Lua programming language. This has been demonstrated very well by Instructables user WilliamT15 who has documented how to get the data from a DHT22 temperature and humidity sensor into the Thingspeak open-source data platform.

As the code for our popular DHT22-based sensors has now matured for the ESP8266 getting started is fast with the only hurdle being connecting the sensor to the NodeMCU module. In the example project a small prototyping expansion board has been created which solves the problem neatly and preserves the NodeMCU board for use in other projects. However the effort is worthwhile as the data can be presented neatly and accessed from any web-based device, for example:

For complete details and links to the code, visit the project Instructables page. And for more, we're on facebook, twitter and Google+, so follow us for news and product updates as well.

If you're looking for a sensor to measure temperature and humidity - check out our HUMID: humidity and temperature sensor module. Designed around the DHT22 sensor, it only requires one digital pin and power - and is easy to use with out Quick Start guide. With a temperature range of -4°C to +125°C with +/-0.5°C accuracy, and humidity at 0-100% with 2-5% accuracy you're ready to measure. For more information and to order, click here

July 10, 2015

Harnessing discarded VFDs for Arduino-powered clocks

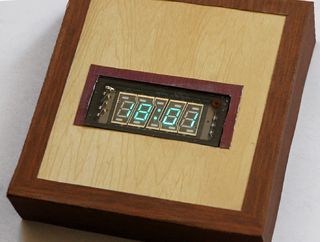
Discarded and unused electrical devices can be harvested for all sorts of useful parts - and when it's hard rubbish collection week all those inkject printers are great for stepper motors. Another great find are VFD (vacuum fluorescent displays) used in appliances for time displays, and a neat example of reusing such a VFD has been demonstrated by Jimdo from the CPU Museum.

As you can see from the image below, a four-digit VFD has been used as the display for a neat clock, controlled by an Arduino-compatible. One point of difference with working with VFDs against LEDs and other displays is the method of driving the display, and some great notes on determining pinouts and control methods are given so you can work on random units yourself.

For complete details and some great build tutorials check out the clock's Instructable page. And for more, we're on facebooktwitter and Google+, so follow us for news and product updates as well.

The most important part of any clock project is the inclusion of an accurate real-time clock IC. Here at Freetronics we have the Maxim DS3232 real-time clock IC module:

Apart from keeping accurate time for years due to the temperature-controlled oscillator and having a tiny coin-cell for backup, it is very simple to connect to your Arduino project. A driver library allows your program to easily set or read the time and date. Perfect for clock projects, dataloggers or anything that needs to know the date and time. Furthermore it contains a digital thermometer and 236 bytes of non-volatile memory to store user settings and other data. For more information, check out the module page here

July 08, 2015

Make your own light-following robot tank with Arduino

One of the benefits of using an Arduino or compatible board is the ease of adding external hardware and making things you thought were not possible. One example of this is a light-following robot tank - and you can make your own thanks to Instructables member Jason McLaughlin.

By using a common robot tank chassic powered by DC motors, Jason can control this with an Arduino Uno-compatible board and our HBRIDGE motor shield for Arduino. With the addition of two light sensors, the Arduino can determine where the stronger light source is from in relation to the robot - and then rotate and motor towards the stronger light source.

With the addition of more light sensors, the tank can have more "light vision" and make smoother movements - or even compare two light sources and choose the stronger one. Either way, to get started on your own version, please visit Jason's Instructable page. And for more, we're on facebook, twitter and Google+, so follow us for news and product updates as well.

If you're looking into starting with Arduino and robotics, such as controlling a stepper motor (or DC motors) from your Arduino or compatible, check out our HBRIDGE: DC/stepper motor shield.

Based around the powerful Allegro A4954 H-bridge driver IC you can control two DC motors with complete ease, or one bipolar stepper motor. With connections for external power management, a complete beginners' guide and documentation - motor control couldn't be any easier. For more information and to order, visit the HBRIDGE: page.

July 06, 2015

Build a Raspberry Pi-based Internet Monitor

Is your internet connection somewhat flaky? Drops in and out at the whim of the weather? Then the following project by Instructables member talk2bruce solves the problem. They've documented a neat internet monitor based around a Raspberry Pi - which continually pings an external site on a regular basis.

Based on the result of the ping test, the three-colour lamp indicates the status of the conection... green for OK, yellow for successful pings up to 50% of the time, and red for no connection.

The code is written in python and documented for the beginner - and the design files for the laser-cut enclosure are also provided so you can reproduce the nifty case shown above. Finally the addition of a shutdown button for the Raspberry Pi inside the enclosure removes the need to abruptly power down the Pi.

For complete details to make your own, head over to the project's Instructable page.  And for more, we're on facebookGoogle+, and twitter - so follow us for news and product updates as well.

If you're looking for a neat way to add external circuitry to your Raspberry Pi model A+, B+ or 2 model B then check out our new PiBreak Plus Raspberry Pi Prototyping Board:

This is a great way to add your own electronic components, circuitry, sensors or other devices to your Raspberry Pi model A+, B+ or 2 Model B - any of the current Raspberry Pis with a 40 pin GPIO header. The PiBreak Plus also includes a GPIO female header to solder yourself, and a pair of nuts, bolts, washers and spacers to ensure a a great fit.

And in the Freetronics fashion we've used a quality gold-plated (ENIG) PCB for durability, brought out all the power rails along with the GPIO next to the prototyping area to make adding circuits a breeze. Furthermore the pinouts are labelled on both the top and bottom of the PCB to save time referencing the right GPIO pins. For more information and to order - visit the PiBreak plus page now!

July 02, 2015

NEW PRODUCT - Freetronics SimpleBot Shield Kit for Arduino

If you're interested in making your own robot, or have heard about NodeBots and want to join in the fun - now you can with the new Freetronics SimpleBot Shield Kit for Arduino:

Once assembled, the SimpleBot Shield gives you an excellent platform for building an interactive robot or NodeBot and features:

  • Ultrasonic rangefinder sensor for obstacle avoidance.
  • Light dependent resistor (LDR) wired for ambient light sensing, or to use lights for signalling.
  • Four full colour RGB WS2812 "NeoPixel"-type LEDs - one for each corner of the robot.
  • Servo headers, including two headers to attach "continuous rotation servos" to use as motors.
  • An on-board 6V power supply for optimal servo performance

Getting started is easy - the SimpleBot shield fits neatly over your Freetronics Eleven or other Arduino-compatible, and can also be used with your Raspberry Pi in conjunction with a Freetronics PiLeven board:

For more information about our new SimpleBot Shield Kit for Arduino and to order - visit the product pageAnd to keep up with new products, news and more - follow us on facebook, twitter and Google+.

July 01, 2015

Make your own Raspberry Pi 2 DIY LED LAN device counter

Over at the Bergen hackerspace in Norway the members needed a fast way to determine how many devies were connected to their local area network at the same time, and came up with a neat solution based on a Raspberry Pi and Arduino-compatible circuit. A clear indication of their requirements is displayed using Arduino-controlled 7-segment LED displays.

The Raspberry Pi interrogates the network every ten minutes, determines the number of devices and sends the value to the Arduino side via serial. The value is interpreted by the Arduino and reflected in the LED displays.

This project is not only a useful project but also a good example of maximising the synergy between a Raspberry Pi and Arduino. For details on making your own counted, visit the project's Instructable page. And for more, we're on facebookGoogle+, and twitter - so follow us for news and product updates as well.

For more complex Raspberry Pi projects that require interaction between an Arduino and a Raspberry Pi for enhanced hardwre control you can save time and space by using our new PiLeven board:

The PiLeven is an Arduino-compatible board based on the Arduino Uno, but with a few changes. Obviously it's a bit of a strange shape! The PiLeven fits right on top of a Raspberry Pi (either model B or B+) using the Raspberry Pi expansion headers.

The PiLeven also has a high-current switchmode power supply, so you can plug in anything from 7V to 18Vdc using the standard 2.1mm jack. The PiLeven can power the Raspberry Pi, so you don't need a regulated 5V USB connection anymore.

Serial communications on the PiLeven is linked through to the Raspberry Pi, so your Pi can upload new sketches straight to the PiLeven or send/receive data and commands. We've included level shifters so the 3.3V Pi can talk safely to the 5V PiLeven. And you can plug standard Arduino shields right into the PiLeven, giving your Raspberry Pi access to the huge range of shields already available. For more information about the PiLeven, including our tutorials - and to order yours today, visit the PiLeven webpage.

June 30, 2015

Build your own Arduino-based games console

Making your own video games may seem difficult, however nothing could be further than the truth. And your Arduino or compatible board has enough processing power to run a wide variety of classic video games that are quite enjoyable - so why not make your own?

A great example of doing so has been documented by Joao Vilaca who uses an Arduino-compatible, analogue joystick and a colour display to play games such as Tetris and Breakout. As you can see from the video below, the gameplay is acceptable and runs like the original:

For all the information and sketches required to make your own, visit Joao's interesting website.  And for more, we're on facebook, twitter and Google+, so follow us for news and product updates as well.

If you're looking for a neat and colourful display to use with your Arduino or Raspberry Pi - consider our 128x128 pixel OLED Module. With a diagonal size of 1.5" and 16,384 colours to select from, so almost anything is possible. Furthermore there's a microSD card socket, and removable tabs on each side which can hold LEDs and buttons:

And using the module is made simple - we have tutorials and drivers for both the Arduino and Raspberry Pi platforms - great for experimenters or those who use both systems. Furthermore, check out the forum where members are already creating modified drivers to rapidly increase the display speed. For more information including our Quickstart guides - and of course to order - visit the OLED Module product page.