July 22, 2016

Automatic Fish Feeder

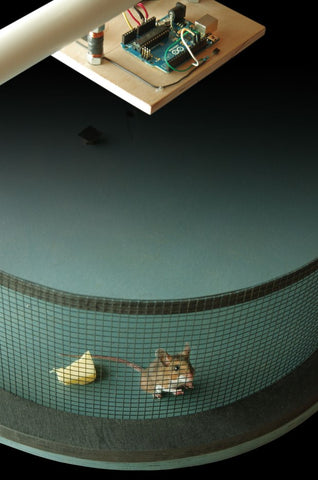
Do you ever forget to feed your fish? Are you sick of needing to organise someone to feed your fish when you go on holidays? With this awesome project from DangerousTim you can overcome all these problems and more! The project uses a clock to determine when the fish should be fed and two servo motors to dispense the food to the fish.

Fish Feeder

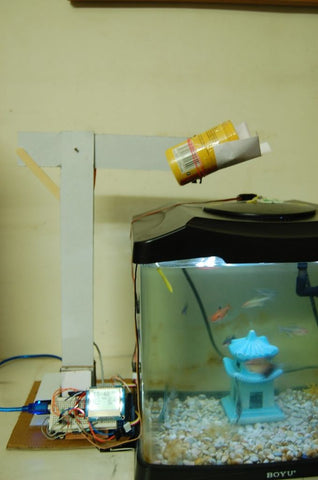
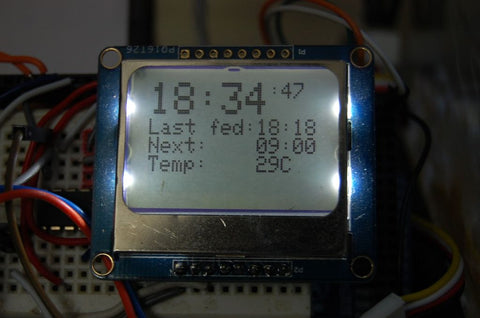
Additionally an LCD screen is used to provide information to the user. This project is sure to save you a lot of time and ensure that your fish are always well fed, but never overfed! The instructions for this project are very comprehensive and can be found at the following link.

LCD

If you felt like expanding this project you could easily set your fish feeder up so that you can keep track of key aquarium statistics and adjust feeding patterns remotely. Check out the video below to see the fish feeder in action.


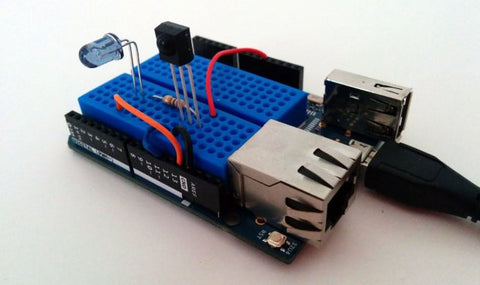
If you are looking for an Arduino to use in your automatic fish feeder, why not check out the Freetronics “Eleven” Arduino Compatible Board.

Eleven

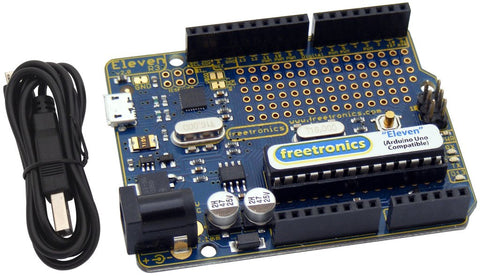
The Eleven is just like an Arduino Uno (and 100% compatible), however the Freetronics team have made a number of improvements to the Arduino Uno design such as adding in a prototyping area, using a micro-USB connector and more. These improvements mean that the Eleven is as easy to use as possible and is of the highest quality! To find out more about the fantastic Freetronics Eleven check out the following link. The Eleven has just come back into stock, so order soon to avoid missing out!

Already have an SMS enabled heating system? Planning on building your own? Let us know in the comments section below or on Facebook and Twitter.  

July 21, 2016

Arduino Weather Station

Are you interested in weather patterns but frequently find yourself frustrated by the lack of precise data for your home? With this fantastic project written by Freetronics cofounder Jonathan Oxer you don’t need to rely on the national weather service anymore.

Weather Station

The weather station receiver allows you to build your own personal weather station for your home or office. The weather station consists of an external sensor system that transmits data to a display unit over a 433MHz transmitter.  To get started creating your own weather station check out Practical Arduino.

Reciever

Completing this project would be a great way to learn more about working with radio communications.

The wireless functionality in this project is based on a 433MHz wireless connection. These types of connections are very common and have the potential to be used in many different projects. If you are planning on working on this project, or any other that requires wireless communications, why not invest in our own 433MHz Receiver Shield. The shield has a large, gold plated prototyping area, three status LEDs and a built in reset button. For more information and to order visit the 433MHz Receiver Shield product page.

Receiver Shield

Love to have your own weather station? Let us know in the comments section below or on Facebook and Twitter.

July 20, 2016

Arduino Smart Letterbox

Never forget to collect the mail ever again with this useful Arduino mail notifier! Using 315MHz wireless radios, Riley Porter has created a system that lets you know whenever the mail arrives. With this system you never have to worry about soggy mail ever again, and can even keep track of the typical times that mail arrives in your letter box. The notifier uses a light sensor to detect when a letter has been received and then transmits a notification to the receiver over a 315MHz wireless signal. To get started on this project check out the following link.

Mail Notifier

The project is clearly explained and completing it would be a great way to learn more about working with radio communications.

The wireless functionality in this project is based on a 315MHz wireless connection. These types of connections are very common and have the potential to be used in many different projects. If you are planning on working on this project, or any other that requires wireless communications, why not invest in our own 315MHz Receiver Shield. The shield has a large, gold plated prototyping area, three status LEDs and a built in reset button. For more information and to order visit the 315MHz Receiver Shield product page.

315 MHz Receiver Sheid

Think you would find a mail notifier useful? Let us know in the comments section below or on Facebook and Twitter.

July 19, 2016

Arduino Automatic Pet Feeder

Do you ever find yourself forgetting to feed your pets? Do you find it hard to wake up early in the morning to ensure that your pets have the food they need? All these problems can be easily overcome with StevenDeDomenico’s automatic dog feeder.

Feeder

The dog feeder uses a mechanical system of servos and stepper motors to dispense regular food, or treats at times set by the user. A real time clock ensures the the Arduino powering the project keeps track of the time, and a TFT LCD is used to display a menu for the dog owner to set the feeding times. This is a really fantastic project that highlights the versatility of Arduino. Incase these features were not enough, you can also control feeding remotely from your mobile phone, and use the inbuilt security camera to check that the dispenser is working properly! Although this is quite a complicated project with the many systems involved, Steven’s instructions are sure to give you some inspiration and help get you started.

Automatic Dog Feeder

Check out the video below to see the feeder in action:


When you use motors in your Arduino project you will almost certainly need a H-Bridge motor driver. A H-Bridge allows you to easily control the direction of your motors from within your code. Our own Dual Channel H-Bridge Motor Driver Shield is a perfect solution to this problem, allowing you to drive two DC motors or a stepper motor. The Dual Channel H-Bridge Motor Driver Shield features PWM control, selectable current limits and a prototyping area to add your own parts. To find out more check out the Dual Channel H-Bridge Motor Driver Shield page.

H-Bridge

To keep up to date with the latest news, projects, product announcements and to let us know what you think of this project, follow us on Facebook and Twitter.

July 18, 2016

Pokemon Go Arduino Safety Badge

Do you ever find yourself almost running into things while you are playing Pokemon Go? It is very easy to get so engrossed in the game that you forget about your surroundings. With this awesome project from Seeed Studio you can build your own “safety badge” which alerts you of potential hazards.

Safety Badge

The badge uses an ultrasonic distance sensor to detect potential obstacles, a vibration motor (similar to the types of motors found in most phones) to alert you when you are approaching a hazard, and an Arduino to interface between the sensor and the motor. To get started building your own safety badge checkout the following link.


Want to make your own badge but don’t know where to get started with Arduino? Check out our Experimenter’s Kit which provides a perfect platform to learn the basics.

Experimenters Kit

The kit is comprised of a wide range of parts including a servo, sensors, lights, buttons, a sound module and more. Importantly, a Freetronics Eleven Arduino-compatible board is included to ensure that the kit contains everything you need to get started with Arduino. All these great parts would be useless without some form of instructions which is why we have developed a comprehensive project and instruction booklet to get you started. Check out the product page to find out more.

Do you think this project will help you catch ’em all? Let us know in the comments section below or on Facebook and Twitter.  

July 17, 2016

Skill Sunday: Arduino TV Out

Many people are not aware that a humble Arduino board is capable of producing an output to a TV. Welcome to the second post in our “Skill Sunday” series! This week we are going to teach you how you can connect your Arduino to your TV. The best thing about this project is that it is really easy. All you need is a RCA cord and some resistors, and you can be generating fantastic black and white graphics on your TV in no time.

Tv Out

Once you have hooked up your Arduino to your TV, the possibilities are endless.  You could display sensor data and graphs on your TV, enjoy remakes of classic games such as pong or even send messages to your TV from a keyboard. To get started learning the basics check out this instructable from AdmRainbowBeard.

Tv Out


The Freetronics ProtoShield is perfect for this project. The shield fits directly onto an Arduino board, and would be ideal for keeping your project compact and well built. With the large general purpose area in the middle where you can solder on your own parts, you can be sure your project will be durable and long lasting! The ProtoShield is a high quality, corrosion resistant gold plated PCB and represents great value at only $3! For more information or to order visit the ProtoShield product page.

ProtoSheild

Did you enjoy learning about the TV out capability of Arduino? Do you have a skill you would like us to highlight next weekend? Let us know in the comments section below or on Facebook and Twitter.

July 16, 2016

Arduino Smart Rat Trap

If you have been having trouble with rats or mice, check out this innovative project from The Brothers McKenty. The rat trap cleverly uses a hanging basket which falls when a rat is detected, trapping the rat inside. An infrared sensor detects the presence of a rodent, and an RGB LED and a buzzer provide you with useful trap status feedback. The project is clearly documented and is likely to develop both your electronics skills and your general DIY construction skills, with the trap based on a solidly constructed chassis. The addition of Arduino to this rat trap means that it is far more intelligent and effective than any store bought alternatives! To get started on this project check out the following link.  

Smart Rat Trap

When you construct your Arduino rat trap, why not check out the ProtoShield for Arduino. The ProtoShield is an excellent tool to turn your temporary, breadboarded project into something more permanent. The shield fits directly onto an Arduino board and has a large general purpose area in the middle where you can solder on your own parts to create a durable, long lasting project! The ProtoShield is a high quality, corrosion resistant gold plated PCB and represents great value at only $3! For more information or to order visit the ProtoShield product page.

ProtoShield

Do you need to rid your house of rats? Love this project? Let us know in the comments section below or on Facebook and Twitter.

July 15, 2016

Build a Universal Remote with Arduino

With this clever project from Tony DiCola you can overcome the confusion of having multiple remotes by combining them all into an Arduino powered universal remote.  The remote is built using a number of common parts including a IR led and an IR receiver. The IR receiver is used to decode the signals from the original remotes so that they can be sent to your entertainment devices by the IR led on the universal remote. When set up, the universal remote can provide an interface between your various entertainment devices and your smartphone allowing you to control all of your devices from your smart phone.     


To get started on this simple but useful project, check out the following link.

Universal Remote

Rather than breadboarding your circuitry why not check out our own ProtoShield for Arduino. The ProtoShield is an excellent tool to turn your temporary, breadboarded project into something more permanent. The shield fits directly onto an Arduino board and has a large general purpose area in the middle where you can solder on your own parts to create a durable, long lasting project! The ProtoShield is a high quality, corrosion resistant gold plated PCB and represents great value at only $3! For more information or to order visit the ProtoShield product page.

ProtoShield

Let us know what you think of this project in the comments section below or on Facebook and Twitter.

July 14, 2016

Build an Arduino Powered Coffee Cup Spy Camera

Did you ever dream of being a spy as a child? Do you have children who love to play as spies? Why not create your own coffee cup spy camera! The camera in the coffee cup is automatically triggered when the cup is tilted (as determined by an accelerometer), allowing you to discretely capture photographs or videos while looking like you are just sipping your coffee!

Coffee Cup

Apart from being a novel project, completing your own spy camera will help you learn how to interface between a TTL camera, SD card and Arduino. To get started on this project check out the instructions prepared by Steve Hobley.


If you are looking for a accelerometer to complete this project why not check out the Freetronics 3-Axis Accelerometer Module. The module has independent X,Y and Z axis outputs ready to connect directly into an Arduino. The module is quite small so it would be perfect to fit inside a coffee cup! To find out more and to order check out the product page.

Accelerometer

Inspired by this project? Would you design it differently? Let us know in the comments section below or on Facebook and Twitter.

July 13, 2016

Arduino Air Quality Monitor

Ensuring that your home or office has sufficient air quality is imperative for maintaining good health. Many people would have no idea about the quality of the air in areas they spend large amounts of time, and would be under the impression that building a project to find out would be prohibitively expensive. However, this project from AriV4  demonstrates how you can create an internet connected air monitoring system for well under $50!

Air Quality

With some tinkering this project could open up many potential uses. For example, once poor quality air has been detected you could configure your fan to turn on, or a window to open. Although it sounds simple, it could make a real difference to your health and even potentially save your life in the event of a carbon monoxide build up! To get started with this project check out the following link.

Carbon Monoxide

Love the idea of an air quality monitor but have no idea where to get started with Arduino? Check out our Experimenter’s Kit which provides a perfect platform to learn the basics.

Experimenters Kit

The kit is comprised of a wide range of parts including a servo, sensors, lights, buttons, a sound module and more. Importantly, a Freetronics Eleven Arduino-compatible board is included to ensure that the kit contains everything you need to get started with Arduino. All these great parts would be useless without some form of instructions which is why we have developed a comprehensive project and instruction booklet to get you started. Check out the product page to find out more.

Inspired by this project? Let us know in the comments section below or on Facebook and Twitter.