July 02, 2016

Make Your Own Autonomous Paintball Sentry Gun

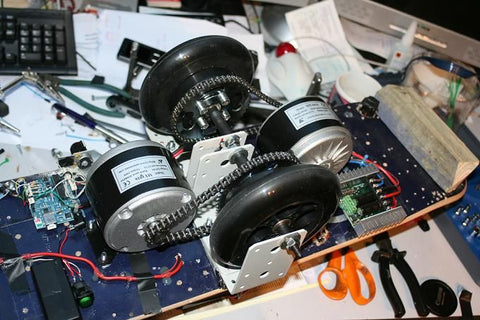
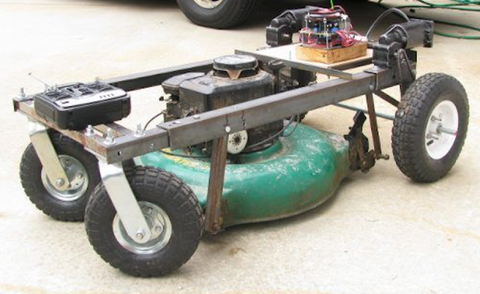
Sick of losing at paintball? Need a novel way to deter trespassers? Enjoy making cool projects? This Arduino powered sentry gun tracks, shoots and aims entirely autonomously! A computer interprets the video feed from a webcam and sends control signals to an Arduino, which interfaces between the computer, and the servo motors that aim the robot. The project runs on free, open source software and is very well documented.

Sentry Gun

Furthermore, if you would rather build a Nerf sentry gun this project is entirely adaptable. If you aren’t impressed enough already, the system developed in this project is even used during Australian Navy training! With some effort there is no reason why you couldn’t be added to the long list of people who have successfully completed their own sentry guns. To get started on this impressive project check out the Project Sentry Gun website.


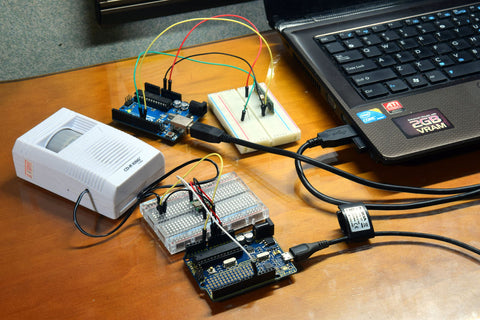
If you are thinking about making your own sentry gun, but don’t know where to get started with Arduino, our Experimenter’s Kit is a great way to learn the basics.

Experimenter's kit

The kit is comprised of a wide range of parts including a servo, sensors, lights, buttons, a sound module and more. Importantly, a Freetronics Eleven Arduino-compatible board is included to ensure that the kit contains everything you need to get started with Arduino. All these great parts would be useless without some form of instructions which is why we have developed a comprehensive project and instruction booklet to get you started. Check out the product page to find out more.

Considering making your own sentry? Already have a victim in mind? Let us know in the comments section below or on Facebook and Twitter.  

July 01, 2016

Make Your Own Self Balancing Hoverboard

Recently, “Hoverboards” have been all the rage. As exciting as hoverboards (exploding batteries and all) are, nothing beats the satisfaction of making your own! With this excellent project from XenonJohn there is nothing to stop you from spending a weekend doing just that. The hoverboard works by reading inputs from a gyroscope and accelerometer to ensure that the central wheels always stay under the rider's centre of gravity, thus, “balancing” the skateboard. Although an advanced project it is very well documented and certainly achievable if you are willing to put in the time. To get started visit the Instructable

Self Balancing Skateboard

Once completed you will be able to ride around on your skateboard by controlling it from your Wii Nunchuck as shown in the video below:


If you are looking for an accelerometer and gyroscope why not check out the Freetronics 9-DOF IMU (an inertial measurement unit (IMU) that combines three sensors to track a total of 9 degrees-of-freedom (DOF)). The sensor combines an accelerometer, magnetometer and gyroscope into one tiny, Arduino compatible package which would be perfect for this project. To find out more and to order visit the 9-DOF IMU product page.

9-DOM IMU

Are you planning on attempting this project? Fascinated by self balancing devices? Let us know in the comments below or on Facebook and Twitter.

June 30, 2016

Take Control of Your Rubbish With This Trashy Project

Sick of your rubbish bin overflowing? Sick of never remembering to take out your bins? Check out this Arduino powered smart rubbish bin! The project allows you to turn your bin into an internet of things (IoT) device so that you can keep track of how full your bin is, and even schedule reminders to take your bin out. The bin uses an IR distance sensor to measure the height from the top of the bin to the current rubbish level. This information is then sent to an Arduino which makes a comparison between the current distance and the height of the bin to work out the rubbish level and update a web app.

Smart Bin

You can even configure your smart bin to tweet or email you when the bin reaches capacity! Love the idea of a smart trash can and can’t wait to get started? check out the Instructable from jsigmier to get started.


If you are looking to get started making your own smart trash can, why not check out our Arduino ProtoShield. The ProtoShield is an excellent tool to turn your temporary, breadboarded project into something more permanent. Proto Shields fit directly onto an Arduino board and have a large general purpose area in the middle where you can solder on your own parts to create a durable, long lasting project! The ProtoShield is a high quality, corrosion resistant, gold plated PCB and represents great value at only $3!

ProtoShield

To find out more about our fantastic ProtoShields check out the product page. Planning on taking control of the rubbish in your life? Let us know in the comments section below or on Facebook and Twitter.   

June 29, 2016

Automate Your Chicken Coop With Arduino

Fascinated by the idea of keeping chickens? Hesitant at the thought of having to regularly feed the chickens or get up early to let them out into the yard?  Looking to optimise your existing chicken pen? If you answered yes to any of the previous questions, you are in the right place! Blogger Roger Reed has create an excellent fully automated chicken pen.

Chicken Coop

The pen includes features such as fully automated cooling, lighting, food, water, an automated door and even an infrared camera. Not only have these improvements saved Roger a lot of time, they have also increased the number of eggs his chickens “Penny and Henny” have been laying! To get started building your own Arduino chicken coop, check out the comprehensive blog Roger has used to document the project.   

Thinking of automating your chicken coop, but don’t know where to get started with Arduino? Check out our Experimenter’s Kit which provides a perfect platform to learn the basics.

Arduino Kit

The kit is comprised of a wide range of parts including a servo, sensors, lights, buttons, a sound module and more. Importantly, a Freetronics Eleven Arduino-compatible board is included to ensure that the kit contains everything you need to get started with Arduino. All these great parts would be useless without some form of instructions which is why we have developed a comprehensive project and instruction booklet to get you started. Check out the product page to find out more.

Did this project inspire you to get started automating your own chicken coop? Let us know in the comments section below or on Facebook and Twitter.  

June 28, 2016

Remotely Mow Your Lawn With Arduino

For many people, especially those with a large yard, regularly mowing their lawn is an exhausting, time consuming or expensive chore. Enter the Arduino remote control lawn mower!

Mower

With this fantastic project you can mow your lawn from the comfort of your armchair and even equip your lawn mower with a wheelbarrow to shift things around your garden by merely twiddling your thumbs. The project uses an Arduino as an interface between the remote control system and two motorised wheelchair motors that drive the mower. Although beyond the scope of this project, it wouldn't take much to modify this remote control lawn mower to be fully autonomous, saving you even more time and money! If this sounds like something that you could use, check out johndavid400’s very well documented Instructable.


When you use motors in your Arduino project you will almost certainly need a H-Bridge motor driver. A H-Bridge allows you to easily control the direction of your motors from within your code. Our own Dual Channel H-Bridge Motor Driver Shield is a perfect solution to this problem, allowing you to drive two DC motors or a stepper motor.

H-Bridge

The Dual Channel H-Bridge Motor Driver Shield features PWM control, selectable current limits and a prototyping area to add your own parts. To find out more check out the Dual Channel H-Bridge Motor Driver Shield page. To keep up to date with the latest news, projects, product announcements  and to let us know what you think of this project follow us on Facebook and Twitter.

June 27, 2016

Add Internet Connectivity to Your Guitar With Raspberry Pi

Have you ever wanted to keep track of the temperature and humidity of your guitar? If you answered yes, or just want to create your own IoT (Internet of Things) device, this project is for you. Vandyke IT has developed a system which collects key statistics from your guitar and transmits them to a Raspberry Pi receiver.  Although the instructions are limited, they are sure to inspire you to create your own IoT device and do provide some useful tips. If you want to find out more check out the following link.


If you are working on a projected that requires interaction between an Arduino and a Raspberry Pi you should check out our PiLeven board.

The PiLeven is an Arduino-compatible board based on the Arduino Uno that fits right on top of a Raspberry Pi using the Raspberry Pi's expansion headers. The PiLeven also has a high-current switchmode power supply, so you can plug in anything from 7V to 18Vdc using the standard 2.1mm jack and even use it to power the Raspberry Pi. The serial communications on the PiLeven are linked through to the Raspberry Pi, so your Pi can upload new sketches straight to the PiLeven or send/receive data and commands. 

The PiLeven is fully compatible with standard Arduino shields adding a huge amount of potential functionality to your Raspberry Pi. For more information, tutorials and to order, visit the PiLeven webpage.

Are you thinking of making a project that requires interaction between Arduino and Raspberry Pi? Let us know in the comments section below or on Facebook and Twitter.

June 26, 2016

Automatically Trigger Your Camera Using a Motion Detector and Arduino

Imagine you are trying to photograph a rare bird without startling it, or want to ensure that you have photographic evidence if your house is broken into. These are just a few of the possibilities that this project from Instructables member and Freetronics customer ASCAS open up. The project consists of a motion detecting module which wirelessly communicates with the remote receiver connected to the camera. This allows you to position your motion detector separately to your camera for added flexibility. The tutorial is easy to follow,  informative and you are sure to learn a lot while you create your new automatic camera trigger! To get started check out the following link.

Automatic Camera Trigger

The wireless functionality in this project is based on a 433MHz wireless connection. These types of connections are very common and have the potential to be used in many different projects. If you are planning on working on this project, or any other that requires wireless communications, why not invest in our own 433MHz Receiver Shield. The shield has a large, gold plated prototyping area, three status LEDs and a built in reset button. For more information and to order visit the 433MHz Receiver Shield product page.

Wireless Reciever

Planning on attempting this project? Have another idea on how an automatic camera trigger could be useful? Let us know in the comments section below or on Facebook and Twitter.

June 25, 2016

Build a Simple Line Following Robot with Arduino

Few projects are more satisfying than building a fully autonomous robot! However, it can sometimes be difficult to know where to start. Fortunately, Instructables member ZRob314 has put together a fantastic tutorial outlining everything you need to know. The project is simple enough that you should be able to complete it in a few hours, but if you have never built an Arduino powered robot before, you are sure to learn a lot! To get started check out the following link.

When building any sort of basic Arduino robot you will almost certainly need a H-Bridge motor driver. A H-Bridge allows you to easily control the direction of your motors from within your code. Our own Dual Channel H-Bridge Motor Driver Shield is a perfect solution to this problem, allowing you to drive two DC motors or a stepper motor.


The Dual Channel H-Bridge Motor Driver Shield features PWM control, selectable current limits and a prototyping area to add your own parts. To find out more check out the Dual Channel H-Bridge Motor Driver Shield page. If you decide to attempt this project our I/R Reflectance sensor will also come in handy. 
To keep up to date with the latest news, projects and product announcements follow us on Facebook and Twitter.

June 24, 2016

Add Keyless Entry to Your Home or Office With RFID

Being able to open and unlock a door with the quick touch of an RFID tag adds a new dimension to managing access to your home or office. Gone are the days of fumbling in the dark trying to find the right key for the particular door you are trying to open, or having to keep track of all the different sets of keys you have had cut. With an RFID enabled electronic door you can open your door with a simple “tap”, easily and securely manage who has access and even keep a log of who has opened the door. Instructables member pcmofo has put together a well documented guide on how to get started which can be found at the following link.


Although this project sounds difficult, with many electronic door locks commercially available it is really a simple matter of configuring the RFID reader to trigger the electronic lock. Indeed, our own RFID Door Lock Shield provides a fantastic and simple interface between the RFID reader, your Arduino Compatible board and the electronic lock. For more information and to order, please visit the RFID Door Lock Shield page.

RFID Door Lock Shield

To keep up to date with the latest news, projects and product announcements follow us on Facebook and Twitter. 

June 23, 2016

Build an Arduino Powered Chess Robot

Do you ever find yourself struggling to find chess opponents that are at your level? This project could be perfect for you! Instructables member Maxjus has developed an Arduino powered chess robot that uses stepper motors to create an X-Y table to move the pieces around and reed switches to determine their location. Magnets located underneath the table move the pieces creating the illusion that the pieces are “magically” moving themselves. If you wanted to get started with this project check out the Instructables link or this YouTube Video.

For more news and updates find us on Facebook, Google+, and Twitter.


If you're looking to develop projects based on an Arduino that use stepper motors - simplify the process with our Freetronics StepDuino board:

The StepDuino is a complete, self-contained Arduino-compatible board with 2 on board stepper motor drivers, 2 servo outputs, a 20x4 LCD, a micro SD card slot, and more! It's a fantastic general purpose board for any project that uses stepper motors. You can use it as the brain of your next robotics project!

The StepDuino uses the same processor architecture as the common Arduino Uno, so you can program it right from the Arduino IDE simply by selecting "Arduino Uno" as the board type. Everything simply works out of the box, just as it would with a regular Arduino - but now you can also drive steppers directly and display feedback on the huge LCD. For more information, tutorials and to order - visit the StepDuino page.