July 12, 2016

Make a Secret-Knock Candy Machine with Arduino

This is the perfect project to test your Arduino abilities! Steve Hoefer’s Secret-Knock Gumball Machine only dispenses candy when you make the correct knocking pattern, and is sure to be a hit around any home or office. After you have completed this project you are sure to be an expert in working with the servos, piezo buzzers and Arduino microcontroller that make the magic happen.

Candy Machine

The secret knock candy machine is not a simple project by the instructions provided by Steve are comprehensive and well documented. To get started impressing your friends with this novel treat dispenser check out the following link!


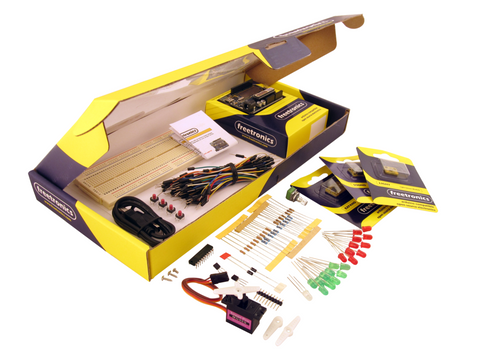
Love the idea of an air quality monitor but have no idea where to get started with Arduino? Check out our Experimenter’s Kit which provides a perfect platform to learn the basics.

Experimenters Kit

The kit is comprised of a wide range of parts including a servo, sensors, lights, buttons, a piezo module (perfect for a knock sensor) and more. Importantly, a Freetronics Eleven Arduino-compatible board is included to ensure that the kit contains everything you need to get started with Arduino. All these great parts would be useless without some form of instructions which is why we have developed a comprehensive project and instruction booklet to get you started. Check out the product page to find out more.

Looking forward to showing off your maker skills by starting on this project? Let us know in the comments section below or on Facebook and Twitter.  

July 11, 2016

Splash Photography With Arduino

Splash photos are incredibly fascinating and common in advertising. However, whilst they are easy to find, taking your own splash photo can be very tricky! Now with this project from Thomas Burg and Johannes Gottwald you can spend a weekend making your own Arduino powered, high speed, splash photography rig to drastically simplify the process.

Splash Photo

The rig uses an Arduino to precisely time the dropping of the object as well as the firing of the flash so that you can get the perfect shot every time. For anyone interested in photography, this project could save you hours of time and is sure to yield satisfying results. To get started taking fantastic splash photos with Arduino check out the following link.


Rather than breadboarding your circuitry as suggested in the project guide, why not check out our own ProtoShield for Arduino. The ProtoShield is an excellent tool to turn your temporary, breadboarded project into something more permanent. The shield fits directly onto an Arduino board and has a large general purpose area in the middle where you can solder on your own parts to create a durable, long lasting project! The ProtoShield is a high quality, corrosion resistant gold plated PCB and represents great value at only $3! For more information or to order visit the ProtoShield product page.

ProtoShield

Have a particular splash shot in mind? Let us know what you think of this project in the comments section below or on Facebook and Twitter.

July 10, 2016

Skill Sunday: Arduino Waveform Generation

This is the first in a new blog series entitled “Skill Sunday”! The purpose of Skill Sunday is to highlight unique or relatively unknown capabilities of Arduino and provide you with the resources needed to help you master this new “skill”. The series will be weekly (with posts on Sunday, obviously...) so stay tuned for more!

Waveform Generation

Waveform generation has many potential uses, the most common of which is sound synthesis. Most Arduino users only know how to generate simple beeps, but unknown to many, Arduino can be used for complex waveform generation, and even additive synthesis.

Additive Synthesis

This capability allows you to create unique tones, simulate the plucking or strumming of a guitar, and more! To get started learning about Arduino waveform generation check out this fantastic tutorial by Jon Thompson. The tutorial contains excellent explanations and starts with the basics so that it it is helpful for anyone who wants to get started synthesising sounds with Arduino.

Want to start synthesising sounds, but don’t know where to get started with Arduino? Check out our Experimenter’s Kit which provides a perfect platform to learn the basics.

Experimenters Kit

The kit is comprised of a wide range of parts including a servo, sensors, lights, buttons, a sound module and more. Importantly, a Freetronics Eleven Arduino-compatible board is included to ensure that the kit contains everything you need to get started with Arduino. All these great parts would be useless without some form of instructions which is why we have developed a comprehensive project and instruction booklet to get you started. Check out the product page to find out more.

Have an idea of a skill that should feature on next weekend's post? Let us know in the comments section below or on Facebook and Twitter.  

July 09, 2016

Create an Arduino Tetris Remake

Does the mention of “Tetris” bring the memories flooding back? With this great project from ElecFreaks you can revitalise those memories! The project uses an Arduino to power an LCD screen and read inputs from the small game controller. Have a look at the picture below for an example of the crisp, full colour gameplay! If you thought that all Arduino could do was flash a few LEDs, this project is a perfect example of the platform's versatility across a wide range of advanced applications. To get started creating your own Tetris remake check out the instructable.

Tetris

Want to start making your own Tetris remake, but don’t know where to get started with Arduino? Check out our Experimenter’s Kit which provides a perfect platform to learn the basics.

Experimenter’s Kit

The kit is comprised of a wide range of parts including a servo, sensors, lights, buttons, a sound module and more. Importantly, a Freetronics Eleven Arduino-compatible board is included to ensure that the kit contains everything you need to get started. All these great parts would be useless without some form of instructions, which is why we have developed a comprehensive project and instruction booklet to get you started. Check out the product page to find out more.

Did this project bring back memories? Let us know in the comments section below or on Facebook and Twitter.  

July 08, 2016

Fingerprint Security With Arduino

Every wanted to add biometric security to your Arduino project? You are in the right place! Adding fingerprint biometric security to your house or apartment could provide convenient and secure keyless entry, and will certainly create an interesting talking point when you have people over.  This project works using a fingerprint module that can store up to 1000 fingerprints and has a false detection rate of 0.001%, so you can sleep easy at night! Completing a project such as this is a great way to increase your Arduino skills and is sure to be a lot of fun. To get started check out the following video:


When creating your fingerprint sensor you will want some form of display to provide feedback to the user to let them know if their fingerprint was successful or not. Why not check out the Freetronics OLED Stick LCD Adapter. The adaptor is designed to work with the Freetronics LeoStick and will allow you easily connect a 128X128 pixel OLED module to the compact LeoStick, so that you can keep your fingerprint sensor as small as possible. Check out the product page to find out more.  

OLED Adaptor

Have an idea of an Arduino project that needs biometric security? Let us know in the comments section below or on Facebook and Twitter.   

July 07, 2016

Modify Your Skateboard With Arduino

Bored of having a skateboard that is identical to everyone else's? Set yourself apart from the crowd with this fascinating project! Instructables user nusnel has used programmable LED strips and a hall effect sensor to add cool lighting effects to his skateboard. Using the hall effect sensors and some magnets, the speed of the skateboard can be determined, and with some clever Arduino magic, the LED’s can be programmed to look as if they are moving at the same speed, but in the opposite direction to the skate board. Check out the video below to get an idea of how spectacular the effect is!


 The project is very well documented and could be completed in a few hours once you get the parts together. Completing this project is sure to add to your skill set and result in a spectacular outcome. However, the project relies on breadboarding your circuitry which could potentially cause issues. It is possible that while riding your pimped up skateboard, connections may pop out of the breadboard,causing a great deal of frustration! To overcome this issue why not check out our own ProtoShield for Arduino. The ProtoShield is an excellent tool to turn your temporary, breadboarded project into something more permanent. The shield fits directly onto an Arduino board and has a large general purpose area in the middle where you can solder on your own parts to create a durable, long lasting project! The ProtoShield is a high quality, corrosion resistant gold plated PCB and represents great value at only $3!

ProtoShield

Keen to start work on your skateboard? Check out the following link. When getting your parts together be sure to check out the ProtoShield product page to find out more. Let us know what you think of this project in the comments section below or on Facebook and Twitter.   

July 06, 2016

Arduino Alarm Clock

With this cool project from Tony DiCola you can create a Google Calendar connected,  Arduino powered, smart alarm clock. The alarm will automatically set itself based on your calendar, meaning you can optimise your sleeping times without having to worry about missing meetings! The project will teach you about using TFT touch screens, creating internet connected Arduino devices, and generating sounds with Arduino. The Arduino alarm would not be considered a basic project, but the instructions provided are very comprehensive so you should have no problem completing the project if you are willing to put in the time.

Alarm Clock

To get started making your own Arduino alarm clock check out the following link.


Have no idea where to get started with Arduino? Check out our Experimenter’s Kit which provides a perfect platform to learn the basics.

Experimenters Kit

The kit is comprised of a wide range of parts including a servo, sensors, lights, buttons, a sound module and more. Importantly, a Freetronics Eleven Arduino-compatible board is included to ensure that the kit contains everything you need to get started with Arduino. All these great parts would be useless without some form of instructions which is why we have developed a comprehensive project and instruction booklet to get you started. Check out the product page to find out more.

Looking forward to improving your sleeping patterns with this project? Let us know in the comments section below or on Facebook and Twitter.  

July 05, 2016

Create a Tweeting Toothbrush With Arduino

Struggle to get your kids to brush their teeth? Want to keep better track of your own teeth brushing habits? Check out this innovative project from Ruben Mortier which uses an accelerometer and an Arduino, to monitor teeth brushing behaviour.

Tweeting Toothbrush

The “Inventive Toothbrush” not only notifies parents via email and twitter when their children have started brushing their teeth, but also displays helpful brushing tips on a screen, and plays music to encourage children to brush for longer. This helpful project is sure to be fun to make and will have the added satisfaction of solving a common parenting issue! To get started check out the following link.


If you are looking for a accelerometer to complete this project, why not check out the Freetronics 3-Axis Accelerometer Module. The module has independent X,Y and Z axis outputs ready to connect directly into an Arduino. The small footprint of the module means it would be perfect for attaching to a toothbrush! To find out more and to order check out the product page.

accelerometer

Planning to revolutionise your children's teeth brushing habits? Let us know in the comments section below or on Facebook and Twitter.

July 04, 2016

Arduino Aquaponics!

Aquaponics is a unique system of raising fish and growing plants together. At a basic level, the fish fertilise the plants, allowing plants to grow in a water saving, chemical free environment.  However, developing effective aquaponic systems can be very difficult. Rik Kretzinger has added an Arduino into his aquaponic garden to make things run as smoothly as possible. Adding an Arduino allows the garden to be fully automated, with various pumps controlled by the data inputted by water level, humidity, temperature and moisture sensors. The project even allows you to control and log data from your garden over the internet! The Arduino aquaponic garden allows you to combine the joy of "making", with the satisfaction of growing your own veggies! Although the project requires a number of parts to get started, it could be a worthwhile investment in the long run with likely savings from growing your own produce. To get started building your own aquaponics garden check out the following link.

Aquaponic Garden

The project is extremely well documented and provides many useful tips to ensure that your garden is as productive as possible. If you plan to make your own aquaponics garden you will certainly need a temperature sensor. Why not check out the Freetronics temperature sensor module? The module is accurate to 0.5 ℃ and features a wide temperature range, mounting holes, and comes with full code examples. To find out more about our fantastic temperature sensor check out the product page.

Temperature Sensor

How do you feel about aquaponic gardening? Let us know in the comments section below or on Facebook and Twitter.   

July 03, 2016

Create an Arduino Powered Quadcopter

Curious about how quadcopters work? Sick of regularly breaking cheap quadcopters? With this project from instructables member treyes4 you will learn how to build an Arduino powered quadcopter flight controller. However, this isn’t just any old quadcopter! With features such as position lock and altitude hold, this might even be an upgrade to the old quadcopters you have lying around at home. The flight controller uses a number of sensors such as a GPS, altitude sensor, gyroscope and accelerometer to provide the information necessary to implement these features. If this sounds like a project that interests you, check out the following link to get started!

Arduino Quadcopter

The video below demonstrates the quadcopter in action:


A gyroscope and accelerometer are an integral aspect of this project. Why not check out the Freetronics 9-DOF IMU (an inertial measurement unit (IMU) that combines three sensors to track a total of 9 degrees-of-freedom (DOF)). The sensor combines an accelerometer, magnetometer and gyroscope into one tiny, Arduino compatible package which would be ideal for use in a quadcopter. To find out more and to order, visit the 9-DOF IMU product page.

9-DOF IMU

Inspired to build your own Arduino powered quadcopter? Have a funny quadcopter story to share? Let us know in the comments section below or Facebook and Twitter.