March 19, 2015

Learn about wireless remote control with Arduino

An Arduino can be used as the base for all sorts of wireless remote-control projects, and the folks at the Creative Computing Club of Suffolk UK have created a neat tutorial that offers a joystick-style wireless remote control using two Arduino boards and 433 MHz wireless data link modules.

The process is quite simple - the transmitter's Ardiuno read the values from an analogue joystick and converts them into four directions and sends the result as serial text over the wireless link. The receiver's Arduino takes the text message and acts upon it - in this instance controlling four matching digital outputs.

This is a great framework for simple remote-control projects and should inspire greater things. To get started, visit the CCC's Instructable page. And for more, we're on facebook, twitter and Google+, so follow us for news and product updates as well.

If you're looking to work with your own RF wireless hardware, but don't want to make your own receiver circuit - check out our range of  315/433 MHz receiver shields:

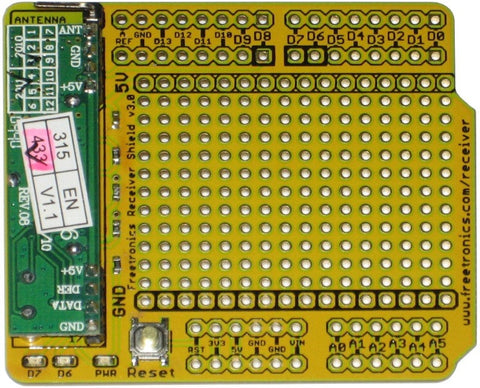
Apart from being idea for working with the various low-cost data links on the market, the shield can also be used to capture wireless weather station data, as described in the book "Practical Arduino". For more information and ideas, check out the product page.

March 19, 2015

Build a digital potentiometer shield for Arduino

A digital potentiometer can be quite useful in more advanced projects, and can be used for various tasks such as part of a digital-to-analogue converter, automating older analogue circuitry and more. However experimenting with them can be difficult and this was also experienced by Enrico Miglino.

Instead of giving up, Enrico has designed and documented a shield for Arduino based around the Analog Devices AD5206 quad digital potentiometer. Apart from giving the circuit a neat home, the shield also includes extra potentiometers for adding preset values to their digital counterparts, and neat DIP switches to cut them in and out.

With this shield you can now experiment with a proven circuit and also use it as the base for further projects requireding a digital potentiometer. Finally Enrico runs through the shield in the following video:

For more information including the schematic and example Arduino sketches visit the project page. And for more, we're on facebookGoogle+, and twitter - so follow us for news and product updates as well.

If you need to add external hardware or devices to your next Arduino project, you'll need a protoshield to mount the external circuitry. In doing so, consider our range of ProtoShields. From the tiny LeoStick to the Mega we have a wide range to suit your application.

March 18, 2015

Optimising the Arduino 1.6.x IDE for faster code

Although the Arduino IDE gives us an open-source and free method of easily creating and uploading code to our Arduino or compatible boards, it is preset to optimise the size of the code sent to the microcontroller. The downside of this is that the code may not be the most efficient, and trade-offs can be made between code size and performance. 

How can this be done? Thanks to Instructables member Bodmer who has investigated the five speed/size options available with the GCC compiler used by the IDE. These comparisons result with some very interesting data - such as an increase in sketch execution speed of around 33% with a resulting increase in code size of 25%. Naturally your results will vary however with this guide you can work on your own optimisations. 

To get started, visit the informative Instructable page. And for more, we're on facebookGoogle+, and twitter - so follow us for news and product updates as well. 

If you've reached the limit of speed-optimisation of your code - it's time to go faster with an Arduino Due-compatible board. Here at Freetronics we have the EtherDue - which has more connectivity possibilities and options than the original:

It's the Arduino Due-compatible board with the Freetronics additions including Ethernet network connectivity, MAC address chip, microSD storage, optional PoE, upgraded power supply and more - while retaining the simplicity and ease of the Arduino IDE (with 100% compatibility). And you still have a full USB interface for uploading sketches and direct programming. For more information on this powerful board, check out the EtherDue product page

March 18, 2015

Create artistic cookies with a CNC Spirograph

With some imagination and an Arduino almost anything is possible, including re-purposing items which may no longer have any use. One fun example of this is by Marie Caye and Arvid Jense, who have created a simple CNC-style device which can be used to create spirograph-type patterns on cookies with icing.

The main hardware is from a used turntable, ideal for rotating biscuits awaiting their artistic icing coat. This is dispensed via a funnel whose position across the cookie is controlled via a servo and Arduino. With a combination of turntable speed and servo position all sorts of effects can be created with the icing, as shown in the following video:

Finally an Arduino project you can sink your teeth into - and you can find out how by visiting the project's Instructable page. And for more, we're on facebookGoogle+, and twitter - so follow us for news and product updates as well.

If you're interested with making your own CNC-type device, save time and increase reliability with the Freetronics CNCPlotter Stepper Motor controller:

The CNCPlotter is a complete twin stepper motor solution - from the onboard Arduino Leonardo-compatible microcontroller, microSD card socket, USB interface and twin stepper motor controllers - all topped with a 20x4 LCD. Simply connect power and your motors, upload a control sketch and your CNC-based device is ready to go. For more information, details and to order visit the CNCPlotter page.

March 17, 2015

The "Artbot" - a colour-sensing interactive drawing robot

As part of a university course, Roland van Dierendonck was tasked with creating an interactive robot and came up with the "Artbot" - an Arduino-controlled robot that draws using a marker pen, and changes its behaviour depending on the value returned from a colour sensor. That is, it can react to its own art work (or that of a fellow Artbot) for some interesting results.

Making the robot is quite simple, with an Arduino and motor shield over a small motorised robot chassis, tank or other base. By placing a black boundary around the surface the robots are allowed to operate within, you can keep them where they need to be and not rushing off to draw on the floor! You can see a pair of Artbots in action through the following video:

For more details and instructions about the Artbot, visit the project pageAnd for more, we're on facebookGoogle+, and twitter - so follow us for news and product updates as well.

 If you're looking into starting with Arduino and robotics, such as controlling two DC motors (or a stepper motor) from your Arduino or compatible, check out our HBRIDGE: DC/stepper motor shield. Based around the powerful Allegro A4954 H-bridge driver IC you can control two DC motors with complete ease, or one bipolar stepper motor. With connections for external power management, a complete beginners' guide and documentation - motor control couldn't be any easier. For more information and to order, visit the HBRIDGE: page

March 17, 2015

Avoid garage parking disasters with a Arduino-based parking guide

Now and again we see a relatively simple Arduino-based project which is easy to make and very useful - such as this parking guide system by Instructables member mindtesterdev. This project is a solution to the problem of driving into a garage that may not have much excess space and thus the driver needs to take special care.

By mounting an ultrasonic distance sensor at the same horizontal level as the vehicles' bumper level - a connected Arduino can determine how far away you are from an accident. The distance to go is indicated with an RGB LED that changes colour or blinks in a pattern programmed and understood by the end user. Check out the following video for a quick demonstration of entering the garage:

It's great to see how neat the final installation has become, the project would appear to unknowing observers as a commercial product. To make your own version, head over to the project's Instructable page. And for more, we're on facebookGoogle+, and twitter - so follow us for news and product updates as well.

If you're looking to learn about Arduino development platform and how it interacts with external devices such as ultrasonic distance sensors -  you can't go past "Arduino Workshop -  A Hands-On Introduction with 65 Projects” by John Boxall.

Arduino Workshop takes the reader from having zero knowledge about the Arduino platform, electronics and programming and leaves them with the know-how and instructions on everything from blinking an LED, to robotics, wireless data, cellular communications, motor control, sensors, Internet connected systems and more. For more information including a sample chapter and table of contents, visit the book page.

March 16, 2015

Counting "high fives" with an Arduino and Freetronics DMD

And now for something different is the activities of "The High Five Guy". This consisted of a person wired up with an Arduino controlling a white Freetronics Dot Matrix Display and a sensor mounted on the palm of his hand.

After receiving a "high five", the sensor triggers an Arduino digital input, and through some simple code increments a number displayed on the DMD and also blinks the LED strips worn by the user. In the following video MHFG (Mr High Five Guy) is attending a Dragon Con cosplay event in the United States, with the result effects of the system being quite popular (skip to 1:37):

 To keep track of MHFG's activites, visit his website. And for more, we're on facebookGoogle+, and twitter - so follow us for news and product updates as well. 

As used in the project mentioned above, check out our Freetronics Dot Matrix Displays. They're simple to use, yet very bright for indoor and outdoor situations. Available in various colours, the 32 x 16 LED matrix can display text and graphics quite easily - and can be daisy-chained together for extended displays. For more information, see our range of Dot Matrix Displays here

March 16, 2015

Experimenting with LEGO train detection and control using Arduino

In the last few months there seems to be a renaissance of LEGO trains, and many Arduino enthusiasts have been using their boards to add all sorts of interaction and control to their layouts. An ongoing series of tutorials for the beginner is explaining how to do this and the latest update by the Arduino LEGO Trains YouTube channel shows us how to use light sensors to detect trains as they approach a station and cause them to stop for a duration.

The train is detected by a light sensor fitted between two sleepers, and when this goes dark the Arduino stops current to the train via a separate L298N motor controller which replaces the 9V speed controller. This is a neat idea and allow you to add some automated realism for hands-off enjoyment of the trains. Watch the following video for a complete rundown and more:

To expand on the project consider using PWM to slowly bring the train to a stop, with the sensor placed further away from the station. And for more interesting videos, subscribe to their YouTube channel.And for more, we're on twitter, facebook and Google+, so follow us for news and product updates as well.

If you need a light sensor, you can maintain constant reliable results with our LIGHT: light sensor module:


Our tiny light-sensor module uses the very-reliable TEMT6000 light sensor, which gives consistent and repeatable readings even between different units - unlike cheapie light-dependent resistors, which can vary dramatically in their sensitivity. So for reliable light sensing - look no further


March 13, 2015

Build a huge Arduino-powered Laser Cutter and Engraver

Most CNC or laser cutter/engraver projects usually have a bed size of around a square foot - however if you have the space, a larger version would be advantageous. As usual the commercial price of such as machine can be out of reach, so an option is to make your own. This has been demonstrated by Instructables member FamousMods who shows how to make a cutter that is around one metre square.

The largest challenge of such a project is making the frame and enclosure, followed by alignment of the belts for each axis - however with the time and patience you can have a successful reproduction. Furthermore there's an explanation of the software required, design files and how to convert images to vectors for reproduction with the laser. 

To learn more about this great tool, visit the informative Instructable page. And for more, we're on facebookGoogle+, and twitter - so follow us for news and product updates as well.

If you're looking to develope CNC machines on a larger scale, you will need to control full-sized stepper motors and a servo or two. To simplify the process you can use our new Freetronics StepDuino board:

The StepDuino is a complete, self-contained Arduino-compatible board with 2 onboard stepper motor drivers, 2 servo outputs, a 20x4 LCD, a micro SD card slot, and more! It's a fantastic general purpose board for any project that uses stepper motors. You can use it as the brain of your next robotics project!

The StepDuino uses the same processor architecture as the common Arduino Uno, so you can program it right from the Arduino IDE simply by selecting "Arduino Uno" as the board type. Everything simply works out of the box, just as it would with a regular Arduino - but now you can also drive steppers directly and display feedback on the huge LCD. For more infromation, tutorials and to order - visit the StepDuino page.

March 13, 2015

Make a remote-control Balancing Car Robot with Arduino

Experimenting with remote-control cars is always fun - whether it be experiementing with speed, handlng or battery life. However another option is to consider something much more unique - converting the car so it can balance on two wheels. This adds a whole new level of options to any car and the process of mofifying a Tamiya RC car has been documented by Instructables member Kaeru no Ojisan.

Balancing is acheived using the "inverted pendulum" technique, which relies on data from a triple-axis accelerometer and gyroscope processed by an Arduino to control the rear motors when required. Furthermoe a servo is used to help the car shift from normal use to balanced driving and back again. Check the car out in the following video:

You can learn more about this car modification from the Instructable page. And for more, we're on facebook, twitter and Google+, so follow us for news and product updates as well.

If you're interested in making your own self-balancing or autonomous device such as the car above, you'll need an inertial measurement unit (IMU) and here at Freetronics we have the 9-DOF IMU module:

With an onboard accelerometer, gyroscope and magentometer your project will have a wide variety of data to work with, and doing so is very easy. We have libraries for both Arduino and Raspberry Pi to get you started. We even included an onboard voltage regulator and logic level shifters, so you can connect it directly to either 3.3V or 5V microcontrollers right out of the box. Just plug and play!

Our 9-DOF Inertial Measurement Unit module is now in stock and ready to ship, so for more information and to order - visit the 9-DOF Inertial Measurement Unit product page. And to keep up with news, products and more from Freetronics, please follow us on your choice of facebookGoogle+, and twitter.