For some the sound of rain (or other natural happenings) can be quite soothing, and the ability to listen can help them relax or find sleep easier to achieve. With this in mind Instructables member Adum24 has created a device that can simply play rain or other sounds at the flick of the switch.
Based around a Raspberry Pi, the user interface is simply a power and volume switch. The Pi can boot automatically and begin playing the audio file without any other user intervention. To save effort some inexpensive powered speakers have been mounted inside an enclsure with the Pi to make the simple rain box - as demonstated in the following video:
Apart from the orginal use, this could be harness for all sorts of simple audio-playback requiremenst. So click here to learn how to make your own version. And for more, we're on facebook, Google+, and twitter - so follow us for news and product updates as well.
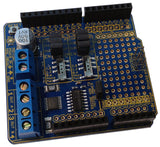
Every day we find more uses for our PiBreak board - the great way to mount circuitry to your Raspberry Pi. It provides labelled breakout pins for all GPIOs, a large prototyping area with solder pads, and power rails for easy power connection:

Furthermore the PiBreak also includes mounting hardware to firmly attach it to your Raspberry Pi using a nut, bolt, and spacer - and is compatible with all revisions of both model A and B Raspberry Pi computers. For more information about our new PiBreak board, our Getting Started guide, and to order - visit the product page.