August 04, 2014

The Arduino-powered "WAVEbuoy" wave height indicator

All sorts of data is available on public websites, including the financial information, weather reports and so on. Another example is wave height data - and data from a worldwire group of buoys that are constantly sending water temperature and well data back to a central server. Instructables member surfershort has created a neat Arduino-powered device to interrogate this data and display the swell height of a particular buoy with an RGB LED.

The hardware is quite simple, just an Ethernet-enabled Arduino or compatible board, a power supply and the LEDs for indication. However the project has been finished neatly with the use of small translucent dome sitting atop a classy wooden enclsoure as shown below:

It's a great project that can be reproduced quite easily, so for complete details visit the Instructable page. And for more, we're on facebookGoogle+, and twitter - so follow us for news and product updates as well.

When putting together your next Internet-enabled Arduino project - save time, space and money with the Freetronics EtherTen. Apart from being fully Arduino Uno-compatible, it has onboard Ethernet, microSD socket, full USB interface (so you don't need a costly FTDI cable just to upload a sketch!) and supports optional Power-over-Ethernet.

July 31, 2014

Experimenting with Arduino and state machines

Although most of us are happy to create Arduino sketches using procedural methods from C++ and other experiences, there are other methods and one of these is by using state machine programming. The operation of a state machine can usually be described by:

... having an initial state or record of something stored someplace, a set of possible input events, a set of new states that may result from the input, and a set of possible actions or output events that result from a new state

And this method has been demonstrated well by Arduino forum member JimboZa with their Arduino-based state machine to control an electronic turnstile. 

His simulation takes all options of use into account, and is also an interesting example of a different method of programming. Furthermore they've provided a schematic for a simple electronic model as well. 

Fore more information including the sketch and discussion, log in to the Arduino forum. And for more, we're on facebooktwitter and Google+, so follow us for news and product updates as well.

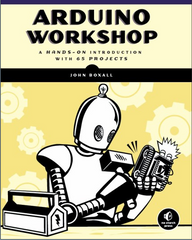
If you're looking to learn how to use an Arduino in various methods, you can't go past reading a copy of "Arduino Workshop -  A Hands-On Introduction with 65 Projects” by John Boxall.

Arduino Workshop takes the reader from having zero knowledge about the Arduino platform, electronics and programming and leaves them with the know-how and instructions on everything from blinking an LED, to robotics, wireless data, cellular communications, motor control, sensors, Internet connected systems and more. For more information including a sample chapter and table of contents, visit the book page

July 30, 2014

DemUino - the Arduino-based computer in a keyboard

After being inspired by the classic 8-bit computers of his youth, Dimitrios Kalfakis was motivated to make his own version in a minimalist and economical fashion. And the resulting computer - dubbed the "DemUino" is a success. Instead of modifying other peoples' code, Dimitrios wrote his own simple interpretive programming language that is similar to BASIC, and input is accepted from the PS/2-style keyboard (which the circuitry is mounted inside) or an RS232 serial port.

It's an amazing feat considering the constraints of the hardware, however is quite usable as demonstrated with some example programs. Furthermore users can save and retrieve their code to the EEPROM for a neat storage solution. And the LCD fitted to the keyboard just tops it off nicely.

With a reasonable battery you could have a portable PC that's certainly something different. We love it, and you can find an extremely well documented website about this and other related projects on Dimitrios' website. And for more, we're on facebook, twitter and Google+, so follow us for news and product updates as well. 

If you're wanting to make your own Arduino-compatible computer such as the DemUino above, you'll need an ATmega328P MCU with Arduino Uno bootloader:

This is the same Atmel AVR ATmega328P microcontroller used in the official Arduino Uno, as well as our ElevenEtherTenUSBDroid, and other boards. Perfect for building your own Arduino-compatible project directly on a breadboard or on a custom PCB, or for replacing the MCU in an existing board. Comes with the Arduino Uno bootloader pre-installed. Better still, it even has a special label stuck on top with details of the pinout, so you don't even need to look up the datasheet when connecting it up in your project! For more information and to order, click here!

July 30, 2014

Creating graphic effects with Arduino-controlled character LCDs

The incredibly common character LCDs used with Arduino projects is much more capable than most users realise. These HD44780 and compatible interface LCDs can also generate small icons or images using the pixel area available for a single character of text.

This has been demonstrated very well by Arduino forum member JO3RI who runs though a few of their examples and provides the code to create various effects. Although you cannot create more complex images, ther scope is there to make larger icons, indicators and fun images that can be put to use to liven up various displays in your projects. A quick example of a sprite animation is shown in the following video:

Doing so is quite simple, to learn more check out the code examples in the Arduino forum. And for more, we're on facebook, twitter and Google+, so follow us for news and product updates as well. 

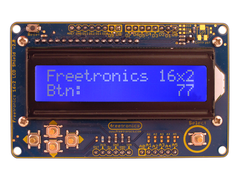
Looking for a rapid-use LCD for your Arduino (or Raspberry Pi) projects? Save time and move forward with the Freetronics LCD & Keypad shield which contains a bright 16x2 character LCD and five buttons that can be read from only one analog input pin:


July 29, 2014

Experimenting with Arduino and electric go-karts

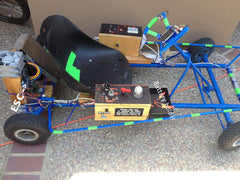
Many of us have been known to experiment with remote-control cars, robotic tanks and other smaller devices, but rarely expand this work into life-size projects. With that in mind we're excited to show an electric go-kart built by Instructables member gizzmotronics

Instead of a simple speed control, this kart has some neat Arduino-controlled lights, indicators, and also interfaces with the electronic speed controller to easily alter the speed from the chain drive and twin fan-cooled motor. It's an amazing effort and can reach speeds of over 45 km/h.

Bear in mind the safety aspects of working with and driving such a kart, however we're sure the effort would be more than worth it. To learn more about the project, visit the Instructable page. And for more, we're on facebookGoogle+, and twitter - so follow us for news and product updates as well.

If you're looking for an Arduino Uno-compatible board for various projects, choose what tens of thousands of others have done and use our Freetronics Eleven - the Arduino-Uno compatible with low-profile USB socket, onboard prototyping space and easy to view LEDs: 

July 29, 2014

Build a mechanical "Parkour" game with Arduino

After the popularity of the mobile app "Flappy Birds" a few derivatives have been presented in various forms, and one example has been documented by Arduino fomrum member kathyelecfreaks. Her version is a physical game in the very sense, in that the player controls a physical "person" that is above a constantly-rotating belt of surface. An interesting exercise of bringing computer games to life, as demonstrated below:

The game is also an interestingd demonstration of integrating motor control, various sensors and inputs in a more complex Arduino sketch, so log in to the Arduino forum to learn more. And for more, we're on facebook, twitter and Google+, so follow us for news and product updates as well.

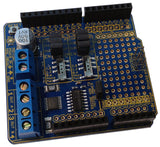
 If you're looking into starting with Arduino and motor control  - check out our new HBRIDGE: DC/stepper motor shield. Based around the powerful Allegro A4954 H-bridge driver IC you can control two DC motors with complete ease, or one bipolar stepper motor. With connections for external power management, a complete beginners' guide and documentation - motor control couldn't be any easier. For more information and to order, visit the HBRIDGE: page.

July 28, 2014

Build a simple counting timer with Arduino

Sometimes a task or exercise will require a simple timer, and a neat example of this has been documented on the WTH blog. They've used a small Arduino-compatible board to drive a double-digit LED display, and with a little work the entire unit can become portable for gym or other use.

Even without a real-time clock IC an Arduino can keep time quite accuraltey, and for this purpose solves the problem neatly. You can always modify the code for various counting options or add a few more buttons to create a customisable count up or down timer. A demonstration of the unit can be seen in the following video:

You can find the Arduino sketch and details in the timer project page. And for more, we're on facebookGoogle+, and twitter - so follow us for news and product updates as well. 

Have you been reading about Arduino and would like to understand more so you can work with projects like the example above, but not sure where to start? Then order one of our Experimenter's Kit for Arduino: 

The package includes a wide variety of parts, sensors and modules including: a servo motor, lights, buttons, switches, sound, sensors, breadboard, wires and more. Furthermore a Freetronics Eleven Arduino-compatible board is included to make this an extensive hobby experimenter, inventor and starter kit. 

However we don't leave you alone to figure it all out, included is a great project and instruction booklet, plus access to a supporting web page and software examples. In other words - this is everything you need to get started for a fun range of electronics and Arduino related projects! So to get started or for more information and to order, check out the product page.

July 28, 2014

Build an interactive Infinity Mirror Clock

With some colour or RGB LEDs and some simple woodwork many hobbyists have made themselves an infinity mirror, a neat device that gives the effect of an infinite distance into the future. However enthuisast Dushyant Ahuja has taken this concept one step further and created a mirror that also functions as a clock.

The RGB LEDs in his version can be controlled to display various colours which represent the time, and the alterations can be done remotely thanks to the use of a Bluetooth receiver in the clock circuitry. Futhermore with the use of an infra-red distance sensor - the clock can detect the presence of a user and turn off the LEDs, allowing use of the mirror for reflective means. It's a relatively simple yet quite outstanding project and demonstrated in the following video:

For complete details, visit the project's Instructable page. And for more, we're on facebooktwitter and Google+, so follow us for news and product updates as well.

The most important part of any clock project is the inclusion of an accurate real-time clock IC. Here at Freetronics we have the Maxim DS3232 real-time clock IC module:

Apart from keeping accurate time for years due to the temperature-controlled oscillator and having a tiny coin-cell for backup, it is very simple to connect to your Arduino project. A driver library allows your program to easily set or read the time and date. Perfect for clock projects, dataloggers or anything that needs to know the date and time. Furthermore it contains a digital thermometer and 236 bytes of non-volatile memory to store user settings and other data. For more information, check out the module page here.


July 26, 2014

Emulate a Commodore 64 tape drive with Arduino

Fans and users of the classic Commodore 64 computers will find this project by Peter Edwards of great interest. Peter has created an Arduino-powered device that can emulate the tape deck for a Commodore 64, which will increase the reliability of playing tape-based software and reduce wear on original tapes.

The "Tapuino" converts the MP3 files of orginal tape recordings back into signals which are fed through an interface cable from an original datasette unit. With some work Peter has added compatibilty for "fast load" software and also created a neat user interface with an LCD so the unit can be reduced in size and portable. It's an amazing hack and a great way to keep the old 8-bit games alive

For complete details, visit Peter's interesting website. And for more, we're on facebookGoogle+, and twitter - so follow us for news and product updates as well.

If you're looking for an Arduino Uno-compatible board for various projects, choose what tens of thousands of others have done and use our Freetronics Eleven - the Arduino-Uno compatible with low-profile USB socket, onboard prototyping space and easy to view LEDs: 

July 24, 2014

Reverse-geocaching with Arduino

For a fun gift that relives memories of places in personal history, Theo Meyer has worked with previous examples and built his own geocaching box. For the uninitiated this is a device that needs to be taken to various locations, and once the journey has completed the box can be opened to reveal a gift or suprise of some sort.

In theory it may sound complex, however with the use of an Arduino, GPS module and a large battery it's quite easy. The sketch checks that required GPS coordinates have been received, and then controls a servo or solenoid to release the latch in the box.

This is a fun project that can be made by beginners and experts alike, so for details including the sketch and hardware schematic - log into the Arduino forum. And for more, we're on facebooktwitter and Google+, so follow us for news and product updates as well.

If you're looking to learn how to use an Arduino with GPS receivers, servos and and much more, you can't go past "Arduino Workshop -  A Hands-On Introduction with 65 Projects” by John Boxall.

Arduino Workshop takes the reader from having zero knowledge about the Arduino platform, electronics and programming and leaves them with the know-how and instructions on everything from blinking an LED, to robotics, wireless data, cellular communications, motor control, sensors, Internet connected systems and more. For more information including a sample chapter and table of contents, visit the book page.