August 08, 2014

Build a face-tracking turret with Arduino and OpenCV

Although the Arduino development platform is quite powerful, when harnessed to external technology it can play a part in a much larger or more involved system. One neat example of this is by enthusiast Luka Gabrić who has created an amazing face-tracking turret without too much effort.

The Arduino us used to control the turret, with servos for both the x- and y-axis rotations. This then communicates via USB to a host PC running python code and interfacing with OpenCV. This results with an incredibly responsive face-tracking system as demonstrated in the following video:

For details including the Arduino sketch and python code, visit Luka's interesting website. And for more, we're onfacebookGoogle+, and twitter - so follow us for news and product updates as well. 

Have you been reading about Arduino and would like to understand more so you can work with projects like the example above, but not sure where to start? Then order one of our Experimenter's Kit for Arduino: 

The package includes a wide variety of parts, sensors and modules including: a servo motor, lights, buttons, switches, sound, sensors, breadboard, wires and more. Furthermore a Freetronics Eleven Arduino-compatible board is included to make this an extensive hobby experimenter, inventor and starter kit. 

However we don't leave you alone to figure it all out, included is a great project and instruction booklet, plus access to a supporting web page and software examples. In other words - this is everything you need to get started for a fun range of electronics and Arduino related projects! So to get started or for more information and to order, check out the product page.


August 08, 2014

Introducing the Freetronics "StepDuino" Stepper Motor Controller

 Controlling one or two stepper motors and a servo or two from an Arduino or compatible board can involved a stack of shields or some complex wiring that can possibly go wrong when you least expect it. And after being inspired by various uses for stepper motors for CNC machines, plotters and various robotic devices - we're proud to introdce the StepDuino Stepper motor controller.

The StepDuino is an all-in-one board that not only combines an Arduino Uno-compatible board, but also a wide range of peripherals including a twin stepper motor controller, twin servo outputs, a microSD card socket and topped with a 20 x 4 character LCD. 

And as the StepDuino is a fully-assembled unit, you can get started in under ten minutes with our neat tutorial page which explains the use of both servos and stepper motors, the LCD and more.

It's the compact, all--in-one solution that makes motor control easy and safe. For more information, our tutorials and to order your own StepDuino - please visit the product page. And for more, we're on facebook,twitter and Google+, so follow us for news and product updates as well. 

August 08, 2014

Meet us in person at the Mini Maker Faire Sydney

If you like to build things, and you're in Sydney next weekend, you absolutely must get yourself down to the Powerhouse Museum for the second Mini Maker Faire Sydney on the weekend of August 16 and 17.

There will be dozens of exhibitors including Freetronics, and we'll even have some of our gadgets with us available at special show-only prices so it's the perfect time to come and say hello in person and pick up a bargain at the same time.

After visiting the Mini Maker Faire Sydney last year we were impressed with the range and quality of exhibits, and look forward to not only having a look around ourselves but also saying hello to all those who will stop by our stand at the Faire.

Located at the Powerhouse Museum, the Faire is easy to reach via public transport. For more information about the event, visit the Mini Maker Faire Sydney websiteAnd for more, we're on facebook,twitter and Google+, so follow us for news and product updates as well


August 07, 2014

Remote home automation with Arduino and GSM Modules

Home automation is an increasingly popular project to build with Arduino and compatible hardware, thanks to the relative simplicity of the hardware and software required - plus you can make it work how you want it to work. To demonstrate this, Timofte Andrei made his own system for a university project and to demonstrate his skills. Apart from the usual relay control, this system can be communicated with via SMS text message using an inexpensive GSM shield for Arduino.

Apart from controlling relays remotely, the user can poll for temperature from a local sensor. With a little work more controls or sensors could be added for a remote and interactive control system. Finally, Timofte runs through his system in the following video (however it's in his native Romanian).

Nevertheless you can find all the details about his system including hardware details and the sketch from the Instructable page. And for more, we're on facebook, twitter and Google+, so follow us for news and product updates as well. 

If you're wanting to make your own Arduino-compatible project such as the auotmation system above, you'll need an ATmega328P MCU with Arduino Uno bootloader:

This is the same Atmel AVR ATmega328P microcontroller used in the official Arduino Uno, as well as our ElevenEtherTenUSBDroid, and other boards. Perfect for building your own Arduino-compatible project directly on a breadboard or on a custom PCB, or for replacing the MCU in an existing board. Comes with the Arduino Uno bootloader pre-installed. Better still, it even has a special label stuck on top with details of the pinout, so you don't even need to look up the datasheet when connecting it up in your project! For more information and to order, click here!

August 07, 2014

Convert a rotary telephone into an MP3 player

A relic of the previous century, the rotary telephone can still find a use in these modern times for the retro technology enthuisast. One example of this has been documented by Instructables member MrLeeh who has converted a vintage instrument into an MP3 player with a Raspberry Pi.

After removing the bell and other unnecessary electronics, new speakers were fitted inside the handpiece, and the dial connected to the Raspberry Pi's GPIO. With some simple software the user can choose the song to play and control the volume with the orginal dial. Furthermore a Pi shutdown button has been fitted to the rear - and the only external modification is a microSD socket instead of the telephone wall lead.

Very well done, and a great example of merging two technologies. For complete details, visit the project Instructable page. And for more, we're on facebookGoogle+, and twitter - so follow us for news and product updates as well.

Every day we find more uses for our PiBreak board - the great way to mount circuitry to your Raspberry Pi. It provides labelled breakout pins for all GPIOs, a large prototyping area with solder pads, and power rails for easy power connection:

Furthermore the PiBreak also includes mounting hardware to firmly attach it to your Raspberry Pi using a nut, bolt, and spacer - and is compatible with all revisions of both model A and B Raspberry Pi computers. For more information about our new PiBreak board, our Getting Started guide, and to order - visit the product page.

August 06, 2014

Simple home automation with Android and Arduino

Now and again a neat and simple home automation system is documented, and the latest example is by Instructables member ascas who has created a simple method of controlling up to eight mains power outlets via Bluetooth and an Android device.

An Arduino and Bluetooth module listen for serial commands from the Android device, and then control a bank of relays which take care of switching the mains current. And thanks to the ease of Android app development, Angelo has provided a neat switching app for the user interface.

As always we have to say, mains wiring can be fatal if handled incorrectly so get a licensed electrician, otherwise check out the Instructable to learn more about the project. And for more, we're on facebook, twitter and Google+, so follow us for news and product updates as well. 

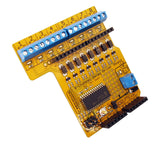
If you're looking for a simple way to control many relays from your Arduino, without using up all your digital I/O pins - check out our RELAY8: driver shield:

So what is the RELAY8:? It's an Arduino shield that allows you to drive up to 8 relays from your Arduino using just 2 I/O pins with this shield. It communicates with your board using I2C, so you can even stack several shields together to drive 16, 24, or more outputs! Includes back-EMF protection and works with a wide range of relays. Perfect for home automation projects! For more information and to order, click here

August 06, 2014

An Arduino-powered World Map Time Display

As an interesting art installation, reddit user ewoolsey has created an interesting and huge world-time clock. Instead of a simple digital display, they have instead created a giant abstract map of the world based from a Mercator projection, with holes drilled through the surface to represent land mass.

The time is then displayed by using RGB LEDs behind the holes, where the colour of the light represents the time over that area. Thus over time a sweeping motion of vertical colour bands will represent the change in time across the world.

Apart from being a neat art installation, a smaller (or larger) version would be great in an office with various outposts or in the study of a travel enthusiast. Either way, you can find more details through the creator's project gallery. And for more, we're on facebooktwitter and Google+, so follow us for news and product updates as well.

The most important part of any clock project is the inclusion of an accurate real-time clock IC. Here at Freetronics we have the Maxim DS3232 real-time clock IC module:

Apart from keeping accurate time for years due to the temperature-controlled oscillator and having a tiny coin-cell for backup, it is very simple to connect to your Arduino project. A driver library allows your program to easily set or read the time and date. Perfect for clock projects, dataloggers or anything that needs to know the date and time. Furthermore it contains a digital thermometer and 236 bytes of non-volatile memory to store user settings and other data. For more information, check out the module page here.

August 05, 2014

"Me Arm" - the inexpensive Arduino-powered robot arm

Making your own robot arm that can be controlled from an Arduino is a lot easier than you would first image, and a neat example of this has been demonstrated by Jack Howard with and Benjamin Grey with their "Me Arm" robot. One of the goals of the project was to produce a robot arm with less than an A4 sheet of acrylic and inexpensive servos.

As you can see from the video below, the goal has been met and once access to a laser cutter can be found, the robot arm could be constructed for well under fifty dollars. Then all sorts of control possibilties can be created.

To get started on your own version, you can find all the design files for the arm and example Arduino sketches on the project page. And for more, we're on facebookGoogle+, and twitter - so follow us for news and product updates as well. 

Have you been reading about Arduino and would like to understand more so you can work with projects like the example above, but not sure where to start? Then order one of our Experimenter's Kit for Arduino: 

The package includes a wide variety of parts, sensors and modules including: a servo motor, lights, buttons, switches, sound, sensors, breadboard, wires and more. Furthermore a Freetronics Eleven Arduino-compatible board is included to make this an extensive hobby experimenter, inventor and starter kit. 

However we don't leave you alone to figure it all out, included is a great project and instruction booklet, plus access to a supporting web page and software examples. In other words - this is everything you need to get started for a fun range of electronics and Arduino related projects! So to get started or for more information and to order, check out the product page.

August 05, 2014

Make your own ATtiny programming shield for Arduino

If you're interested in creating small Arduino-based projects in volume, or are interested in the possibilties with using smaller micrcontrollers then the ATtiny series will be of interest. In a smaller 8-pin package than the usual Arduino's ATmega328P-PU - they're cheaper but have less function. Nevertheless they're quite usable and can be programmed with the Arduino bootloader.

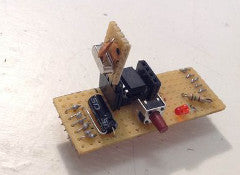
This process has been taken one step further by Instructables member bigboom378 whose ATtiny shield for Arduino makes programming these smaller cousins a snap. The circuitry is quite simple, and can fit on a fraction of a protoshield, for example:

Then after a quick download the Arduino IDE can work with the ATtinys. To learn howm visit the project Instructable page. And for more, we're on facebooktwitter and Google+, so follow us for news and product updates as well.

If you find yourself working with AVR-based projects or uploading firmware to various projects - then you'll need our USBasp - the USB in-circuit programmer for Atmel AVR controllers. Based on the original design by Thomas Fischel, it's fully compatible with the Arduino IDE and all three major operating systems, using the USBasp is a cinch.

You can select 3.3V or 5V target voltages, supply power to your project via the USBasp and even update the firmware on board yourself.  Furthermore we've included the ICSP cable and microUSB cable so it's ready to use out of the box. 

 For more information including our Getting Started guide, design information and to order - please visit the USBasp product page

August 04, 2014

Build a digital Zoetrope with Arduino

Many types of effects can be created with LEDs and movement, such as persistence-of-vision devices - and another example of this work is called the zoetrope. This is a device that can animate pictures by spinning incredibly fast, and with LEDs this can be reproduced with control via an Arduino.

Sholto Bateson has created his own version that is simple in execution but works quite well. Seven LEDs (and an Ardiuno-compatible board) are mounted on the shaft of a larger electric motor, and the rotations are detected using a hall-effect sensor. This allows the Arduino board to accurately control the LEDs with respect to the rotaional speed, and thus display various text or other graphic effects as shown in the following video:

A neat project and an object of interest to observers if mounted in a clear enclosure. For details to make your own version, visit the project page. And for more, we're on facebookGoogle+, and twitter - so follow us for news and product updates as well.

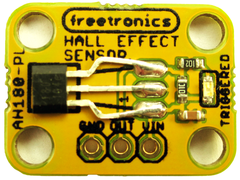
If you're interested in detecting changes in magnetic fields with your Arduino, you'll need a hall effect sensor and we have a convenient module just for the purpose - our HALL: Hall Effect Magnetic and Proximity Sensor Module. It operates on both 3.3 and 5V boards, can detect both north and south pole magentic polarity and shows when triggering is successful with a convenient LED. 

To learn more about the HALL: module, read our Quick Start Guide and to order, visit out HALL: product page.