January 19, 2015

Wake up without effort using this Arduino-controlled 600W wake-up lamp

If you have trouble waking up in the morning, and a loud alarm clock just isn't doing the trick - then another option may be to use a very bright lamp. Some can wake up when the bedroom light is turned on, so taking this theory to the next level Instructables member kerembasaran has solved the problem.

By creating a typical Arduino-controlled timing system with a real-time clock IC, the timing is takem care of - and this controls relays to switch on six 100W light globes. This combination could also be controlled gradually to emulate a retina-burning reproduction of a sunrise clock.

When building projects that involve mains current, check with the regulations in your area with regards to what you can do and what needs to be done by a licenced electrician. Otherwise for more details, check out the project's Instructable page. And  for more, we're on facebook, twitter and Google+, so follow us for news and product updates as well. 

If you're looking for a simple way to control many relays from your Arduino, without using up all your digital I/O pins - check out our RELAY8: driver shield:

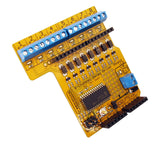
So what is the RELAY8:? It's an Arduino shield that allows you to drive up to 8 relays from your Arduino using just 2 I/O pins with this shield. It communicates with your board using I2C, so you can even stack several shields together to drive 16, 24, or more outputs! Includes back-EMF protection and works with a wide range of relays. Perfect for home automation projects! For more information and to order, click here

January 16, 2015

Build a "Charliecube" RGB LED Cube powered by Arduino

Building your own RGB LED cube is an interesting challenge, apart from the physical work required to carefully assemble your own the concepts with controlling the LEDs is also an interesting learning experience thanks to the concept of "charlieplexing" - controlling many LEDs from a few digital output pins on your microcontroller.

A great example of a home-made Arduino-powered RGB LED cube has been documented by Instructables member HippyNerd which results in a neat cube that instead of using PCBs for each later, relies on a very carefully-arranged network of bare single-core wire for rigidity and connection.

Apart from building the cube there's also some interesting explanation about how the circuit works. Finally, a demostration of the cube is shown in the following video:

For more informaiton cube and making your own, visit the project's Instructable page. And for more, we're on facebookGoogle+, and twitter - so follow us for news and product updates as well. 

If you're interested in RGB LED cubes - but not up for making one from scratch - check out our CUBE4: RGB LED cube kit:


It's easy to construct and use, and with an onboard Arduino-compatible board the cube can be used to display all sorts of data or create visual effects. It's easily controlled via simple text commands via the USB port - or write your own Arduino sketch. It's incredibly customisable and there's so much more. For more information and to order, visit the CUBE4 page

January 16, 2015

Stream temperature data from a Raspberry Pi

After experimenting with various sensors and a Raspberry Pi, the next thought is usually how to get the data from the sensor to the outside world. Doing so is quite easy thanks to the connectivity built into a Pi and using a cloud-based data gathering service.

An example of these services is initialstate and they have published a neat tutorial explaining how to stream temperature data from a DS18B20 temperature sensor to their online service.

The hardware connections are simple and should only take a few moments, followed by entering the python code. Then you can review the temperature from afar and share it with others if need be.

For more information about the tutorial and the service, visit the project's website. And for more, we're on facebookGoogle+, and twitter - so follow us for news and product updates as well. 

If you're interested in measuring termperature with a reliable sensor - consider using our TEMP: DS18B20-based temperature sensor module:

The TEMP: uses the Dallas DS18B20 1-wire digital temperature sensor, with a wide measurement range of -55 to +125°C at an accuracy of +/- 0.5°C. For more information, tutorials and to order - visit the TEMP: page

January 15, 2015

Build an electronic scorekeeper for card games and more with AVR

There's almost a limitless number of games that can be enhanced or helped along with an electronics project, and card games are not excluded from this arena. An example of this is by Instructables member mkanoap who has created a great electronic scoring system that's embedded into a storage box for the game in play.

The system is powered by an ATtiny2313 microcontroller, and keeps track of scores for between onen and four players. The system can be setup and controlled from one player's side of the board, and uses a MAX7219 LED display driver IC to manage the eight LED digits with ease. A quick demonstration of the system is shown in the following video:

Futhermore if you'd like to make your own version, everything from the code to the PCB design files are included, so visit the project Instructable page to get started. And for more, we're on facebookGoogle+, and twitter - so follow us for news and product updates as well. 

If you find yourself working with AVR-based projects or uploading firmware to various projects - then you'll need our USBasp - the USB in-circuit programmer for Atmel AVR controllers. Based on the original design by Thomas Fischel, it's fully compatible with the Arduino IDE and all three major operating systems, using the USBasp is a cinch.

You can select 3.3V or 5V target voltages, supply power to your project via theUSBasp and even update the firmware on board yourself.  Furthermore we've included the ICSP cable and microUSB cable to it's ready to use out of the box. 

For more information including our Getting Started guide, design information and to order - please visit the USBasp product page. And to keep up with product announcements, we're on twitter and Google+ - so follow us for news and product updates as well. 

January 15, 2015

Add secure access and logging to your garage door with Raspberry Pi

As the idea of home automation becomes more prevalent, many Raspberry Pi enthusiasts are turning to the platform for adding connectivity around the home, and one popular example is hacking the garage door opener. One example of this has been published by Instructables member AkiraFist whose garage door system is controlled via SMS text message and also logs access by time and video snapshot.

The hardware is quite simple - consistiing of a Raspberry Pi conencted to the intermet with a camera, and some external circuitry connected to the up/down button on a garage remote control fob. This saves having to construct a separate transmitter circuit. Then some clever software is used to parse an online SMS service (Twilio in this example) for commands to open or close the door, check the status or even shut it all down. Image data is logged to a webserver or this could be sent to Dropbox or other storage solutions.

An interesting interactive system that could also be used with a motion detector for security systems or other control-based projects. Either way, visit the project Instructable for complete details. And for more, we're on facebookGoogle+, and twitter - so follow us for news and product updates as well.

If you need to add external circuitry to your Pi, one option is to use our PiBreak board. It provides labelled breakout pins for all GPIOs, a large prototyping area with solder pads, and power rails for easy power connection:

Furthermore the PiBreak also includes mounting hardware to firmly attach it to your Raspberry Pi using a nut, bolt, and spacer - and is compatible with all revisions of both model A and B Raspberry Pi computers. For more information about our PiBreak board, our Getting Started guide, and to order - visit the product page.

January 14, 2015

Experimenting with graphics on the Freetronics Dot Matrix Display

Although most of our LED Dot Matrix Displays end up being used for large text or numerical displays, you can address each LED individually - and thus create all sorts of interesting displays and graphics.

One example of this has been demonstrated by Andrey Minin who has used two DMDs to create a 32 x 32 LED display with the following results:

Furthermore Andrey has also published a sketch to demonstrate this with our OLED display as well. To check out the sketches for yourself and more discussion - visit the Freetronics support forum. And for more, we're on facebookGoogle+, and twitter - so follow us for news and product updates as well. 

As used in the project mentioned above, check out our Freetronics Dot Matrix Displays. They're simple to use, yet very bright for indoor and outdoor situations. Available in various colours, the 32 x 16 LED matrix can display text and graphics quite easily - and can be daisy-chained together for extended displays. For more information, see our range of Dot Matrix Displays here

January 14, 2015

Interfacing a Punched Card Reader with Arduino

In the previous century early mainframe computers were programmed with a series of punched cardboard cards, with each card containing one instruction. These cards were placed in order into a reader device, which had sensors to detect holes in the card and converted the hole position into data. In hindsight this method may have seemed incredibly odd, but at the time it worked well.

As an interesting homage to the past, Kyle Owen has located a punched card reader, a deck of cards and successfully interfaced it to an Arduino board. With a relatively simple sketch the Arduino can interpret the data from the card reader and send it to the serial monitor - as shown in the following video:

An interesting example of old and new technology, and follow Kyle's YouTube channel for updates to this interesting project. And for more, we're on facebookGoogle+, and twitter - so follow us for news and product updates as well.

If you're looking for an Arduino Uno-compatible board to embed into various projects, choose what tens of thousands of others have done and use our Freetronics Eleven - the Arduino-Uno compatible with low-profile USB socket, onboard prototyping space and easy to view LEDs: 

January 14, 2015

Track body weight with Motivational Bathroom Scales

Keeping track of one's weight can often be a traumatic or difficult experience, especially when medical advice is that you're a little too heavy. Thus when it comes time to measure your body weight - it can often be a task that is avoided or hated.

However like most things a little motivation goes a long way, and including from your bathroom scales. With this in mind, Instructables member 10DotMatrix has used a Raspberry Pi, external circuitry and hacked some inexpensive digital scales to create a system that can play audio messages when taking your weight and also log the data and much more. 

Furthermore a good explanation of how digital scales work including the load cell is given, making this at least an interesting read. Finally a demonstration of the scales is shown in the following video:

For complete details, visit the project's Instructable page. And for more, we're on facebookGoogle+, and twitter - so follow us for news and product updates as well.
For projects that require interaction between an Arduino and a Raspberry Pi you can save time and space by using our new PiLeven board:

The PiLeven is an Arduino-compatible board based on the Arduino Uno, but with a few changes. Obviously it's a bit of a strange shape! The PiLeven fits right on top of a Raspberry Pi (either model B or B+) using the Raspberry Pi expansion headers.

The PiLeven also has a high-current switchmode power supply, so you can plug in anything from 7V to 18Vdc using the standard 2.1mm jack. The PiLeven can power the Raspberry Pi, so you don't need a regulated 5V USB connection anymore.

Serial communications on the PiLeven is linked through to the Raspberry Pi, so your Pi can upload new sketches straight to the PiLeven or send/receive data and commands. We've included level shifters so the 3.3V Pi can talk safely to the 5V PiLeven. And you can plug standard Arduino shields right into the PiLeven, giving your Raspberry Pi access to the huge range of shields already available. For more information about the PiLeven, including our tutorials - and to order yours today, visit the PiLeven webpage.


January 13, 2015

Build your own Arduino-based Pulse Sensor

As part of a university course, Orlando Hoilett was tasked with creating a pulse sensor and turned to the Arduino platform to solve the problem. The device is an interesting mix of analogue and digital electronics, that starts with the LED and IR photodiode to detect the pulse in a finger whose signal is then filtered and amplified for reading by an Arduino or compatible board.

Then the rest is quite simple, you can use all sorts of methods to display the pulse data from a flashing LED to feeding the data to a PC for graphing or logging as shown below:

Please note that such a device is not a replacement for certified medical equipment. Otherwise to learn more, visit Orlando's project page. And for more, we're on facebookGoogle+, and twitter - so follow us for news and product updates as well.

Need a small Arduino-compatible for use with your own portable projects? Then check out out our LeoStick. It's the Arduino Leonardo-compatible board that's cheaper and smaller than the original:

 Apart from being one of the smallest Arduino-compatibles on the market with USB, it also has an onboard RGB LED and piezo which can be used a knock sensor and various tune and sound effects. Plus you can add extra circuitry with the matching protostick! For more information and to order, click here.

January 13, 2015

Interfacing rotary telephones with Arduino

Old technology is often left by the wayside, which can be a great shame as with a little effort you can have some fun hacking them with more modern items - such as an Arduino or compatible board. One example of this is the classic rotary telephone - which is used in many fun projects as a form of user-input or even converted to a mobile phone.

However the concepts of converting the signals received from the dial into usable input with an Arduino may be confusing to some, so thanks to Instructables member guidomax you can get that phone back to work. They explain the connections required, som example circuitry to interface with your Arduino and also a demonstration sketch to finalise your knowledge.

So to get started, check out the Instructable page. And for more, we're on facebookGoogle+, and twitter - so follow us for news and product updates as well.

If you're looking to learn about Arduino development platform and how it interacts with external devices, you can't go past "Arduino Workshop -  A Hands-On Introduction with 65 Projects” by John Boxall.

Arduino Workshop takes the reader from having zero knowledge about the Arduino platform, electronics and programming and leaves them with the know-how and instructions on everything from blinking an LED, to robotics, wireless data, cellular communications, motor control, sensors, Internet connected systems and more. For more information including a sample chapter and table of contents, visit the book page