February 03, 2015

NEW - The Freetronics 170mm Electronics Ruler

New from Freetronics is our 170mm Electronics Ruler:

This is a great tool that will not only help you draw straight lines but us also covered with information that the electronics hobbyist or enthusiast will find of interest, such as:

  • Ohm's Law reference
  • Pinout of the AVR ICSP header commonly used on Arduino boards
  • Common PCB track widths in both metric and imperial
  • Electronics colour codes
  • Formulae for calculating resistance and capacitance in parallel and series
  • LED orientation guide
  • Pinout and colour codes for the common FTDI-type serial cable
  • Prefixes and multipliers for scale conversion

These great rulers are in stock now for only $4 including GST, so visit the product page for more information and to order! And for more - we're on facebookGoogle+, and twitter - so follow us for news and product updates as well.


February 02, 2015

Build a lightning trigger for your DSLR camera

Photgraphing lightning can be a difficult yet rewarding facet of the world of photography, and anything that helps with the process can be an interesting development. One example of this has been demosntrated by Uria Dubinsky who uses an light sensor and an Arduino to detect sudden changes in the ambient light, at which point the camera shutter is released.

The electronics behind the project are quite simple, and by modifying an inexpensive wired remote control for the DSLR camera you won't break the bank or the camera if wired correctly. With some calibration the system will detect when the sky brightens and hopefully capture the lightning.

To learn more about this project, visit Uria's Instructable page. And for more, we're on facebookGoogle+, and twitter - so follow us for news and product updates as well.

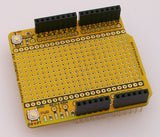
If you need to add external hardware or devices to your next Arduino project, you'll need a protoshield to mount the external circuitry. In doing so, consider our range of ProtoShields. From the tiny LeoStick to the Mega we have a wide range to suit your application.

February 02, 2015

Make an Arduino-powered single pixel camera

And now for something different we have an interesting project by Arduino enthusiast Jordan Blanchard who has created an interesting version of a digital camera with an Arduino. This example uses a single infra-red photodiode to measure the brightness of a certain point - which is considered one pixel of an image.

The IR diode is then swept across two dimensions, using servos for positioning - stopping to take a reading for each new pixel. The data is send back to a PC running some processing code which assembles the data into a finished image. An example of the photo editing is shown in the following video:

 You can learn more about this interesting device from the website (opens in Google Translate). And for more, we're on facebookGoogle+, and twitter - so follow us for news and product updates as well.

If you're looking for an Arduino Uno-compatible board to use with various projects, choose what tens of thousands of others have done and use our Freetronics Eleven - the Arduino-Uno compatible with low-profile USB socket, onboard prototyping space and easy to view LEDs: 

February 02, 2015

BACK IN STOCK - Freetronics EtherDue

We're proud to announce that the Freetronics EtherDue is back in stock for immediate shipment. Just like the Arduino Due, the EtherDue has oodles of ARM-based power - but with the Freetronics additions including Ethernet network connectivity, microSD storage and more - while retaining the simplicity and ease of the Arduino IDE (with 100% compatibility).

The EtherDue is designed to give you high performance connectivity, in an easy to program package. Based on the 84MHz 32-bit Cortex M3 ARM processor which is many times more powerful than the 8-bit AVR processors of earlier Arduino models - you also get a massive 96 kilobytes of RAM (12x the EtherMega) and 512 kilobytes of flash (2x the EtherMega) so there's tons of rooms for the most complex programs to run.


Connectivity options are plentiful too - there's USB device and host sockets, two I2C buses, SPI bus, CAN bus, four hardware serial ports, and a real 12-bit Digital to Analog converter for analog voltage output. And just like the rest of our Ethernet-enabled range the EtherDue provides a number of options for Power over Ethernet. You can use the supplied jumpers and feed 7-20Vdc down the wire for cheap DIY version, or you can use our PoE Regulator 802.3AF along with a proper commercial PoE injector or switch that supplies 48Vdc. It's up to you.

The EtherDue is in stock and ready to ship, so for more information including getting started guides, tutorials, and to order your own - visit the EtherDue product page. And for more - we're on facebookGoogle+, and twitter - so follow us for news and product updates as well.

January 31, 2015

Saturday delivery now available to metropolitan Melbourne, Ballarat, Bendigo and Geelong

Thanks to a new service from Australia Post we're now able to have orders to some Victorian customers delivered on a Saturday. If your postcode is within the new Express Post Victoria Saturday delivery postcode range** - you can now order by midday on Friday and receive your order on Saturday.

To have your Freetronics order delivered on a Saturday is simple:

      • Check your postcode is in the eligible area (listed below)
      • Enter "Saturday delivery" in the note section of your shopping cart - for example:

      • Then select "Express Post" as your shipping method in stage two of the checkout process.

          There is no extra charge for Saturday delivery - and your parcel will usually be delivered between 9am and 1pm. This service is available to:

          • residential addresses
          • 24/7 Parcel Lockers accessible on Saturdays
          • Post Offices and Mail Hubs that are open on Saturdays

          ** The postcode range eligible for Saturday delivery is as follows (as at 10th January 2014):

          • Melbourne and suburbs: 3000; 3002-3023; 3025-3062; 3064-3138; 3140-3158; 3160-3163; 3165-3175; 3177-3210; 3931; 3429; 3335; 3805; 3977
          • Geelong and suburbs: 3220; 3214-3216; 3219; 3228
          • Bendigo: 3550; 3555-3556
          • Ballarat: 3350; 3355-3356

           And to keep up with news, special offers and more from Freetronics, please follow us on facebook, twitter and Google+.

          January 31, 2015

          Make an Arduino-powered touch sensitive piano

          You can make all manner of musical instruments with an Arduino, from simple buzzers to creating MIDI interfaces and more, however standalone instruments are quite easy. This is demonstrated by Andrea Piombo & Silvio De Raeve who were tasked to build an interesting interactive device for a school project and created a neat piano with touch-sensitive keys.

          The keys are crated by cutting aluminium tape into the shape of a small piano keyboard, which are then considered capactive touch sensors by the Arduin sketch. Sounds are generated with simple functions and sent to a small speaker. Andrea and Silvio demonstrate their piano in the following video:

          To lear more about this project, visit the matching Instructable page. And for more, we're on facebook, twitter and Google+, so follow us for news and product updates as well.

          If you're interested in detecting vibrations or working with making sounds and tunes for various reasons, we have a neat little SOUND: sound and buzzer module:

          It can be used as a noise-maker driven by your microcontroller for audible feedback of events, and it can also be used as a knock-detector input to sense events and react to them. Includes a built-in 1M resistor to allow the piezo element to detect shocks. For more information and to order, please visit the product page here.

          January 30, 2015

          Build a password-protected laser trip wire alarm with Arduino

          An Arduino can be the starting point for replacing many consumer items, and one of these is an alarm system. With many inputs and outputs connecting various sensors and alarms is simple, and one interesting example of this has been documented by Ronnie Tucker.

          His system uses a laser trip wire as a main detector - the Arduino monitor the status of a light sensor with the laser pointing towards it - when the line is broken, the alarm can  be sounded. Furthermore, the system is activated or deactivated via a password or PIN entered with a numeric keypad. An example of operation is shown in the following video:

          This is also a great way of learning how to use numeric keypads with Arduino - which opens up all sorts of user-input options. For more infromation about this project, visit Ronnie's Instructable page.  And for more, we're on twitter, facebook and Google+, so follow us for news and product updates as well.

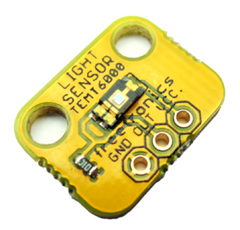
          If you need a light sensor, you can maintain constant reliable results with our LIGHT: light sensor module:


          Our tiny light-sensor module uses the very-reliable TEMT6000 light sensor, which gives consistent and repeatable readings even between different units - unlike cheapie light-dependent resistors, which can vary dramatically in their sensitivity. So for reliable light sensing - look no further

          January 29, 2015

          Experimenting with Arduino and Orchestrate online database service

          Gathering data with an Arduino is quite a simple task, however accessing the data from a remote location can present various hurdles which can be difficult for some users to overcome. Thankfully there are various online services that can simplify the process, and one of these is Orchestrate - an online database service for rapid application development.

          Although that sounds like a mouthful, Orchestrate can also be used to receive data from an Arduino connected to the Internet via a host PC, for later retrieval and analysis. The team from Orchestrate have published a simple tutorial that shows us how to do just that - by logging some temperature data. However this can also be used an example to log almost any type of data that can be gathered with our Arduino-compatible boards.

          For details about the tutorial and online service, visit the Orchestrate website. And for more, we're on facebookGoogle+, and twitter - so follow us for news and product updates as well. 

          Looking for an Arduino-compatible for use with Internet-connected projects that doesn't require a host computer? Then check out the Freetronics EtherMega:

          Quite simply the EtherMega is the fully-loaded Arduino-compatible board on the market today. Apart from being completely Arduino Mega2560-compatible, it includes full Ethernet interface, a microSD card socket, full USB interface, optional Power-over-Ethernet support and still has a circuit prototyping area with extra I2C interface pins. So if your project is breaking the limits, upgrade to the EtherMega today. 

          January 28, 2015

          Control LEGO Power Function trains with Arduino

          Although many LEGO train fans may disagree, the latest "Power Function" system used to control the trains via infra-red has an interesting benefit in that almost any device with an appropriate IR transmitter can control the trains - including Arduino. 

          The process to control trains in this manner is being documented on the LEGOpal blog with some useful first starts. This includes the required circuit to connect an IR transmitter to an Arduino and the required library to make control easy. In no time at all you can send the signals for speed and direction control, a quick demonstration of which is shown in the following video:

          For all the details and to follow this interesting project, visit the LEGOpal website. And for more, we're on facebookGoogle+, and twitter - so follow us for news and product updates as well.

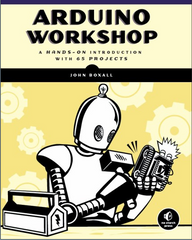
          If you're looking to learn about Arduino development platform and how it interacts with external devices, you can't go past "Arduino Workshop -  A Hands-On Introduction with 65 Projects” by John Boxall.

          Arduino Workshop takes the reader from having zero knowledge about the Arduino platform, electronics and programming and leaves them with the know-how and instructions on everything from blinking an LED, to robotics, wireless data, cellular communications, motor control, sensors, Internet connected systems and more. For more information including a sample chapter and table of contents, visit the book page

          January 27, 2015

          Using Arduino and a "Fox Hunt" Transmitter

          Some members of the amateur radio community enjoy various challenges, and one of these is the "fox hunt". This involves hiding a low-powered transmitter somewhere remote, which broadcasts a CW signal or message in Morse Code. Then the participants use their knowldge of radio to device antennas and locate the "fox".

          An example of a transmitter with an Arduino has been described by Dr. Carol F. Milazzo, KP4MD who uses a surplus modified sonobouy as a transmitter of a signal in morse generated by an Arduino-compatible board. This provides an inexpensive and robust target for the aims of any foxhunt. A quick demonstration of the ouput can be heard in the following video:

          For a detailed analysis of the project and some other interesting reading, visit Dr Milazzo's website. And for more, we're on facebookGoogle+, and twitter - so follow us for news and product updates as well.

          If you need to add external hardware or devices to your next Arduino project, you'll need a protoshield to mount the external circuitry. In doing so, consider our range of ProtoShields. From the tiny LeoStick to the Mega we have a wide range to suit your application.