February 09, 2015

Make Wireless Multi-Channel Voice-Controlled Electrical Outlets with Raspberry Pi

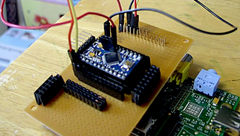
One of the benefits of a Raspberry Pi is the amount of CPU power available for the money, and ths can be harnessed for all sorts of uses - including voice recignition. Ben Finio has demonstrated a useful project based on this technology with his voice-controlled power points. Doing so is easy - by hacking the remote from a set of wireless outlets the Raspberry Pi can easily control them safely without any mains wiring.

Then it's a matter of configuring the Voice Command software which is available as part of the PiAUISuite (Pi Alternative User Interface Suite) by Steven Hickson.  This sends voice captured by a microphone on a connected USB camera to Google for recognition, whose results are then used by the software to control the wireless remote. Check out the following video for a demonstration:

To learn more about this interesting project, visit Ben's Instructable page.  And for more, we're on facebookGoogle+, and twitter - so follow us for news and product updates as well.

If you're making a similar project and need to control large currents with your Arduino digital outputs - you'll need a MOSFET. We've got you covered with out NDRIVE: N-MOSFET driver/output module:

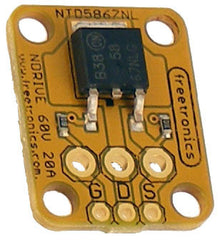
This high-power N-MOSFET module lets you switch high-current loads using a tiny microcontroller. Perfect for controlling that set of traffic lights mounted in your living room! Works brilliantly for automotive projects such as switching high-power 12V lights and high wattage LEDs. For more information and to order, visit the product page

February 09, 2015

Create a bridge between an Arduino-compatible and a Raspberry Pi

Each development board or platform has their own strengths and weaknesses - and often to solve a problem you may be faced with using two to solve a problem. A common example of this is the combination of a Raspberry Pi and Arduino - which can give your projects excellent Internet connectivity along with a hardy method of controlling GPIOs, external hardware and more.

This has been demonstrated by Instructables member thegrandel who shows us how to make an add-on board for a Raspberry Pi that contains a small Arduino-compatible board along with matching GPIO headers to slot over the Pi. They have also demonstrated the software angle - including sending data from the Arduino back to the Pi and vice-versa using a bash script to control the Arduino via serial communications.

For more information on this interesting device, check out the project's Instructable page. And for more, we're on facebookGoogle+, and twitter - so follow us for news and product updates as well.

If you're interested in a bridge between an Arduino and a Raspberry Pi, you can save time and space by using our new PiLeven board:


The PiLeven is an Arduino-compatible board based on the Arduino Uno, but with a few changes. Obviously it's a bit of a strange shape! The PiLeven fits right on top of a Raspberry Pi (either model B or B+) using the Raspberry Pi expansion headers.

The PiLeven also has a high-current switchmode power supply, so you can plug in anything from 7V to 18Vdc using the standard 2.1mm jack. The PiLeven can power the Raspberry Pi, so you don't need a regulated 5V USB connection anymore.

Serial communications on the PiLeven is linked through to the Raspberry Pi, so your Pi can upload new sketches straight to the PiLeven or send/receive data and commands. We've included level shifters so the 3.3V Pi can talk safely to the 5V PiLeven. And you can plug standard Arduino shields right into the PiLeven, giving your Raspberry Pi access to the huge range of shields already available. For more information about the PiLeven, including our tutorials - and to order yours today, visit the PiLeven webpage.

February 06, 2015

cuwire - a developing alternative to the Arduino IDE

Although the Arduino IDE that we know and love has evolved over time, other enthusiasts with experience of other platforms often look for alternative means of programming their Arduino. In some cases they even create their own replacements, and one example of this is cuwire by Ivan Baktsheev.

This comprises of two parts - a command-line tool to build and upload firmward to the board, along with act as a serial monitor - and a full IDE replacement in the form of a Brackets (open-source text editor) plug-in that is cosmetically pleasing and ripe for modification.

The entire project is open-source, so visit the github to get started. And for more, we're on facebookGoogle+, and twitter - so follow us for news and product updates as well.

If you're looking for an Arduino Uno-compatible board to use with various projects, choose what tens of thousands of others have done and use our Freetronics Eleven - the Arduino-Uno compatible with low-profile USB socket, onboard prototyping space and easy to view LEDs: 

February 06, 2015

Control AC outlets from your iPhone with a Raspberry Pi

There's almost an infinite number of combinations of possibilities when it comes to creating home automation projects, and one minimal example has been demosntrated by Instructables member Samuel LIU who shows how to control AC relays with his iPhone and a Raspberry Pi.

The communication between the two devices is via a local WiFi router, and both the iPhone and Pi are running python scripts to create an interface on the phone and for the Pi to interpret the incoming control requests and switch a GPIO pin for relay control. A quick demonstration is shown in the following video:

For complete details please visit the project Instrutable page. And for more, we're on facebookGoogle+, and twitter - so follow us for news and product updates as well.

If you're looking for a neat way to add external circuitry to your new Raspberry Pi model A+, B+ or 2 model B then check out our new PiBreak Plus Raspberry Pi Prototyping Board:

This is a great way to add your own electronic components, circuitry, sensors or other devices to your Raspberry Pi model A+, B+ or 2 Model B - any of the current Raspberry Pis with a 40 pin GPIO header. The PiBreak Plus also includes a GPIO female header to solder yourself, and a pair of nuts, bolts, washers and spacers to ensure a a great fit.

And in the Freetronics fashion we've used a quality gold-plated (ENIG) PCB for durability, brought out all the power rails along with the GPIO next to the prototyping area to make adding circuits a breeze. Furthermore the pinouts are labelled on both the top and bottom of the PCB to save time referencing the right GPIO pins. For more information and to order - visit the PiBreak plus page now!

February 05, 2015

SimpleBot Pi at the Linux Conference in Auckland

Twenty-four keen participants built their own automonous robot, named "SimpleBot Pi", last month as part of the Open Hardware MiniConf (co-organised by Jon Oxer) at Linux Conference Australasia in Auckland.

The SimpleBot Pi is the latest iteration of the open source SimpleBot design by fellow Melbournian Andrew Fisher. Andrew is part of a group called "NodeBots AU", who use the Node.js software platform and the Johnny-Five programming framework to introduce hobby robotics to beginners in a friendly fashion.

Electronically, the of SimpleBot Pi is made up of three boards in a top-to-bottom sandwich:

  • The SimpleBot Shield, assembled on the day, provides breakouts for various sensors, connectors, and the two continuous rotation servos that act as motors.
  • A Freetronics PiLeven provides an Arduino-compatible microcontroller attached to the Pi, for low level hardware control. The PiLeven's built-in switch-mode power supply also powers the Pi from the robot's battery pack.
  • A Raspberry Pi Model B+ provides a high-level WiFi-connected environment to control the robot, so it can interact with its environment.

The builders all had different levels of experience, but almost everyone had a working SimpleBot by the end of the build session.


One of the first uses for brand new SimpleBots was jousting! (or robot hugs, whichever you prefer.)


By the end of the conference a few people had programmed their SimpleBots to do more adventurous things, including Stephen's which sported a camera:

I even snagged a SimpleBot selfie:


SimpleBots (with their RGB LEDs flashing) also made a brief appearance in Thomas Sprinkmeier's excellent talk "How to train your minions", about having fun while teaching technology skills to kids:


If you're interested in learning more about the SimpleBot, a design overview and assembly steps are on the Open Hardware MiniConf Wiki. If all goes well, we are hoping to have some more SimpleBot kits available later in the year for intrepid robot builders! Keep an eye on our friends from NodeBotsAU as well.

Massive thanks to everyone helped us with Open Hardware MiniConf 2015 - including Vik Oliver, Andrew Fisher for all his SimpleBot work, Andy Gelme & Alec Clews from the Melbourne Hackerspace for their development work, the volunteers who came along on the day to provide soldering and troubleshooting assistance, and everyone who came to build a robot.

 The 2016 conference will be in Geelong. Hopefully we'll see you there!


February 05, 2015

NEW - PiBreak Plus Raspberry Pi Prototyping Board

Next in our growing line of Raspberry Pi products is our new PiBreak Plus for Raspberry Pi prototyping board kit. This is a great way to add your own electronic components, circuitry, sensors or other devices to your Raspberry Pi model A+, B+ or 2 Model B - any of the current Raspberry Pis with a 40 pin GPIO header:

The PiBreak Plus also includes a GPIO female header to solder yourself, and a pair of nuts, bolts, washers and spacers to ensure a a great fit:

And in the Freetronics fashion we've used a quality gold-plated (ENIG) PCB for durability, brought out all the power rails along with the GPIO next to the prototyping area to make adding circuits a breeze. Furthermore the pinouts are labelled on both the top and bottom of the PCB to save time referencing the right GPIO pins.

The PiBreak Plus is available now for only $8 including GST. And if you have a Raspberry Pi model A or B with 26-pin GPIO - check out our original PiBreak Raspberry Pi prototyping board.

Finally don't forget to keep up with new product updates, news and more from Freetronics by following us on facebookGoogle+, and twitter.

February 04, 2015

Using the true random number generator in the Arduino Due

Once again Kerry Wong has delved into the lower-level of our most powerful Arduino - the Due, and has explained the native true random number generator in the Due's Atmel SAM3X8E ARM Cortex-M3 CPU. The Arduino code required to enable the TRNG is quite simple, and the output can be signed or unsigned numbers centred around zero.

At first one would think that the generator isn't truly random, however Kerry's demonstration has shown that it works quite well and can be relied on, for example the following is a histogram of one million samples, that shows the even distribution:

All very interesting, and another reason to consider upgrading to a Due. For more information on the TRNG and other interesting articles, check out Kerry's detailed website. And for more, we're on facebookGoogle+, and twitter - so follow us for news and product updates as well. 

Looking for an Arduino Due-compatible board but with more connectivity possibilities and options than the original? Then check out our new EtherDue board:

It's the Arduino Due-compatible board with the Freetronics additions including Ethernet network connectivity, MAC address chip, microSD storage, optional PoE, upgraded power supply and more - while retaining the simplicity and ease of the Arduino IDE (with 100% compatibility). And you still have a full USB interface for uploading sketches and direct programming. For more information on this powerful board, check out the EtherDue product page

February 04, 2015

Experimenting with sound-controlled robotics

There are many forms of input that can be used to control an Arduino or compatible boards, and one of these is sound. This can be used not only for complex signal analysis but also detection of short, sharp sounds such as clapping.

A demonstration of this has been documented by Instructables member YadaP who has created a clap-controlled robot. The output from a microphone sensor module is measured by one of the analogue input pins and once a threshold input as been exceeded, the signal can be interpreted as required. And thus claps can be detected as used with this project.

To learn more about this project, visit the Instructable page. And for more, we're on facebookGoogle+, and twitter - so follow us for news and product updates as well. 

If you're interested in experimenting with sound and your Arduino or other development board, our Freetronics MIC: microphone and sound module is perfect. 

The MIC: contains an integrated dual signal amplifier converts the sound to separate channels for pulse / frequency measurement, and sound volume (pressure) level. Designed to connect straight to an Arduino compatible microcontroller, Analog to Digital converter, or many other circuits. For more information and to order click here.

February 03, 2015

Measuring water tank levels with Arduino

Taks that may have been difficult or dangerous in the past can be assisted with the help of an Arduino, and one example of this is measuring the levels of water tanks. This is especially so when dealing with older rural tanks as some may have frames aged beyond their design.

Therefore we can turn to the Arduino world and inexpensive ultrasonic distance sensors to determine the volume of water left in a tank with the help of a project by Instructables member vonPongrac. The sensor can feed back the distance to the water level to the Arduino, and the sketch can use some basic maths to determine the volume of water in the tank based on the radius and height.

Furthermore once this system is in place, all manner of logging volume over time and other data can be collated for better usage analysis. For more information about such a project, visit the Instructable page. And for more, we're on facebookGoogle+, and twitter - so follow us for news and product updates as well.

If you're looking to learn about Arduino development platform and how it interacts with external devices, you can't go past "Arduino Workshop -  A Hands-On Introduction with 65 Projects” by John Boxall.

Arduino Workshop takes the reader from having zero knowledge about the Arduino platform, electronics and programming and leaves them with the know-how and instructions on everything from blinking an LED, to robotics, wireless data, cellular communications, motor control, sensors, Internet connected systems and more. For more information including a sample chapter and table of contents, visit the book page

February 03, 2015

Make an Arduino-powered thermal camera

Thermal cameras are an interesting tool that can describe the varying temperatues across a small area using colour or other methods, and in some cases the resulting "thermal image" can help define what's located in the area (for example a warm human in a cold area).

If this is of interest, you can make your own version with an Arduino, PC and some basic external hardware and this has been demonstrated by Arduino forum member alina. His system uses two servos that change the direction of a thermal sensor across an area, whose reading is measured at every point and sent back to a PC

The data is then analysed by a python app on the PC and converted into a colour image which is a representation of the heat in the measured area, such as the example below.

Although the process takes time thanks to the speed of servos moving the sensor, it's a fun project and shows what can be possible with an Arduino. For details on this project and links to the required code, login to the Arduino forum. And for more, we're on facebook, twitter and Google+, so follow us for news and product updates as well. 

If you're looking to make your own version of a thermal imaging device, consider our Freetronics IRTEMP: module:


It's perfect for contactless temperature measurement. This is our special version of the industrial infrared remote thermometer units with an onboard power supply, communication support and a software library and examples supplied. Very simple to use with an Arduino as we have provided a Getting Started guide and Arduino library. For more information and to order, click here.