February 23, 2015

Make a Nixie-tube Temperature Display

Although they are a technology from years gone by, the effects of using Nixie tube are still a wonder and help keep alive a classic form of data display that was popular before the advent of LEDs, LCDs, and other methods we take for granted.

A fine example of a Nixie-tube project is the following temperature display by Sascha Grant. They've used ex-USSR IN12A numerical tubes driven by matching high-voltage shift registers with a small neon tube for the decimal point. Temperature is measured by a DS18B20 with the display controlled by a small Arduino-compatible board. Finally the system is mounted inside a custom enclosure which doesn't detract from the overall look and feel

For more information on this display project, visit Sascha's github page. And for more, we're on facebookGoogle+, and twitter - so follow us for news and product updates as well. 

If you're interested in measuring termperature with a reliable sensor - consider using our TEMP: DS18B20-based temperature sensor module:

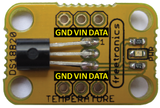
The TEMP: uses the Dallas DS18B20 1-wire digital temperature sensor, with a wide measurement range of -55 to +125°C at an accuracy of +/- 0.5°C. For more information, tutorials and to order - visit the TEMP: page

February 23, 2015

Build a digital anti-procrastination box

Now and again you may become quite hooked on a mobile game app or other device which can be used to waste time very quickly. Alexis Matelin had the same problem and solved it quite neatly with their Arduino-powered digital anti-procrastination box.

 The box can be any size, which is locked using an Arduino-controlled solenoid. The amount of time the box stays locked is set by the user, who can first insert the offending time-burglar to have it out of reach for a period of time. It's a neat and clever solution, which is demonstrated in the following video:

This could also be used as a tool of discipline for younger children and also for fun. Either way, visit Alexis' website for details on making your own version. And for more, we're on facebook, twitter and Google+, so follow us for news and product updates as well.

Looking for a small Arduino-compatible board to embed in various projects? Then consider the Freetronics LeoStick - It's the Arduino Leonardo-compatible board that's cheaper and smaller than the original:

 Apart from being one of the smallest Arduino-compatibles on the market with USB, it also has an onboard RGB LED and piezo which can be used a knock sensor and various tune and sound effects. Plus you can add extra circuitry with the matching protostick! For more information and to order, click here.

February 20, 2015

Experimenting with MPPT solar battery charging with Arduino

Over the last few months Debasish Dutta has documented his ongoing work of designing a useful MPPT (Maximum Power Point Tracking) solar charger unit, and recently the third revision has been published. The charger is based around an Arduino-compatible board, and allows for high charge and load current along with USB charging for portable devices and now with the use of an ESP8266 SoC module, data-logging via WiFi.

Originally the product of necessity, the solar charger project has evolved into a device which rivals commercial units at a much cheaper cost. This is a great example of what can be done with some time, research and inexpensive parts. Review the following video for more on this latest versIon:

For complete details on this series of solar chargers, visit the project's Instructable page. And for more, we're on facebook, twitter and Google+, so follow us for news and product updates as well. 

Looking for a rapid-use LCD for your Arduino (or Raspberry Pi) projects? Save time and move forward with the Freetronics LCD & Keypad shield which contains a bright 16x2 character LCD and five buttons that can be read from only one analog input pin:

February 20, 2015

Controlling RGB LEDs from Android devices with Arduino

Creating your own smartphone apps for Android is quite easy thanks to the free MIT App Inventor environment, and a neat demonstration of this has been provied by Kevin Chen whose RGB colour display app shows how to send serial data over Bluetooth from an Android smartphone in order to control an RGB LED.

Although this is a minimal application, Kevin has provided both the Arduino sketch and the sequence of events for the MIT App Inventor, so you can rapidly get an understanding of how apps are created with this live example. Finally, you can see this in action through the following video:

To get started, visit Kevin's project site. And for more, we're on facebookGoogle+, and twitter - so follow us for news and product updates as well.

As part of the Arduino and Bluetooth experience you'll need a Bluetooth device for your Arduino projects, and to meet this need we've released our new Freetronics Bluetooth Shield:


We've made it simple to use - the Bluetooth Shield acts as a serial link between the other Bluetooth device. Furthermore there's a wide range of jumpers allowing you to select which digital pins to use for data transfer, increasing compatibility with other shields. And with our Quick Start guide it's easier than ever.

Our Bluetooth Shield for Arduino is now in stock and ready to ship, so for more information and to order - visit the shield's product page.

February 19, 2015

Introduction to Arduino and LabVIEW

Many students of engineering and those in related fields of employment often use LabVIEW software by National Instruments, as this provides a graphical programming platform for various technical solutions from data capture, insturment control, automating test and much more. Along with the other features one can also harness an Arduino for integration into a LabVIEW application.

This hasn't been the easiest of processes, however thanks to Instructables member Deyson has created a simple example which includes installation and some code to create a temperature sensing-device with an Arduino and temperature sensor. All the code is included for download and you'll be up and running in no time.

To get started, visit the tutorial's Instructable page. And for more, we're on facebookGoogle+, and twitter - so follow us for news and product updates as well.

If you're looking for an Arduino Uno-compatible board to use with various projects, choose what tens of thousands of others have done and use our Freetronics Eleven - the Arduino-Uno compatible with low-profile USB socket, onboard prototyping space and easy to view LEDs: 

February 19, 2015

Experimenting with Arduino to control interactive sculptures

One of the original goals of the Arduino project all those years ago was to make it easy to use for artists and creatives, and of course this goal has been exceed many times over. An example of an Arduino and art has been documented by Anaisa Franco who uses the platform in the heart of her latest creation - "Interactive sculpture - Externalising Data".

The sculpture detects the presence of people around it using an ultrasonic sensor, and once detected music is played and various effects generated with LED strip lighting. Although the electronics may be simple to some of us, this project shows can anyone can create their own interactive projects without much work at all, for example:

For more details about the sculpture, visit Anaisa's project page.  And for more, we're on facebookGoogle+, and twitter - so follow us for news and product updates as well.

If you're making a similar project and need to control large currents with your Arduino digital outputs - you'll need a MOSFET. We've got you covered with out NDRIVE: N-MOSFET driver/output module:

This high-power N-MOSFET module lets you switch high-current loads using a tiny microcontroller. Perfect for controlling that set of traffic lights mounted in your living room! Works brilliantly for automotive projects such as switching high-power 12V lights and high wattage LEDs. For more information and to order, visit the product page

February 18, 2015

Logging temperature to SD card with the Freetronics EtherTen

Once again Mr Hobbyelectronics has published another interesting and useful video, and in this edition explains how easy it is to log temperature data from a DS18B20 digital temperature sensor to an Arduino-compatible with an SD card socket. 

In this example a Freetronics EtherTen and TEMP: module have been used, a conveinent combination as the EtherTen has an onboard microSD socket. Review the following video to see it all come together:

For more information including the required Arduino sketch, visit the video YouTube page. And for more, we're on facebook,twitter and Google+, so follow us for news and product updates as well.

When putting together your next Internet-enabled Arduino project - save time, space and money with the Freetronics EtherTen. Apart from being fully Arduino Uno-compatible, it has onboard Ethernet, microSD socket, full USB interface (so you don't need a costly FTDI cable just to upload a sketch!) and supports optional Power-over-Ethernet.

February 18, 2015

Program an Arduino over WiFi with ESP8266

Now that the inexpensive ESP8266 WiFi modules are finding their ways into the hands of experimenters, some interesting and useful applications are being developed. One of these is a wireless method of uploading Arduino code .hex files over WiFi. 

This has been demonstrated by Oscar from ORP Systems us quite automated and simple once installed. The Arduino connects to a server over WiFi and listens for a "reboot" command - at which point it resets, enters the bootloader and the server streams the .hex file over WiFi to the Arduino, updating the code. A demonstration is shown in the following video:

For complete details including the server-side python code, check out Oscar's website (opens in Google Translate). And for more, we're on facebookGoogle+, and twitter - so follow us for news and product updates as well.

If you're starting out with ESP8266 WiFi serial modules, save time and eliminate risk by using our new ESP-01 WiFi Module shield for Arduino:

Our new shield has a socket that's perfect for the ESP-01 module, and addresses all the needs of the ESP8266 - such as:

  • 3.3V regulator dedicated to the module to ensure sufficient current capacity
  • Logic level shifters on TX/RX lines: compatible with both 3.3V and 5V Arduino models
  • Selectable TX/RX pins: use D0/D1 for hardware serial, or D2 - D7 for software serial
  • CH_PD pin on ESP-01 module pre-biased for correct operation mode
  • Extra ESP-01 pins broken out for your own connections
  • Prototyping area with 5V and GND rails
  • All Arduino headers broken out for easy connections
  • Stacking R3-style Arduino headers including the ICSP header

So don't fiddle with jumper wires or sub-standard power supplies - order your the Freetronics ESP-01 WiFi Module Shield today. They're in stock right now for only $14 including GST.

February 17, 2015

Build an ambient sound VU meter with Arduino

A VU meter is an interesting tool which you may have seen on older Hi-Fi components as the display of LEDs or a moving meter to the music was always an interesting feature - however their purpose was to display the "loudness" or signal level of an audio input.

You can make your own version quite easily with an Arduino and some external circuitry, thanks to the team at the ArduinoHacks website. They demonstrate how to build a simple preamp circuit with the classic LM386, and convert the signal into one suitable for measurement with an Arduino's ADC pin. The matching sketch then translates the levels into a display with the use of six LEDs - or you could use another form of output to your liking. A demonstration of this is shown in the following video:

For complete details, visit the project's website. And for more, we're on facebookGoogle+, and twitter - so follow us for news and product updates as well.

If you're interested in experimenting with sound and your Arduino or other development board, our Freetronics MIC: microphone and sound module is perfect. 

The MIC: contains an integrated dual signal amplifier converts the sound to separate channels for pulse / frequency measurement, and sound volume (pressure) level. Designed to connect straight to an Arduino compatible microcontroller, Analog to Digital converter, or many other circuits. For more information and to order click here.


February 17, 2015

A fully-automated LEGO train coal terminal controlled by Arduino

Over the past few months we've been tracking the progress of YouTube member almightarjen, as they've been documenting their progress of automating LEGO train sets with electronics and various Arduino-compatible circuits. From basic level crossing controls to automating crossovers to prevent an accident, the systems have become more complex.

And finally all of their hard work has come together, which has resulted in a fully-automated LEGO coal train and terminal system. Trains are controlled, loaded with coal, run around the rail system - and then the coal is dumped just as in real life. If you have a few moments sit back and enjoy the following video:

Kudos to the almightarjen for sharing their Arduino and LEGO work with us. Subscribe to their YouTube channel for much more information and demonstrations. And for more, we're on facebookGoogle+, and twitter - so follow us for news and product updates as well.

If you're looking to learn about Arduino development platform and how it interacts with external devices, you can't go past "Arduino Workshop -  A Hands-On Introduction with 65 Projects” by John Boxall.

Arduino Workshop takes the reader from having zero knowledge about the Arduino platform, electronics and programming and leaves them with the know-how and instructions on everything from blinking an LED, to robotics, wireless data, cellular communications, motor control, sensors, Internet connected systems and more. For more information including a sample chapter and table of contents, visit the book page.