September 04, 2016

Skill Sunday: Magnetic Stripe Decoder

This week on Skill Sunday we will be learning how to get your Arduino to talk to a magnetic stripe reader. Having control over a magnetic stripe reader opens up lots of possibilities such as adding swipe card access to one of the doors around your home. Instructables member powerpants has put together a fantastic guide which details every aspect of using a magnetic stripe reader from the wiring to full code examples. You can checkout the instructions here.

Magnetic Stripe Decoder

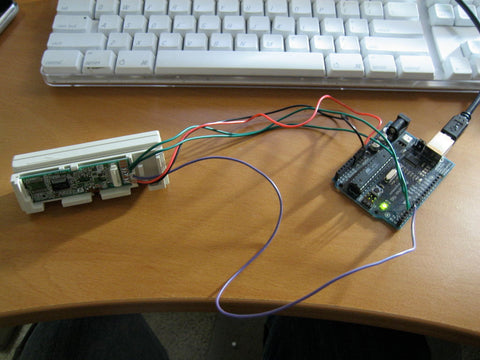
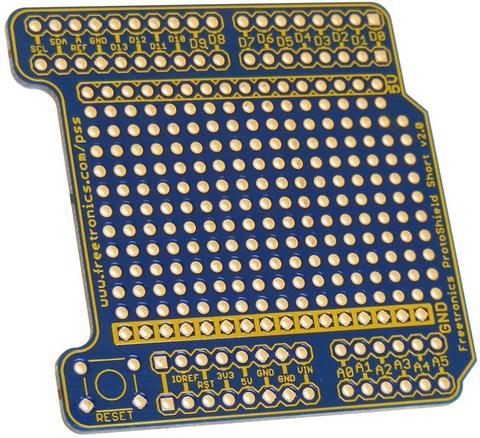
If you are looking to get started making working with a magnetic stripe reader, why not check out our own ProtoShield for Arduino. The ProtoShield is an excellent tool to turn your temporary, breadboarded project into something more permanent. Proto Shields fit directly onto an Arduino board and have a large general purpose area in the middle where you can solder on your own parts to create a durable, long lasting project! The ProtoShield is a high quality, corrosion resistant gold plated PCB and represents great value at only $3! To find out more about our fantastic ProtoShield’s check out the product page.

ProtoBoard

Have a use for a magnetic stripe decoder? Let us know in the comments section below or on Facebook and Twitter.

September 02, 2016

Make Your Own Musical Stairs

If you love music but also enjoy working with electronics, this could be the project for you! Instructables member helenbang has created her own musical stairs.

Stairs

As you walk up and down the stairs different notes are sent to a synthesizer on your computer. Each stair contains a sensor module which includes an IR sensor which allows the Arduino Uno controlling the project to know which stairs are occupied and which notes to play! You can watch her attempt to play happy birthday on her musical stairs in the video below:  


This is a really fun project! To get started building your own musical stairs check out the full instructions, including code samples, at the following link.

If you are looking for an Arduino board to power your musical stairs why not check out the Freetronics “Eleven” Arduino Compatible Board.  

Eleven

The Eleven is just like an Arduino Uno (and 100% compatible), however the Freetronics team have made a number of improvements to the Arduino Uno design such as adding in a prototyping area, using a micro-USB connector and many more. These improvements mean that the Eleven is as easy to use as possible and is of the highest quality! To find out more about the fantastic Freetronics Eleven check out the following link

Considering making your own musical steps? Let us know in the comments section below or on Facebook and Twitter.  

September 01, 2016

New Stock!

We are very excited to let you know that we have just received a shipment with lots of new stock! Items back in stock include our Real Time Clock Module, USB LiPo Charger, H-bridge, N-MOSFET Driver, LeoStick, Hall Effect Sensor, Red Dot Matrix Display, Humidity Sensor and our OLED Display Module. There has never been a better time to start a new project! If you are struggling to think of project ideas have a browse through our blog.

OLEDDMD

HumidityUSB LiPo

Already working on  a project you want us to feature in this blog? Know someone who has been anxiously waiting for one of these products to come back in stock? Let us know in the comments section below or on Facebook and Twitter.   

August 31, 2016

LeoStick Review

Our fantastic LeoStick has just come back in stock! The LeoStick is very similar to an Arduino Leonardo, however it comes in a compact, convenient USB stick style format! If you have been wondering what our LeoStick is and what makes it so fantastic, now is the perfect time to find out. However, rather than telling you ourselves, we thought we would share a review written by Simon Monk. You can check it out at the following link.


If you want to order a LeoStick you can find out more information on the product page.

LeoStick

Want to share your own thoughts about the LeoStick? Working on a project you want us to know about? Let us know in the comments section below or on Facebook and Twitter.  

August 30, 2016

Build Your Own Breathalyzer

If you have been reading our blog over the last few months you have probably read about the awesome Arduino homebrew controller or the Arduino cocktail maker. After writing about these projects we thought that it was only fair that we also let you know about Bot1398’s Arduino Breathalyzer. After all, it is important to make sure that your friends are safe to drive themselves home after partaking in some of your home brewed beers!

Breathalyzer

This project uses an alcohol sensor to provide an estimation of your blood alcohol content. If you are wanting to develop your soldering skills and build something which could genuinely be useful, this is definitely a great project to get started on. You can find out more at the following link.   

If you are looking to get started making your own breathalyzer, why not check out our own ProtoShield for Arduino. The ProtoShield is an excellent tool to turn your temporary, breadboarded project into something more permanent. Our ProtoShield fits directly onto your Arduino board and has a large general purpose area in the middle where you can solder on your own parts to create a durable, long lasting project! The ProtoShield is a high quality, corrosion resistant gold plated PCB and represents great value at only $3! To find out more about our fantastic ProtoShield’s check out the product page.

ProtoShield

Think that you would find having your own breathalyzer useful? Know someone who definitely needs this project? Let us know in the comments section below or on Facebook and Twitter.   

August 29, 2016

Plot Clock

Looking for a unique project to develop your skills? Sick of telling the time on boring analog or digital clocks? With this awesome project from Kjetil Egeland you can build your own “plot clock”.

Plot Clock

This clock uses servos to draw the time on a white board, rub the time out, and then redraw the time. All of this is controlled using an Arduino Uno and a real time clock module to keep the clock in time!  This project is sure to be a hit with your friends and put your knowledge to the test. You can checkout the “plot clock” in action below or find out more at the following link.


 If you are looking for an Arduino board to work on this hack why not check out the Freetronics “Eleven” Arduino Compatible Board.  

Eleven

The Eleven is just like an Arduino Uno (and 100% compatible), however the Freetronics team have made a number of improvements to the Arduino Uno design such as adding in a prototyping area, using a micro-USB connector and many more. These improvements mean that the Eleven is as easy to use as possible and is of the highest quality! To find out more about the fantastic Freetronics Eleven check out the following link. The Eleven has just come back into stock so order soon to avoid missing out!

Inspired to make your own plot clock? Let us know in the comments section below or on Facebook and Twitter.  

August 26, 2016

Experimenters Kit Video Series

If you have been reading our blog recently and have been inspired to create your own Arduino project but have no idea how to get started, the Freetronics Experimenters Kit is a fantastic tool to help you learn the skills you will need to work on more advanced projects. YouTuber Pancake has put together a fantastic series of videos which demonstrates the final result of each of the projects in the Experimenters Kit! You can check out the first video below:


These videos are a really useful resource if you are thinking about buying the experimenters kit and want to find out more about it, or if you are working through the experimenters kit and want to make sure you are on the right track!

Experimenters Kit

The Experimenters Kit includes a wide range of parts including a servo, sensors, lights, buttons, a sound module and more. Importantly, a Freetronics Eleven Arduino-compatible board is included to ensure that the kit contains everything you need to get started with Arduino. All these great parts would be useless without some form of instructions which is why we have developed a comprehensive project and instruction booklet to get you started. Check out the product page to find out more.

Worked through our Experimenters Kit before? Keen to get started? Let us know in the comments section below or on Facebook and Twitter.  

August 25, 2016

DIY Public Transport Tracker

Are you someone who is always running late? Are you frustrated when you miss a train or bus and are left waiting outside for 20 minutes before the next service? With this cool project you can use a DMD (dot matrix display) to display the upcoming times for public transport services you regularly use. You can put this display up on your wall at home and (assuming public transport is GPS tracked in your city) automatically display the upcoming train or bus time predictions. This is sure to give you the motivation you need to make sure you are ready on time! You could even use this project to display upcoming weather forecasts so that you can make sure to dress appropriately for your trip. This project runs of a Raspberry Pi but could easily be adapted to run off an Arduino you prefer. To find out more about this awesome project check out the following link!

Transit Display

If you are looking for an LED dot matrix display to use in this project why not check out our range of displays. They are simple to use, yet very bright for indoor and outdoor situations. Available in various colours, the 32 x 16 LED matrix can display text and graphics easily, and can be daisy-chained together for extended displays. For more information, see our range of Dot Matrix Displays here.

Freetronics DMD

Working on a project you would like us to feature on this blog? Think you would find a transit display useful? Let us know in the comments section below or on Facebook and Twitter.  

August 24, 2016

Awesome Arduino Garden Lights

Have you ever thought it would be cool to nicely light up your garden? With this cool project from Steve8428 you can use addressable RGB LEDs to create a spectacular, dynamic garden lighting display.  The lights are made out of pipe off cuts and controlled by an Arduino. This is quite a basic project but that doesn’t mean that the result isn’t impressive!

Garden Lights

You could easily integrate this lighting system into an existing home automation system and change the mood of your garden from your phone or even automatically based on the time of year. If you can’t wait to get started sprucing up your garden you can check out the project at the following link.

Garden Lights

If you are looking for some addressable RGB LEDs to use in this project check out the FreePixel.

FreePixel

This is a colour LED with a brain! Includes a bright WS2812B addressable RGB LED. This smart module can be daisy-chained, so you can connect a number of these together in a string and drive each of the module colours individually from your microcontroller. To find out more or to order check out the following link.

Inspired by this project? Working on a project you would like us to feature in this blog? Let us know in the comments section below or on Facebook and Twitter.  

August 23, 2016

Motion Following Motorized Camera Base

Do the blindspots in your static security camera system cause you to sleep uneasily at night?  With this motion tracking camera system designed by Lindsay you can remove blind spots and ensure that your cameras will always be recording any intruders!  The project uses a motion sensor and servo to rotate a camera to ensure it is always facing the action. To get started on this cool project check out the following link. Full instructions, schematics and source code have been provided so you should have everything you need to get started.

Camera Base

If you are looking for an Arduino board to work on this hack why not check out the Freetronics “Eleven” Arduino Compatible Board.  

Eleven

The Eleven is just like an Arduino Uno (and 100% compatible), however the Freetronics team have made a number of improvements to the Arduino Uno design such as adding in a prototyping area, using a micro-USB connector and many more. These improvements mean that the Eleven is as easy to use as possible and is of the highest quality! To find out more about the fantastic Freetronics Eleven check out the following link. The Eleven has just come back into stock so order soon to avoid missing out!

Working on a project you would like us to feature on this blog? Let us know in the comments section below or on Facebook and Twitter.