July 20, 2012

Build an LCD Temperature Monitor with history graph

 Using only a 16x2 character LCD, temperature sensors and the usual Arduino-style board, DJ Mentzik has created a useful and informative digital thermometer that also shows the temperature history using some customised characters display on the LCD. To keep the display under control, each segment of the graphical display is an average of the last ten samples. However this could always be changed by editing the sketch. The following is quick demonstration of the display at work:


As you can see from the video the display is quite informative considering the screen real-estate available. For more information, notes and the Arduino sketch visit the project page here. And we're on twitter, so follow us for news and product updates as well. 

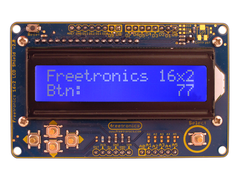
When looking for parts for your own thermometer (apart from a range of Arduino-compatible boards and hardware) we have our LCD & Keypad shield which contains a bright 16x2 character LCD and five buttons that can be read from only one analog input pin:

... and a perfect match would be our TEMP: temperature sensor, which uses the Dallas DS18B20 1-wire digital temperature sensor, which has a range of -55 to +125°C at an accuracy of +/- 0.5°C:


July 20, 2012

DIY Movement-activated Siren Box

 Just for fun and to prank people those sorts of people that can't or won't follow instructions comes this movement-activated siren box. Quite simply, there is a Freetronics Arduino-compatible board connected to our accelerometer board, a tilt switch and a very loud 120 dB siren fitted inside an officious-looking box. The tilt switch keeps the power off until someone picks up the box, then the accelerometer detects movement after a few seconds. Excellent joke and fun for around the office. Maybe. 


For more information, inspiration and the Arduino sketch, visit the project page here. And we're on twitter, so follow us for news and product updates as well. 

To get started with your own siren box, you will need our simple to use AM3X: accelerometer module, which can detect movement on all axes up to 6G, and freefall as well:


July 20, 2012

Arduino-based Internet-controlled sprinkler system

 Instead of paying for a commercial sprinkler timer control computer, Arduino enthusiast "nicoo" devised his own system based on an Arduino with Ethernet connection, connected relays to control solenoid valves and related circuitry. The next result is a system that waters the garden on a timer - except when rain is forecast (weather information is scraped from a website), can be controlled over the web, and tweets the results of the watering when it's finished. Now that's automation...


Although it may sound complex, when broken down into smaller parts it is quite simple. So to get started, check out the instructions page here. And we're on twitter, so follow us for news and product updates as well. 

Moving forward you can use less parts than the original with some new products from Freetronics. The system base could be handled with Freetronics EtherTen. Apart from being fully Arduino Uno-compatible, it has onboard Ethernet, microSD socket and supports optional Power-over-Ethernet:


July 20, 2012

Say goodbye to zombie Arduino-based prototypes...

 Cursed with the problem of finding Arduino-based prototypes without any reference to their original source code, Dave Vondle at IDEO Labs as created a simple yet elegant solution with two parts. The first is a modification to the Arduino IDE that allows uploading the sketch directly to github. During the upload process, the individual USB serial number is attached to the upload. The second and best part is - you can then plug in the Arduino board and retrieve the last uploaded sketch from that board from garithub back to the IDE. Magic!


The only caveat is that you need an Arduino board with inbuilt USB, so it won't work with simple bare bone boards or the Arduino Ethernet model. Luckily all of our Arduino-compatible products have USB except for the KitTen. Nevertheless, for more information, instructions and notes visit the IDEO Labs site here. And we're on twitter, so follow us for news and product updates as well. 

And back to the KitTen. Not a cat, but a simplified Arduino Duemiladieci-compatible board in kit form:


 Great for embedding into more permanent Arduino-based projects, fun for those who enjoy soldering, and inexpensive compared to assembled boards with USB - yet still with the great quality PCB and Freetronics-styled design and finish. 

July 20, 2012

Build your own Arduino-based home thermostat

 Enthusiast Graham McMicken has designed and built an impressive Arduino-powered home thermostat system that not only looks good, but has a graphical user interface and also infrared remote control. Based on an Arduino Mega, real-time clock IC and various 1-wire temperature sensors, the final result is a winner. 


Impressive! This is an excellent example of how you simultaneously build your own replicas of commercial products, learn something and save money. For more information, visit Graham's detailed website here, and examine the sketch here. And we're on twitter, so follow us for news and product updates as well. 

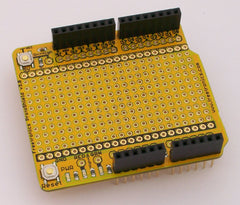
To get started with your own home thermostat, apart from a range of Arduino-compatible boards we have the super accurate DS3232 real-time clock module, DS18B20 temperature sensors, and a range of protoshields to mount the external circuitry. Furthermore, you could enable monitoring and control over the Internet by improving on Graham's design using a Freetronics EtherTen. Apart from being fully Arduino Uno-compatible, it has onboard Ethernet, microSD socket and supports optional Power-over-Ethernet:


:


July 20, 2012

Arduino and the Internet? Easy.

 From anecdotal experience we've found that a few people consider connecting an Arduino to the Internet a difficult process. However it is only a little more complicated than blinking a few LEDs - as the example sketches are also included with the Arduino IDE, which can then be modified for your own purposes. 


Recently one of our customers articulated how easy it is in their own words, and using our EtherTen board you can do so as well. So don't take our word for it - visit gene's site for his experience here. And to keep up with other developments - we're on twitter, so follow us for news and product updates as well. 

Here at Freetronics we have a range of Ethernet-enabled Arduino-compatible hardware, such as the EtherTen above, and also the mother of all Arduino-compatible boards - the EtherMega:


As well as being totally Arduino Mega2560-compatible, the EtherMega has Ethernet onboard, as well as a microSD socket and supports our optional Power-over-Ethernet regulator. When you need maximum I/O, flash and program memory space along with the other features - this is the board to use. 

July 19, 2012

Build your own Arduino-based prototyping tool and performance interface

 Arduino enthusiast and artist Steve Cooley has developed what can only be described as a beautiful and very well-constructed extension the Arduino board with his prototyping tool and performance interface. The purpose of the interface is to allow much easier connections to the analog and digital I/O pins, as well as rotary and linear slide potentiometers to help create analog input for various projects (ideal for the low-fi synthesiser described earlier). Watch Steve's work in action below:


What an amazing piece of work, and a great way of making repeated and stable connections to an Arduino-style board. For more information and very detailed construction diary, visit Steve's pages here. And we're on twitter, so follow us for news and product updates as well. 

If this sort of project intrigues you and you're new to Arduino, the first step is a solid board for your projects - our Freetronics Eleven - the Arduino-Uno compatible with low-profile USB socket, onboard prototyping space and easy to view LEDs:


July 19, 2012

Introducing the m2tklib Mini Interative Interface Toolkit Library

 When designing various projects that use a LCD for a menu or interface, it can be easy to ignore the requirements for a good design in terms of display quality and ease of use. To take some of the burden away from the main design goal, consider using the free m2tklib library. It offers a variety of predefined display functions to work with character and graphic LCD module units, including a variety of input field types and menu structure. For example:


For more information, the library (for Arduino and AVR) as well as an excellent wiki, check out the m2tklib page here. And we're on twitter, so follow us for news and product updates as well.

When prototyping an Arduino-based project that requires an LCD and user-input, consider our Freetronics LCD and Keypad shield. It contains a bright 16x2 character LCD module as well as five buttons that are read with only one analogue input:


July 19, 2012

Build your own low-fi music synthesiser

 To get started with your own prog-rock sound effects, consider building this low-fi synthesiser. The construction is quite easy, and the results speak for themselves - for example in the following video:


With a little extra work this could be mounted neatly inside an enclosure and be useful for budding musicians, sound-effects fans or irritating people. Furthermore this kind of project shows that the Arduino world is more than just digital inputs and outputs - so to get started visit the project page here for the circuits and Arduino sketch. And we're on twitter, so follow us for news and product updates as well.

When creating projects with external circuitry to work with an  project - consider our range of ProtoShields. From the tiny LeoStick to the Mega range, we offer a complete range for you to work with


July 19, 2012

Use an Arduino to monitor mains power usage

 Using an Arduino board, some customised circuitry, an excellent analogue to digital converted and some high-speed optocouplers you can make this version of a mains power monitor unit. The reason for the external ADC is to allow for faster data conversions (which are returned via the SPI bus) and true AC voltage measurement accuracy via a reference voltage. Finally the power data is returned to a PC to be sent to cosm (or other data analysis tools). For example:


As the author notes, be careful when working with mains power - and also be aware of the regulatory requirements in your jurisdition. However to get started including notes, theory, schematics and Arduino code please visit the project page here

To get started with your own Internet-connected Arduino projects, a great start is the Freetronics EtherTen. Apart from being fully Arduino Uno-compatible, it has onboard Ethernet, microSD socket and supports optional Power-over-Ethernet: