October 16, 2016

Skill Sunday: Stacking Arduino Shields

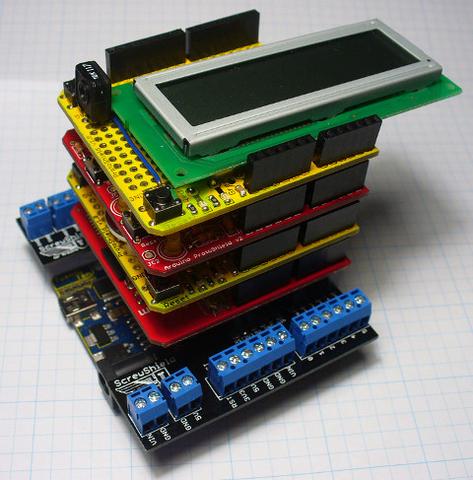
One of the great things about Arduino is the ability to expand your board using shields. Shields are boards which plug into your Arduino and provide all sorts of additional capabilities. Interestingly, you can even “stack” shields so that you can have lots of different combinations of added features. Whilst it might look easy to simply stack shields together, not every combination of shields can be stacked together, there are a number of complications that need to be considered. We have put together a great tutorial which explains the ins and outs of stacking Arduino shields so that you can easily get started building more advanced projects. Checkout the following link to find out more.

Stacking Shields

One of the many shields available from Freetronics is our Bluetooth Shield!

BlueTooth Shield

Our Bluetooth Shield plugs right in to your Arduino and lets you send and receive data and commands from your sketches. You don't even need to do anything fancy in your sketches, because the Bluetooth link acts as a serial port: you just pair it with your computer, then you can simply use "Serial.read()" and "Serial.write()" as normal! The bluetooth shield can operate as a Bluetooth master or slave and is packed full of useful features. To find out more check out the Freetronics Bluetooth Shield product page.

What did you think of this weeks Skill Sunday? Let us know in the comments section below or on Facebook and Twitter.  

October 13, 2016

Smart Garden Pot

If you love gardening you might find this project useful. This smart garden pot lets you keep track of soil moisture and automatically waters your plants for you. An Arduino is used to interface between a humidity sensor and a relay which turns on  a pump which provides water to your plants! Hendra Kusumah who has put this project together has included full code examples and schematics so it should be easy for you to get started. If you want to get started with this project check out the following link.

Smart Garden Pot

Looking for a temperature sensor to use in this project? Why not check out the Freetronics Humidity and Temperature Sensor Module?

The module only requires three wires: GND, power and data. This means that it is very easy to get started recording temperature and humidity data! The find out more visit the product page.  

Humidity Sensor

Know someone who should start working on this project? Let them know in the comments section below or on Facebook and Twitter.  

October 11, 2016

Control Your Lego Trains with Arduino

Have you ever thought that it would be awesome to combine the capabilities of Lego with Arduino? This is exactly what TiagoStantos has done with his Arduino controlled Lego train system.

Trains

The Arduino is used to enable the train to sound a whistle as it approaches the station and when stop at the platform. The project includes full code examples and is sure to inspire you to create more interesting combinations between Lego and Arduino.


To get started learn how you can control your Lego train system with Arduino checkout the following link.

If you are looking to get started on this project why not check out our ProtoShield for Arduino. The ProtoShield is an excellent tool to turn your temporary, breadboarded project into something more permanent. Proto Shields fit directly onto an Arduino board and have a large general purpose area in the middle where you can solder on your own parts to create a durable, long lasting project! The ProtoShield is a high quality, corrosion resistant gold plated PCB and represents great value at only $3!

ProtoShield

To find out more about our fantastic ProtoShield’s check out the product page. Planning on building your own Lego / Arduino train system? Let us know in the comments section below or on Facebook and Twitter.   

October 09, 2016

Skill Sunday: Reading Resistor Colour Codes

Resistors are a fundamental part of almost all electronic circuits. Regardless of if you are working on some Arduino Disco Lights or building a Breadboard Arduino you will need to make sure that you are using the right resistors! To help you learn about how to determine the value of through hole resistors we have put together a comprehensive tutorial. You can check it out at the following link.

Colour Codes

If you are looking for a great resource to develop your Arduino skills why not checkout our Thinker Shield? The shield is ideal for beginners and includes a number of buttons, a buzzer, LEDs and more so that you can get started making all sorts of cool projects! Not only this, but you can find a fantastic project guide on our website! Checkout the product page to find out more.

Thinker Shield

Found this tutorial useful? Interested in our Thinker Shield? Let us know in the comments section below or on Facebook and Twitter.  

October 06, 2016

Arduino Morse Code Reader

Are you fascinated by morse code? With this interesting project from Hackerje you can use an LCD and some push buttons to build your own morse decoder. The decoder reads in your “dots and dashes” and converts them into plain text. With this project not only can you learn about Arduino programing but you can also refine your morse code skills! To get started checkout the following link.

Morse Code Reader

If you are looking for a rapid-use LCD for your morse code reader why not check out the Freetronics LCD & Keypad shield. The shield contains a bright 16x2 character LCD and five buttons that can be read from only one analog input pin:

LCD Keypad and shield

Did I mention that you can play games on your LCD Shield? Check it out!


To find out more or to order checkout the product page.

What did you think of this project? Let us know in the comments section below or on Facebook and Twitter.  

October 04, 2016

Arduino Synthesizer

Unknown to many, the humble Arduino is capable of generating and outputting sounds. With this cool project from audreyobscura you can build your own Arduino Synthesizer. The project uses a number of potentiometers to control various parameters such as pitch, gain and decay.  The project includes in depth instructions which go beyond the electronics and explain how to put your Arduino Synthesizer into a nice project box. To get started checkout the following link.

Arduino Synthesizer

 If you are looking to get started making your synthesizer, why not check out our own ProtoShield for Arduino. The ProtoShield is an excellent tool to turn your temporary, breadboarded project into something more permanent. Proto Shields fit directly onto an Arduino board and have a large general purpose area in the middle where you can solder on your own parts to create a durable, long lasting project! The ProtoShield is a high quality, corrosion resistant gold plated PCB and represents great value at only $3!

ProtoShield

To find out more about our fantastic ProtoShields check out the product page. Planning on making your own Arduino Synthesizer? Let us know in the comments section below or on Facebook and Twitter.   

October 02, 2016

Skill Sunday: Reading Sensor Values Online

If you want to take your projects to the next level and add online capabilities this tutorial is for you. Although it is relatively simply to connect up a sensor to your Arduino and read sensor values onto an LCD or your serial monitor, making these sensor values accessible over the internet adds a whole new level of complexity! With this tutorial you can learn how to create your own online thermometer. To get started checkout the following link.  

Online Interface

If you are looking for a temperature sensor for your Arduino garden why not check out the freetronics temperature sensor module? The module is accurate to 0.5 ℃ and features a wide temperature range, mounting holes and comes with full code examples. To find out more about our fantastic temperature sensor check out the product page.

Temperature Sensor

Learn something this Skill Sunday? Already made an online Arduino project? Let us know in the comments section below or on Facebook and Twitter.   

September 29, 2016

Arduino Xylophone

If you love playing music and making electronics, why not combined these interests and create your own Arduino musical instrument? Instructables member audreyobscura has put together a fantastic set of instructions detailing how you can build your own xylophone.

XylophoneThe xylophone uses piezo sensors to detect when each note has been hit and then uses an Arduino Mega to turn this into a MIDI signal, allowing you to modify the music you make on your computer! If you are keen to get started on this project check out the following link.

If you're looking for a buzzer module to use in this project check out our sound and buzzer module:
PiezoAlthough you can use the sound and buzzer module to generate sounds, it can also be used as a knock-detector input to sense events and react to them. This means it is perfect for this project! For more information and to order, please visit the product page.

Planning on making your own xylophone? Let us know in the comments section below or on Facebook and Twitter.

September 27, 2016

IoT Wardrobe

This intelligent wardrobe system automatically reminds you of the types of clothing and accessories you will  need based on the weather! Not only does it provide these recommendations,  but using a clever LED indicator system it also reminds you of where the different items you will require are located! For example the wardrobe might recommend that you take your umbrella with you if rain is forecast. This is an idea with lots of potential! To get started and to build upon the existing IoT Wardrobe concept, checkout the following link.

IoT Wardrobe

If you are looking for a display to use with your IoT wardrobe why not have have a look at the Freetronics 128X128 Pixel OLED Module. The display is a high resolution, full colour OLED making it perfect for graphics, gauges, graphs and more. To find out more check out the product page.

OLED

Inspired to build your own IoT wardrobe? Working on a project you would like us to feature in this blog? Let us know in the comments section below or on Facebook and Twitter.

September 26, 2016

Arduino Stopwatch

If you are looking for a very simple Arduino project to learn more about Arduino coding, this project is perfect for you. Conor M has built an Arduino stopwatch which uses an LCD Keypad Shield to provide the buttons and screen for your stopwatch. The project requires you to simply plug in the shield and upload the stopwatch sketch, too easy! To find out more visit the instructables page.

Stopwatch

If you are looking for a rapid-use LCD for your Arduino stopwatch why not check out the Freetronics LCD & Keypad shield. The shield contains a bright 16x2 character LCD and five buttons that can be read from only one analog input pin making it perfect for this project!

LCD

Did I mention that you can play games on your LCD Shield? Check it out!


To find out more or to order checkout the product page.

What did you think of this project? Let us know in the comments section below or on Facebook and Twitter.