July 31, 2012

Simple Arduino-controlled LED Tree

 Whether you're looking for a basic Arduino project to share with some  youngsters, or getting in early on the festive season - this project will be of interest. By mounting thirteen LEDs and matching resistors on some prototyping board, the designer has created an illuminated LED tree that could be useful as a decoration of sorts, or another form of data output. 


To get started, head over to the project website for code, construction advice and inspiration. And we're on twitter and Google+, so follow us for news and product updates as well. 

When experimenting with your Arduino board by interfacing with all those LEDs, it can be difficult and time consuming to mess about connecting wires of various sizes to the board. As you can see the designer has chosen our Freetronics Terminal Shield for Arduino - which neatly solved the problem:


Apart from having a larger than normal prototyping area, there are terminal blocks for every Arduino pin, three LEDs for general use and a reset button on the shield. Great for experimenting and fast I/O connections - so order yours today


July 30, 2012

Amazing web-controlled Multi-user Interactive Light Display

 Technologist Andrew Fisher has designed and demonstrated a beautiful multi-user interactive light display with a web-based control system, using a range of our products. The display comprises of three main components - an Ethernet-enabled board that accepts commands from the web server and controls RGB LEDs, a web interface that accepts user control of the different lights, and a web server that processes the web commands from the users and feeds them to the Arduino. The following is a short demonstration of the display at work:


The project may sound complex, however Andrew has published everything you need to get started with your own display. So for a project overview, along with links to the code and documentation - visit Andrew's site here. And we're on twitter and Google+, so follow us for news and product updates as well. 


To recreate your own display, apart from our Ethernet-enabled Arduino-compatible EtherTen board for the web server and hardware control - you'll need some easy to use RGB LEDs:


 Our RGB LED modules as demonstrated include a bright RGB LED on the top of the board and a WS2801 constant-current, addressable, multi-channel LED driver on the back. This smart module can be daisy-chained, so you can connect a number of these together in a string and drive each of the module colours individually from your microcontroller. For more information and to order, visit the product page.

July 30, 2012

The "Sleepytimer" Ardiuno-based sleep pattern monitor

 Once again Mark Wilson has created and share with us another of his fascinating Arduino-based projects. With his "Sleepytimer" you can record the movements made while lying in bed, as a three-axis IMU measures and sends the movements to an Arduino-based device which not only plots them on a graphic LCD, it also dumps the data in graph form to an old point-of-sale printer. This is an amazing logging device that must have saved Mark a lot of money over paying for a commercial unit or visiting a special sleep-monitoring service.

For more information, visit here for links to the project detailed images and Arduino sketch. And we're on twitter and Google+, so follow us for news and product updates as well. 

If you're looking to create an Arduino-based data logging solution, consider our Freetronics EtherTen. Apart from being fully Arduino Uno-compatible, it has onboard Ethernet, microSD socket, full USB interface (so you don't need a costly FTDI cable just to upload a sketch!) and supports optional Power-over-Ethernet:


July 30, 2012

DIY Arduino-based 3D tracking range finder

 Over at the fftarduino blog they are working on a laser rangefinder tracking system, powered by an Arduino board that uses a pan/tilt device mounted with lasers and a simple TTL-based digital camera module. Although it's a work in progress, the results so far are impressive and an interesting vision of what could be possible in the future:


For more information and motivation, visit the project blog site for code, details and the maths behind the control system. And we're on twitter and Google+, so follow us for news and product updates as well. 

When designing your own Arduino-embedded laser wea.. rangefinders, consider our Freetronics LeoStick. Apart from being one of the smallest Arduino-compatibles on the market with USB, it also has an onboard RGB LED and piezo for sound and knock detection:


July 30, 2012

Tutorial: Arduino Timer Interrupts

 Normally an Arduino sketch merrily goes along doing what you want it to do, however sometimes you want things to happen at very specific time intervals. For example, counting the number of pulses over a set period of time to make a speedometer or frequency counter. In situations like these, the use of timer interrupts are very useful as you can stop the sketch at precise times and then call a specific action to occur. 


Although it initially sounds complex, Amanda Ghassaei has written a detailed and easy to follow tutorial which explains the concepts of timer interrupts, followed by some great examples. So to get started, head over to the tutorial and get started. And we're on twitter and Google+, so follow us for news and product updates as well. 

If you are new to Arduino, join in with our range of Arduino-compatible hardwareprototyping shields and module range. A good start is the Freetronics Eleven, the Arduino Uno-compatible board with onboard prototyping space:


July 30, 2012

Build your own DJ-style MIDI Controller with Arduino

 Although building MIDI controllers with Arduino boards is becoming quite popular, not many of these have resulted with an imaginative form of user input similar to the "Hard-DJ" example we found recently. Based on an Arduino Mega-style board, the Hard-DJ uses the usual buttons and sliding potentiometers for control. However the designers have taken the next step and used two old hard drive platters which are mounted to encoder wheels, that act as controls which are operated in the same way as a DJ would fool about with two record players. For example:


Certainly a step above the rest, the "Hard-DJ" is a MIDI controller that works well and can be reproduced with a little effort. To do so, visit the project page on GitHub for the code, Arduino libraries and other information. And we're on twitter and Google+, so follow us for news and product updates as well. 

When projects such as the Hard-Dj have outgrown the normal Arduino-compatible boards, running out of program and flash memory space, or you're stacking on Ethernet and microSD shields, or all at once - it's time to upgrade to the Freetronics EtherMega:


Quite simple the EtherMega is the fully-loaded Arduino-compatible board on the market today. Apart from being completely Arduino Mega2560-compatible, it includes full Ethernet interface, a microSD card socket, full USB interface, optional Power-over-Ethernet support and still has a circuit prototyping area with extra I2C interface pins. Using the EtherMega you could even introduce Internet-control to your MIDI controller! So if your project is breaking the limits, upgrade to the EtherMega today. 


July 30, 2012

Hacking an alarm system keypad for other uses

 One of the great things about the Arduino system is the ease in which it can interface with other devices. One example of this is 'Caitsith2' who has determined how a DSC PC1500RK alarm system control panel works and communicates. Originally it would have been connected to the alarm master control box, however using his examples it can communicate via the serial monitor and therefore can be controlled with an Arduino. For example:


Although this is a specific example, it shows what can be done with random devices found around the home or elsewhere with an Arduino. Or in this case - the Arduino could become the controller of the alarm system if still in place, opening up more advanced control and interface methods. For the example Arduino code, visit here. And we're on twitter and Google+, so follow us for news and product updates as well. 

When experimenting with your Arduino board by interfacing with the "outside world", it can be difficult and time consuming to mess about connecting wires of various sizes to the board. However with the Freetronics Terminal Shield for Arduino - the problem is solved:


Apart from having a larger than normal prototyping area, there are terminal blocks for every Arduino pin, three LEDs for general use and a reset button on the shield. Great for experimenting and fast I/O connections - so order yours today

July 28, 2012

Remote-Control Car Lap Timer System

 When racing remote control cars, more enthusiastic users will desire an automated lap timing system more akin to the "real world" - which is a great idea as it adds to the fun of racing. DuaneB agrees with this and is documenting the progress of his timing system built around an Arduino board. His system will record up to 500 laps, counted by infrared lap capturing and a transponder - and also allow review of previous lap times, average and best times etc. However it is looking very easy to construct, as the Arduino sketch and all details are provided. Here is an example of the work in progress:


So to get started and follow the project, head over to RC Car meets Arduino blog. And we're on twitter and Google+, so follow us for news and product updates as well. 

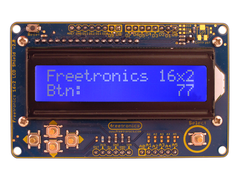
As you can see from the video above, a 16x2 character LCD with five buttons was being used. You can save time and digital I/O pins  by using our Freetronics LCD & Keypad shield - which contains a bright 16x2 character LCD and five buttons that can be read from only one analog input pin:


July 27, 2012

Convert a ZX81 into a USB Keyboard

 If you have an old Sinclair ZX81 that can't be brought back to life (as using it for any other reason would be sacrilege if it worked), you can keep it alive in spirit by converting it into a USB keyboard. As you know an Arduino board can emulate USB devices very easily using the USB library, so with a little hardware the Sinclair can interface with the Arduino, and your'e set. For example:


For more information, the schematic and Arduino details visit the Tynemounth Software blog. And we're on twitter and Google+, so follow us for news and product updates as well. 

If you're looking to embed an Arduino-compatible board in your own USB-related projects, consider our Freetronics LeoStick. Apart from being one of the smallest Arduino-compatibles on the market with USB, it also has an onboard RGB LED and piezo for sound and knock detection. Furthermore as it has the latest Leonardo firmware, the LeoStick can easily emulate a USB keyboard, joystick or mouse:


July 27, 2012

Read 80-column IBM Punch Cards with Arduino

 After discovering some IBM 80-column punch cards, the people at 'codeincluded' have created an amazing system that can read the cards using a wide variety of hardware. First the cards are stacked into a device made from LEGO Technics that holds, aligns and then drops cards one at a time when the user rotates an arm. Then each card is photgraphed using a Canon digital camera hacked with CHDK firmware. The image is then sent to a PC running a python script which can detect the changes in colours and therefore which holes are punched - which then returns the values of the cards. The whole hardware side is controlled via an Arduino board. Watch the following to see it work:


Truly something different, and a great way to articulate to the younger folk "how it was done in the old days". For more informaiton, including the hardware and software details check out the project blog hereAnd we're on twitter and Google+, so follow us for news and product updates as well. 

If you are new to Arduino, join in with our range of Arduino-compatible hardwareprototyping shields and module range. A good start is the Freetronics Eleven, the Arduino Uno-compatible board with onboard prototyping space: