July 26, 2012

DIY Arduino-based USB Keyboard for Cubase

 Musician and Arduino enthusiast "XeNo" has designed and published details for a USB keyboard simulator to use with Cubase music software on his PC. As a lot of commands were repeated frequently, XeNo has created a foot pedal to activate the USB keyboard commands to save having to reach for the keyboard after every take. This type of project can be useful for any PC application that requires repetitive keystrokes, such as games or other editing packages.


To get started with your own keyboard emulator, visit XeNo's blog page here. And we're on twitter and Google+, so follow us for news and product updates as well. 


Part of the project mentioned above was inspired by a project in the book "Practical Arduino" by Jonathan Oxer and Hugh Blemings, which contains fifteen interesting and practical projects that are based around the hardware available from Freetronics. 

By reading this book and will be able to work on your own Arduino-based designs, gain an in-depth knowledge of the architecture of Arduino, and learn the easy-to-use Arduino language all in the context of practical projects that you can build yourself at home. Get hands-on experience using a variety of projects and recipes for everything from home automation to test equipment. Now available in the freetronics store today. 


July 25, 2012

Interfacing Nintendo DS with Arduino

 Korean Arduino enthusiast 'Hounjini' has documented a method of two-way data communication between an Arduino and a Nintendo DS video game system. The hardware side of things could be a little tricky for the beginner, but it is possible. Furthermore there is also a library for the Arduino<>DS communication. Once it's working, you can retrieve touchpad position data and also read the DS buttons. For example:


If you decide to start experimenting with the your NDS, be sure to heed the warnings in the instructions. To get started you can find the instructions hereAnd we're on twitter, so follow us for news and product updates as well. 

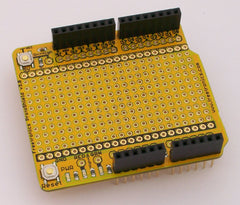
When creating projects with external circuitry, such as the audio system described above - consider our range of ProtoShields. From the tiny LeoStick to the Mega range, we offer a complete range for you to work with


July 25, 2012

Build an accurate clock with sensor display

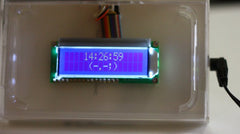
 Arduino enthusiast Kalshagar has documented his minimalist, Arduino-based clock detects your presence as you come close to it. The distance between the clock and human is measured with a Sharp infra-red distance sensor, and the closer you are the brighter the backlight in the LCD module. And for accurate time-keeping, Kalshagar has used the excellent Maxim DS3232 real-time clock IC. Here is the clock mounted in an iPod case:


You can never have too many clocks and this example is certainly different. For more information, including the Arduino sketch and circuit, visit Kalshagar's project page here. And we're on twitter, so follow us for news and product updates as well. 

The most important part of any clock project is the inclusion of an accurate real-time clock IC. Here at Freetronics we have the Maxim DS3232 real-time clock IC module:


Apart from keeping accurate time for years due to the temperature-controlled oscillator and having a tiny coin-cell for backup, it is very simple to connect to your Arduino project. A driver library allows your program to easily set or read the time and date. Perfect for clock projects, dataloggers or anything that needs to know the date and time. Furthermore it contains a digital thermometer and 236 bytes of non-volatile memory to store user settings and other data. For more information, check out the module page here

July 25, 2012

DIY Motorised Rotary Persistence-Of-Vision Display

 Using our great KitTen Arduino-compatible board kit as a base, the people from MicroEd Computers have created a nifty little persistence-of-vision display that doesn't require any mad hand-waving. Instead, the LEDs are fitted a small board which is mounted on a motor which rotates them to create the desire effect. For example:


This is a great adaption of POV systems, and could be used as a decoration, part of a store window display, or another random style of data output. To get started with your own, visit the project page for all details and code here. And we're on twitter, so follow us for news and product updates as well. 

Although you can use almost any Arduino-compatible board for this project, for a more permanent installation consider using the Freetronics LeoStick. Apart from being one of the smallest Arduino-compatibles on the market with USB, it also has an onboard RGB LED and piezo for sound and knock detection:

July 25, 2012

Control Epson POS printers with your Arduino

 After being given an older Epson point-of-sale printer from a friend who returned from a sale, Philip Hayton set about understanding the Centronics parallel-printer interface and has documented how to drive the printer from an Arduino board. This is a great start as there are many, many older printers with the Centronics interface that could be used as well. 


So to get started with your own Arduino-based docket system or hacking away with other Centronics-interface printers, visit Philip's fascinating project site here. And we're on twitter, so follow us for news and product updates as well. 

So if this sort of project intrigues you and you're new to Arduino, the first step is a solid board for your projects - our Freetronics Eleven - the Arduino-Uno compatible with low-profile USB socket, onboard prototyping space and easy to view LEDs:


July 25, 2012

Read Sega Megadrive cartridges with Arduino Mega

 An Arduino and video game enthusiast has documented a method of reading the contents of Sega Megadrive video game cartridges using an Arduino Mega board and some simple hardware. A Mega is required due to the number of connectors on the game cartridge, which connects to the circuit via an old ISA slot from a '486-era motherboard. Although simple, this project could possibly lead to methods of backing up the old Sega cartridges.


For more information, Arduino sketch and notes - visit the project web page. And we're on twitter, so follow us for news and product updates as well. 

When projects such as the Sega cartridge reader outgrow the normal Arduino-compatible boards, running out of program and flash memory space, or you're stacking on Ethernet and microSD shields, or all at once - it's time to upgrade to the Freetronics EtherMega:


Quite simple the EtherMega is the fully-loaded Arduino-compatible board on the market today. Apart from being completely Arduino Mega2560-compatible, it includes full Ethernet interface, a microSD card socket, full USB interface, optional Power-over-Ethernet support and still has a circuit prototyping area with extra I2C interface pins. So if your project is breaking the limits, upgrade to the EtherMega today. 


July 24, 2012

Play MIDI music with your Arduino

 Although we can generate a variety of beeps and tones with piezo buzzers, that isn't the limit to your board's musical capabilities. John at jarv.org has taken music further and described a way to convert MIDI files into code that can generate very good renditions of the original. The process requires some open-source sequencing software and python code which converts the sequence files for use in the Arduino sketch. Here's an example of the system at work:


Very well done in our opinion. Using this method you can add very credible tunes and sound effects to your projects. So to get started, check out John's blog here. And we're on twitter, so follow us for news and product updates as well.

When creating projects with external circuitry, such as the audio system described above - consider our range of ProtoShields. From the tiny LeoStick to the Mega range, we offer a complete range for you to work with


July 24, 2012

DIY Arduino-based BiCMOS Curve Tracer

 And now for something completely different - using Don Sauer's detailed instructions you can make your own curve tracer. It is made possible with some interesting external analogue circuitry, and Processing on a host PC to work with the data from the Arduino board. The purpose of this is to analyse characteristics of transistors such as the collector current as the voltage changes. The circuit is relatively simple, and Don has documented it very well. 


So for more information and to get started, visit Don's detailed project page here. And we're on twitter, so follow us for news and product updates as well. 

To get started with your own Arduino-embedded projects, look no further than the Freetronics LeoStick. Apart from being one of the smallest Arduino-compatibles on the market with USB, it also has an onboard RGB LED and piezo for sound and knock detection:


July 24, 2012

Experimental interactive animations with Arduino and Animata

 Using an Arduino board, various hardware, and a real-time connection back to a PC running Animata - a real-time animation editor, Matti has devised what could be descibed as a futuristic interactive artwork piece or a nightmare generator. The system is loosely mounted on a vintage Viewmaster, and contains an accelerometer which measures your head movements. This data is sent back to the PC to help generate the interactive animations. For more see the following video:


For more information and details - hit up the project site here. And we're on twitter, so follow us for news and product updates as well. 

When creating your own Arduino-embedded projects and size is important, consider using our Freetronics LeoStick. Apart from being one of the smallest Arduino-compatibles on the market with USB, it also has an onboard RGB LED and piezo for sound and knock detection:


July 24, 2012

Build your own Arduino-based LCD Oscilloscope

 Using a simple Arduino board, a KS0108-compatible graphical LCD and our favourite method of reading many buttons using only one analogue input pin, Noriaki Mitsunaga has built a respectable home-made digital oscilloscope. Although you won't be analysing high-speed data buses or complex radio signals, following the project is worthwhile as you can learn about the concepts behind how an oscilloscope works and more advanced Arduino programming. Here's a demonstration of the project at work:


Well done Noriaki or should we say 'yoku dekimashita'. For more information, schematic, Arduino sketch and more, visit the project page here. And we're on twitter, so follow us for news and product updates as well.

So if this sort of project intrigues you and you're new to Arduino, the first step is a solid board for your projects - our Freetronics Eleven - the Arduino-Uno compatible with low-profile USB socket, onboard prototyping space and easy to view LEDs: