August 04, 2012

Huge "Game of Life" using Freetronics Dot Matrix Displays

 The team at the Adelaide (Australia) Hackerspace have been experimenting with our dot matrix display boards, and demonstrated a version of Conway's "Game of Life" software running effectively on the display. For the curious this is a simple one-player automated game. Each player (or LED) lives or dies based on the number of players around it. This provides an random display of LEDs in which you can soon see the patterns of life and death, for example:


This is another great implementation of the Game of Life and also the use of a DMD. Kudos to the hackerspace team for their efforts. For the Arduino sketch and files, visit the project GitHub page here. And we're on twitter and Google+, so follow us for news and product updates as well.


As you can see above the hackerspace used a Freetronics Dot Matrix Display. Available in a variety of colours, they consist of a 32 by 16 matrix of LEDs. Included with the DMD is a cable to directly connect with an Arduino-compatible board, and at low brightness (which is still fine to read indoors) you can power one DMD from the Arduino. However by connecting 5V at 2.5A for each board they operate at a brightness which is visible anywhere. Furthermore you can daisy-chain (with the included cable) six or more displays for great effects. So for more information head over to the DMD pages today

August 04, 2012

Canduino - the Internet-connected Candy Machine

 Using the everymote system (web-base remote control for the Internet of things) that still seems to be under development, the designers have demonstrated a method of controlling the output section of a candy machine to dispense the contents using their web-based remote control system. An interesting development, however it doles out those M&Ms only one at a time...


One could always reproduce the system with an Ethernet-enabled Arduino running the webserver and a continuous rotation servo. However for more information, including the Arduino sketch head over here. And we're on twitter and Google+, so follow us for news and product updates as well.

To add Ethernet connectivity to your Arduino projects, consider using our Freetronics EtherTen. Apart from being fully Arduino Uno-compatible, it has onboard Ethernet, microSD socket, full USB connection (no pesky FTDI cables needed) and supports optional Power-over-Ethernet:


August 04, 2012

Arduino and Vintage Incandescent Displays

 Sometimes you come across a display technology from a bygone era, and relish the thought of firing it up for fun or something useful. In an example of this, John has demonstrated using the FFD51 incandescent seven segment numerical displays from the early 1970s with Arduino-compatible boards and 74HC595 shift register modules. Although each segment of the displays draws around 30mA, the shift registers still handled the current with aplomb and without overheating after a period of time. Here is an example of the displays in motion, notice the glow effect as each segment powers up:


Apart from seeing the older displays, the article is a brief explanation of how to use Arduino and shift registers as well as a real-time clock IC. For more information and sketches, head over to the blog here. And we're on twitter and Google+, so follow us for news and product updates as well.


Instead of using DIP-format 74HC595s, John uses our Freetronics EXPAND: Expansion/Shift register modules. They contain the 74HC595 shift register on a small board with standard 0.1" spacing holes that are perfect for soldering header pins into for breadboard use, and a small "power on" LED. By doing this you have a robust vehicle to insert and remove easily without tools or the risk of bending the IC pins. This is only one of our large range of prototyping modules - check the full range today!


August 03, 2012

Hacking ASUS Routers to add wifi to Arduino

Technologist Tod Kurt has documented the process of giving an Arduino board wifi internet access using some interesting hacking. By modifying an ASUS WL-520gu wifi router with DD-WRT Linux firmware, you can create a serial to network gateway. In the following video Tod runs through a basic demonstration of the system at work:


For more details and instructions, head over to Tod's blog here. And we're on twitter and Google+, so follow us for news and product updates as well.

If this seems out of your reach, you can still add Ethernet connectivity to your Arduino projects using our Freetronics EtherTen. Apart from being fully Arduino Uno-compatible, it has onboard Ethernet, microSD socket, full USB connection (no pesky FTDI cables needed) and supports optional Power-over-Ethernet:


August 02, 2012

Build your own event countdown timer

 When the big day is coming up, it can help to have a gentle reminder every day to keep things on schedule (or remind you to get moving!). Dr Ayars from Hardware Hacks has come up with a neat Arduino-based solution - it is programmed with an end date and then displays the remaining number of days, minutes, hours and seconds until the event. Nothing like this to remind you that time is fleeting.


To start counting down until your next event, get started with the project details found hereAnd we're on twitter and Google+, so follow us for news and product updates as well.

When working on your own microcontroller projects that require a real-time clock, consider our Freetronics RTC Module:


Based on the Maxim DS3232 real-time clock IC, it is small enough to integrate with almost any project - and being controlled by I2C works with all development platforms. Perfect for clock projects, dataloggers or anything that needs to know the date and time. For more information, tech specs and to order - visit the product page here

August 02, 2012

Experimenting with Arduino and piezos

 Arduino enthusiast 'Lucky Larry' spent some time to document his experimenting with Arduino and some piezo sensors. After realising that they can be also used as knock sensors, he used them to create a minimalist drum machine. However instead of just detecting simple knocks, his code detects the approximate peak frequency of each hit, and generates a matching tone for output. For example:


For more information, explanation and the Arduino sketch, head over to Larry's page here. And we're on twitter and Google+, so follow us for news and product updates as well. 

If you're interested in working with piezos for various reasons we have a neat little SOUND: sound and buzzer module:


It can be used as a noise-maker driven by your microcontroller for audible feedback of events, and it can also be used as a knock-detector input to sense events and react to them. Includes a built-in 1M resistor to allow the piezo element to detect shocks. For more information and to order, please visit the product page here


August 02, 2012

Control Arduino via Android without rooting

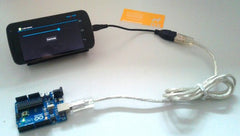
 As part of their series on Arduino and Android device interaction, Manuel Di Cerbo has written a short and useful tutorial on communicating between an Android app and an Arduino without using the Android SDK. Basically this involves using the Arduino board as the USB device, which is possible with the Arduino Uno, Freetronics Eleven, EtherTen, etc. Demonstration source code is available for the Arduino and Android app. 


For more information on this and other interesting articles, check out this blog. And we're on twitter and Google+, so follow us for news and product updates as well. 

If you're looking to go deeper into Android and Arduino interaction - you will need an Arduino-compatible board with inbuilt USB host shield suitable for Android ADK work. So look no further as we have the Freetronics USBDroid board:


Apart from being a fully Arduino Uno-compatible, it has onboard microSD socket and the full USB socket and host-mode controller. As well as the Bluetooth application described above, this is the ideal platform for developing peripherals or projects based around Android devices with ADK (Android Developer Kit) functionality, but without requiring a USB host controller shield stacked onto an Arduino. For more information and to order, visit the product page here


August 02, 2012

Tutorial: Arduino and the 74HC595 Shift Register

 Once a new Arduino user has worked through the myriad of possibilities with their board, there will come a time when they need more digital output pins. Although it's easy to just say "Oh, now you can buy a Mega" there are much more affordable and educational ways of solving the problem. One of these is to learn how to use the 74HC595 shift-register IC. For the uninitiated, it has eight digital pins that can be controlled by sending a eight bits of data (which are high or low) from the Arduino, which then determine the pin state on the shift register. 


If this is a new concept, visit the Arduino ShiftOut tutorial over at the Arduino website, it explains in detail how to use one or more shift registers to expand the number of digital outputs very easily. And we're on twitter and Google+, so follow us for news and product updates as well. 


When working with 74HC595 shift registers and solderless breadboards (or more permanent solutions) consider using the Freetronics EXPAND: Expansion/Shift register module. It contains the 74HC595 shift register on a small board with standard 0.1" spacing holes that are perfect for soldering header pins into for breadboard use, and a small "power on" LED. By doing this you have a robust vehicle to insert and remove easily without tools or the risk of bending the IC pins. This is only one of our large range of prototyping modules - check the full range today!

August 02, 2012

Convert Morse code to text with an Arduino

 HAM radio operator and Arduino enthusiast WB7FHC has written a great tutorial on how to program an Arduino to decode Morse code.  Apart from being an interesting exercise in Arduino programming, it could be useful for the tired (or lazy?) DX'er who needs to keep track of various code transmissions. Although the project sends the results to the Serial Monitor, it could easily be modified for an LCD and thereby making the unit portable. Here is an example of operation:

To get started, work through the detailed tutorial here. And we're on twitter and Google+, so follow us for news and product updates as well. 

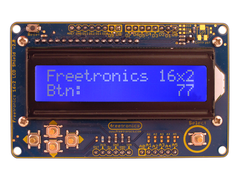
To easily convert projects like this for portable use with an LCD, consider our Freetronics LCD Keypad Shield, which contains a bright 16x2 character LCD and five buttons that can be read from only one analog input pin:


August 02, 2012

Build your own Arduino-based Laser Show

 Amongst other interesting things, Rich Olsen has described how to make an interesting laser show that can be used to display various patterns and text using a wide variety of hardware, a laser pointer and two home-made galvonometers. If you ever want something to do on a rainy weekend, this project would be a great start, and is open to all sorts of modifications (e.g. displaying tweets). For an example check the following video:


As a side note, always take care with laser pointers and don't allow them to shine into the eyes of anyone. For a complete description of how to make this, check out Rich's instructions here. And we're on twitter and Google+, so follow us for news and product updates as well. 

If you are new to Arduino and looking to make your own projects, join in with our range of Arduino-compatible hardwareprototyping shields and module range. A good start is the Freetronics Eleven, the Arduino Uno-compatible board with onboard prototyping space: