December 10, 2014

A pulse-controlled record player

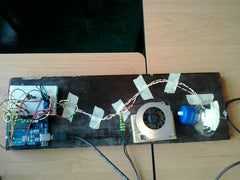
And now for something different is the interesting modification of a record player by Instructables member bigsnailasaur. The speed of the player is determine by the pulse of the user, which introduces some interesting interactive music playback - and would make dance tracks more interesting as the user can essentially match the pitch with their feelings at the time.

The conversion is quite simple - output from a pulse sensor is measured by an Arduino, which can then control the DC motor speed using a H-bridge. The project will require some calibration to ensure the sketch can generate the required control output for 33 and 45 RPM - at which point accurate control is possible.

To learn more about this modification to a record player, visit the project's Instructable page. And for more, we're on facebookGoogle+, and twitter - so follow us for news and product updates as well.

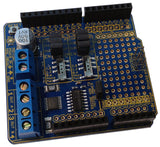
 If you're looking into starting with Arduino and motor control, such as controlling a DC motor (or stepper motor) from your Arduino or compatible, check out our HBRIDGE: DC/stepper motor shield. Based around the powerful Allegro A4954 H-bridge driver IC you can control two DC motors with complete ease, or one bipolar stepper motor. With connections for external power management, a complete beginners' guide and documentation - motor control couldn't be any easier. For more information and to order, visit the HBRIDGE: page

December 10, 2014

Build a minimalist Christmas Tree with a "Star Wars" theme

It's that time of year again when many of us enjoy making Christmas decorations with an electronic twist, for fun and as gifts for others. One interesting example of this has been demosntrated by Darbin Orvar who has created a minimalist Christmas tree with LED strips, which is controlled by an Arduino to blink the LEDs to match the sequence of a tune from the "Star Wars" movie.

Controlling the LEDs is quite simple, and Darbin explains how this is done with power transistors. The sketch is simply a matter of controlling the digital outputs at the right time to enable the required LED strips to match the tune. This is demosntrated with gusto in the following video:

For more information, check out Darbin's project page. And for more, we're on facebookGoogle+, and twitter - so follow us for news and product updates as well.

If you're making a similar project and need to control large currents with your Arduino digital outputs - you'll need a MOSFET. We've got you covered with out NDRIVE: N-MOSFET driver/output module:

This high-power N-MOSFET module lets you switch high-current loads using a tiny microcontroller. Perfect for controlling that set of traffic lights mounted in your living room! Works brilliantly for automotive projects such as switching high-power 12V lights and high wattage LEDs. For more information and to order, visit the product page

December 08, 2014

Using both microcontrollers on your Arduino Uno-compatible board

Did you know the small micontroller near the USB socket on you Arduino Uno or compatible is usable for much more than just a USB-serial converter? In fact it's a fully-featured MCU just like the ATmega328 and similar on various boards. With this knowledge you can make use of this as an Arduino-compatible and thus use both MCUs on the one board at the same time.

The benefits of doing so include offloading some work from the main MCU to the second one, or dedicating the second MCU to different types of interfaces with other hardware. And doing so isn't that diffucult due to the interesting tutorial published by NicoHood whose examples show how to emulate a USB keyboard and much more with his HoodLoader2 code.

To learn how, check out the project website. And for more, we're on facebookGoogle+, and twitter - so follow us for news and product updates as well.

If you're looking for an Arduino Uno-compatible board to embed into various projects, choose what tens of thousands of others have done and use our Freetronics Eleven - the Arduino-Uno compatible with low-profile USB socket, onboard prototyping space and easy to view LEDs: 

December 08, 2014

Build a tiny LED Matrix Word Clock

The drive for miniaturisation may have taken the back seat of most consumer's minds, now that the opposit is starting to become popular - for example larger smartphones and so on. However making things as small as possible is always an interesting challenge for the hobbyist and one excellent example of this has been demonstrated by Daniel Rojas with his tiny word clock.

By choosing a very small 8x8 LED matrix, and applying a printed sheets of letters in the appropriate place, each LED can neatly represent a letter. With a matching custom-made PCB on the rear with an Arduino-compatoble circuit and real-time clock IC - the clock can come to life and operate in the same manner as the larger wall-mounted word clocks. For a great demonstration check out the following video:

To make your own version, visit Daniel's interesting website for design files and more information. And for more, we're on facebook, twitter and Google+, so follow us for news and product updates as well. And have you made something great and want to share it with the world? Post the details in our Project Showcase forum, and you could even win a prize.

If you're looking for a tiny Arduino-compatible board that's still easy to work with - check out the Freetronics LeoStick. It's the Arduino Leonardo-compatible board that's cheaper and smaller than the original:

 Apart from being one of the smallest Arduino-compatibles on the market with USB, it also has an onboard RGB LED and piezo which can be used a knock sensor and various tune and sound effects. Plus you can add extra circuitry with the matching protostick! For more information and to order, click here.

December 04, 2014

Announcing the Freetronics KiCAD library

Freetronics has been founded on the principles of the open hardware movement, and since the beginning we've supported the movement by keeping our products open. 

And over time our engineers have been using KiCAD - the open-source design suite for electronic design automation. Now after several years Freetronics engineer Angus Gratton has collated the parts we used and published the Freetronics KiCAD library for use by the public:

If you're interested in working with the Freetronics library, you can download it from our github page - and we're open for discussion about the library in the Freetronics forumAnd for more news, updates and information, we're on facebook, twitter and Google+, so follow us to stay up to date. 

December 04, 2014

Drink enough water with the help of Arduino

Now that summer is upon us (well here in Australia anyhow), it's important to stay hydrated and with this project by Instructables member C4rmel you can do so while experimenting with your Arduino or compatible board. 

The system uses a force-sensitive resistor placed under a base upon which a bottle of water is placed, the size of which is determined by you water needs. Once you've calibrated the full and empty weight with the resistor - the Arduino can indicated your progress with one or more LEDs. 

This could also be used to test if someone has been drinking from a certain bottle that perhaps they shouldn't be - or other weight and Arduino projects. For more information, check out the project's Instructable page. And for more, we're on facebook, twitter and Google+, so follow us for news and product updates as well.


If you're looking to simplify using multiple LEDs into one unit, consider the Freetronics RGBLED: full colour module. It includes a bright RGB LED on the top of the board and a WS2801 constant-current, addressable, multi-channel LED driver on the back. This smart module can be daisy-chained, so you can connect a number of these together in a string and drive each of the module colours individually from your microcontroller. For more information and to order, visit the product page.

December 03, 2014

Build your own modular electronics prototyping system

When you're pushed for space to use with the hobby of electronics, it's easy to lose track of items on the bench or difficult to move in a hurry if required. Therefore a neat and modular solution that keeps the main items together and in one place is a great idea, and this though has been actioned by David Caplette with his modular electronics prototype system.

The system consists of wooden boards that can slot together with a dovetail or common jigsaw-style fashion, and each board is hollowed somewhat to allow an Arduino, solderless breadboard or other item of interest. David shows the process in the following video:

For more information on this interesting concept, check out David's project page. And for more, we're on facebookGoogle+, and twitter - so follow us for news and product updates as well.

If you're looking for an Arduino Uno-compatible board to embed into various projects, choose what tens of thousands of others have done and use our Freetronics Eleven - the Arduino-Uno compatible with low-profile USB socket, onboard prototyping space and easy to view LEDs: 


December 03, 2014

Upgrade your tea-making with The Tea-O-Tron 3000.2

Now again it's fun to take an existing task and completely over-engineer the process, because ... you can. One example of this has been demonstrated by Instructables member HckrSvn whose "Tea-O-Tron 3000.2" takes making tea to the next level.

The system uses an Arduino-controlled stepper motor which is used to hold the tea bag over the mug of water - and can be used to move the bag in and out of the water. The steep duration is set via an infra-red remote control with the details displayed on an LCD. 

It's an interesting example of using the hardware together, and for more information check out the project Instructables page. And for more, we're on facebookGoogle+, and twitter - so follow us for news and product updates as well. 

Have you been reading about Arduino and would like to understand more so you can work with projects like the example above, but not sure where to start? Then order one of our Experimenter's Kit for Arduino - as used in many classroom and learning environments:

The package includes a wide variety of parts, sensors and modules including: a servo motor, lights, buttons, switches, sound, sensors, breadboard, wires and more. Furthermore a Freetronics Eleven Arduino-compatible board is included to make this an extensive hobby experimenter, inventor and starter kit. 

However we don't leave you alone to figure it all out, included is a great project and instruction booklet, plus access to a supporting web page and software examples. In other words - this is everything you need to get started for a fun range of electronics and Arduino related projects! So to get started or for more information and to order, check out the product page.

December 02, 2014

Interfacing a Game Boy camera with a TI84 calculator and Arduino

And now for something completely different an a great example of hacking together two completely different worlds with the help of an Arduino, the people at Cemetech have shown how it's possible to display images from a Nintendo Gameboy camera with a Texas Instruments TI84 calculator.

The process only requires the sensor in the camera module, and the Arduino sketch take care of the image conversion to the TI calculator via the standard interface protocol used for cable communications between TI calculators. Considering the resolution of the camera, the results are quite successful - for example:

So if you're looking for something new to do with your TI84, check out the project page for more information. And for more, we're on facebookGoogle+, and twitter - so follow us for news and product updates as well.

If you need to add external hardware or devices to your next Arduino project, you'll need a protoshield to mount the external circuitry. In doing so, consider our range of ProtoShields. From the tiny LeoStick to the Mega we have a wide range to suit your application.

December 02, 2014

Make your own Hygrometer

In what would be a great project to demonstrate part of the process of measuring weather data, Instructables member hansverkaik has documented how to make a classic hygrometer - a device to measure the amount of relative humidity in the air. 

This process uses two temperature sensors, one to measure the dry air temperature and another in an enclosure to measure the wet temperature. With this data the humidity can then be calculated by an Arduino or compatible and displayed on an LCD. 

For details on how to reproduce this yourself, visit the project Instructable page. And for more, we're on facebooktwitter and Google+, so follow us for news and product updates as well. 

If you're looking for a sensor to measure temperature and humidity - check out our HUMID: humidity and temperature sensor module. Designed around the DHT22 sensor, it only requires one digital pin and power - and is easy to use with out Quick Start guide. With a temperature range of -4°C to +125°C with +/-0.5°C accuracy, and humidity at 0-100% with 2-5% accuracy you're ready to measure. For more information and to order, click here