July 05, 2012

Add a speedometer to your skateboard with Arduino

 When thrashing his deck down the hallways leonardor was curious as to his actual speed when doing so. And so with some simple Arduino-based hardware, a magnet and a reed sensor - the skateboard speedometer was born. It simply works by timing the period between revolutions of the wheel, and converting it into a speed which is then display on an LCD mounted into the skateboard. You can see it in action here:

When riding your own skateboard mounted with such a display, try keep your eyes on where you're going more than the LCD! Nevertheless, to get started you can find the circuitry, instructions and code here. A project like this really needs an tiny Arduino heart, and a perfect example is our Freetronics LeoStick - the Arduino-compatible with onboard USB, RGB LED and piezo (for speed alarms!)


July 05, 2012

Build you own IKEA-framed Binary Clock

 Once again we have found an Arduino-based project that has been developed into an item that wouldn't look out of place in your home or office. Cello62 has described and built a nice binary clock which is housed in an inexpensive frame from IKEA. Apart from the frame, the clock face has been created on some acetate sheets which adds to the professional look, for example:


It's always great to see a project move from the experimental or breadboard stage to a finished product. For more information, code and circuit details visit the instructions here. The accuracy of this project could be improved greatly by the use of a real-time clock IC - for example our Real Time Clock module based on the DS3232 RTC. Accuracy is maintained with a temperature-controlled oscillator, battery backup and also 236 bytes of NV memory for user data:


July 05, 2012

DIY Low-power motion-sensing Night Light

 As a gift krazatchu designed and built an attractive night light that operates when a signal is received from a motion sensor. Although this isn't anything new - there are two points of difference which make this a great project. The first is the housing, the light has been converted from a simple project into an object that wouldn't look out of place in any home. The second is the low-power requirements - the object can operate for several years on standby using one battery, due to the creative low-power circuitry. For example:


Once again this shows what can be done with the Arduino ecosystem. For more information including code and schematic, see here. To get started with your own Arduino-controlled lighting projects, apart from our range of Arduino-compatible boards - consider our RGBLED: Full Color RGB LED Module. They are easy to connect, and you can control more than one by simply daisy-chaining them together. 


July 05, 2012

Build your own "Dice Game with no luck"

 Once again Mike Cook shows us in detail an interesting project involving an Arduino-based heart - his "Dice Game". How the game works is a little different than expected, as Mike writes:

The idea is that it is a game involving a dice, but with no random element of luck. In this game the top number on the dice is used to indicate by how much a number, or heap as I call it, should be reduced. The winner is the first to reduce it to exactly zero, or get the opponent to overshoot zero. What makes this into a game of skill is that, on any turn, the only numbers you can't use are the number already shown on the top of the dice, and the number the dice is resting on.

Certainly different - and moreso when you discover how the dice is "read" by the game. The dots are tiny magnets, and a hall effect sensor can then detect the strength of each side of the dice when laid flat on the game - therefore determining the value when face up. You can see this in action in the following video:


Certainly different and very well done. Kudos to Mike for such a great project, and documenting it for us to see. You can read all about it and download the design files from his site. When building your own Arduino-based project, consider using the Freetronics Eleven - the Arduino Uno-compatible board with low-profile USB socket, visible LEDs and onboard prototyping space:


July 05, 2012

DIY Programmable 8-step tone sequencer

The people at Beavis Audio Research were experimenting with an Arduino board to create various tones and followed this up by creating a musical sequencer with eight positions. By including controls for duration, frequency, tempo and volume some nostalgic video game sound effects can be created, for example:


By taking the time to enclose the project into a neat housing the sequencer has moved from a simple project to a product that can be used by anyone. Which goes to show what can be capable with an Arduino-based project. For more information, including design story code and schematics, visit this page. When building your own embedded-Arduino project, consider using our Freetronics LeoStick - one of the smallest Arduino-compatibles on the market with onboard USB, RGB LED and piezo:


July 04, 2012

Huge Arcade button Arduino MIDI Controller

When regular controls just aren't large enough - arcade buttons are the next step. This was the theory turned into practice by 'fraganator' who has made an amazing Arduino-based MIDI controller. Here is a detailed video demonstration of the controller in action:


Although there are a few Arduino-based MIDI controllers around for inspection, this unit is one of the best - for the performance, and the fact that the designer has published complete details including Arduino code, housing dimensions and circuitry. For more information and to get started visit here. When working on your own embedded-Arduino projects, consider the Freetronics LeoStick - one of the smallest Arduino-compatibles on the market with onboard USB, piezo and RGB LED:


July 04, 2012

DIY Mechanical Hot Water Timer Control

 Ryan Blace was looking for a way to manually turn on or off his electric hot water system, as the manual control in fitted timer box was a little too close to the mains current for his liking. Instead, he created an Arduino-controlled solution that has a servo which physically controls the switch in the original timer box - for example:


Although it can be simple to use a mains-rated relay, it can be prudent to avoid doing so when unsure about working with mains current or from a legal perspective you may not be licensed to do so. Either way, this is another example of using an Arduino board to solve a problem. For more information, visit his site here

To get started with your own timing projects, use our real-time clock module based on the DS3232 - with a temperature-controlled oscillator it is highly accurate, and has an onboard backup battery for when the power dies and 236 bytes of non-volatile memory for user data.


July 04, 2012

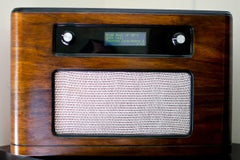
Arduino-controlled retro wifi radio

 Using a 1940s-era radio housing as a base, Jay Collett has retrofitted a modifed Asus WL-520GU router, an Arduino, LCD display and associated circuitry to create a fine-looking wifi radio. The final result is certainly a work of art:


The microcontroller part was originally based on WinAVR and C, however Jay decided to use the Arduino system instead to make the project easier for people to follow and reproduce. The hardest part may be the customised shield and circuitry for the audio section, however with some study and time this can be achievable. And the results would definitely be worth it:


To get started, Jay has made all the design files available for download, so read more about the radio and move forward from here. When creating more complex circuitry to work with an Arduino-compatible project - consider our range of ProtoShields. From the tiny LeoStick to the Mega range, we offer a complete range for you to work with


July 04, 2012

Simple DIY Arduino-based Compass

 Using an inexpensive GPS module that outputs NMEA codes and some Arduino-based hardware, Dave has created a simple yet effective LED compass. Using the popular tinygps Arduino library, Dave's code can determine the heading and illuminate an LED as such:


The housing is from a car dashboard gauge and is quite appropriate. At first this may seem like a complex project, but as shown on Dave's site it is incredibly simple to build and code for. All the required code, circuitry and more can be found here. To get started with your own Arduino-embedded projects, use a Freetronics LeoStick - one of the smallest Arduino-compatibles on the market with onboard USB, piezo and RGB LED:


July 04, 2012

Build Physical PC Status Gauges with Arduino

 Michael at Mitchtech has published a neat and simple method of creating physical gauges to show various operating parameters for his computer, for example CPU load and memory usage. He uses an Arduino board, two servos and some Python code which should take less than one hour to assemble. The results are shown in the following video:


This is another great example of how easy it is to visualise data using an Arduino board. You can read about the project and examine the code from Michael's post. To get started with your own Arduino-based projects, start with the Freetronics Eleven - the Arduino Uno-compatible with compact USB socket, onboard prototyping area and easy to read status LEDs: