July 03, 2012

Huge games with the Freetronics DMD and Wii Nunchick

 Once again Chris Debenham has used the Freetronics Dot Matrix Displays and published details on building a large-display video game system. Using two of the DMDs and one NIntendo Wii Nunchuck controller, various games such as Pong and Snake can be played. As demonstrated in the video below, the displays are smooth and don't flicker at all:


One again this shows what can be possible with an Arduino-compatible board and some imagination. Note that Chris is running the DMDs using an external power supply, however you can run one DMD directly without a power supply if you're happy with reduced brightness. We have the Dot Matrix Display boards available in several colours, including red, blue, yellow, green and white, and even without external power are easy to read indoors. 


For complete details including the Arduino sketches, visit Chris' website here

July 03, 2012

DIY Apple Remote Shield

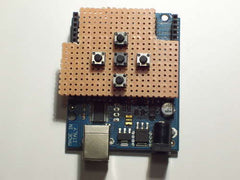
 For those with a recent Apple computer that has infra-red remote control, you can now start to automate remote commands using this simple and effective DIY Apple remote shield. This would be a great way to automate turning on the computer, and starting music playback  - or for a prank that involves "taking over" someones computer in the office. The hardware is simple and comprises of five buttons and some IR LEDs:


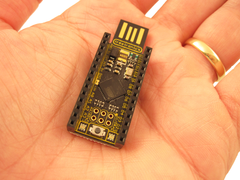
Although this could be constructed easily using an Arduino-compatible board and regular protoshield - if you wanted a smaller version, this could be done with some tight circuitry using our Freetronics LeoStick:


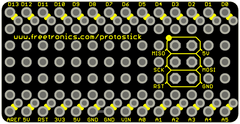
and matching ProtoStick:


To get started with your own Apple Remote shield, the instructions and code can be found here

July 03, 2012

DIY LC meter with frequency measurement

 Once again Kerry Wong has published details of a useful Arduino-based project - his LC meter with frequency measurement. To measure inductance or capacitance the frequency of an oscillator is measured, and the changes are relative to the component being measured. The theory and design of the meter has been explained in detail, and using his code you can reproduce the meter with a little effort.


Take note that Kerry has used Netbeans for the IDE, however there is a link to understand how to do this. For more design information, code and circuitry visit Kerry's detailed page here. When building your own rendition of this meter, consider using our LCD Keypad shield, which offers the 16x2 character LCD and also five buttons for input:


July 03, 2012

Build a low-fidelity Guitar Pedal with Arduino

 Using some simple external circuitry and PWM, Kyle McDonald has created an inexpensive and effective guitar effects pedal. Although the Arduino board doesn't have a true digital-to-analogue converted, Kyle's creation certain works as described, for example:


Simple, inexpensive and effective could be three words to describe the results of the pedal. Building your own would be a simple weekend project and a lot of fun for the musically-inclined experimenter. To get started with your own pedal, a solid Arduino-compatible board such as the Freetronics Eleven would be a great start:


For more information on making your own pedal, see Kyle's instructions here

July 03, 2012

Arduino-based whole house telephone intercom

 Apart from communicating with the outside world, Joe has designed an Arduino-based solution for using the home telephones as an internal home intercom system. Using the intercom is simple, by quickly picking up the handset and replacing it, the intercom cuts out the telephone line and then "rings" the phones in the house, which can then be used to converse with each other. After the internal conversation has finished, the phones are reconnected to the outside line. It also has a rudimentary form of call waiting that alerts intercom users that an incoming call is present, and they can switch to the call. Very clever. 


When building your own devices that interact with the public telephone network, be sure to understand the rules and regulations when doing so. To get started with your own intercom system, apart from some quality Arduino-compatible boards. Furthermore, you will need some protoshields to hold the extra circuitry. Consider using our range such as the Terminal Shield for Arduino:


For more information, design guides, circuitry and code - visit Joe's site here


July 03, 2012

DIY Environmental monitoring for your data centre

 Mario Guardigli shows how easy it is to monitor environments using Arduino boards with Ethenet shields and various sensors. Apart from temperature and humidity, his system can also monitor door opening/closing, and leave open the options for other types of sensors such as smoke, vibration, light and so on. The Arduino operates as a web server and the data is monitored by Zabbix (an open source distributed monitoring solution). And to save money the housings for the Arduino have been made out of PVC foam sheeting that is somewhat fire resistant.


Building this type of monitor is much cheaper than commercial solutions, and allows for expansion and experimenting with ease. To get started with your own data centre monitor, start with our Freetronics EtherTen - the Arduino Uno compatible with onboard Ethernet, microSD socket and optional power-over-Ethernet support:


 Then consider a range of sensors including the HUMID: temperature and humidity module, and a LIGHT: light sensor module to detect if someone has entered your dark server room. For more information on Mario's work, visit his site here

July 02, 2012

DIY Visual Network Threat Level Indicator

 Joe McManus has created a fascinating Visual Network Threat Level Indicator using an Arduino, Ethernet shield, LEDs and clever coding.  A PC runs a Python script which interrogates data from the Snort log (Snort is an open source network intrusion prevention and detection system) which is connected to the Arduino via Ethernet to display the threat level. For a demonstration see Joe's video here:


As Joe mentions, once the inital novelty of monitoring threat levels wane, using a tool such as this project helps keep the level at the forefront of the users' minds over time. Building your own VNTLI can be simplified using our Freetronics EtherTen - the Arduino Uno-compatible with onboard EtherNet, microSD socket and optional power-over-Ethernet support:


To get started, visit Joe's instructions here

July 02, 2012

Build your own Arduino Chicken Coop Controller

 To save the effort of getting up at sunrise to let the chickens out, instructables user Robot Chicken has designed and built an excellent chicken coop door controlled by an Arduino, the motor from a power tool and some simple circuitry. This is a prime example of the level of automation and control that can be achieved with the Arduino platform.


Now all the user needs is a deterrent device for foxes and the setup would be complete. To get started with your own automation systems, consider using the Freetronics Eleven - the Arduino-compatible with onboard prototyping area, and our LCD Keypad shield, which makes using an LCD very simple:


For more information including a detail design and build story, visit the instructions here

July 02, 2012

Reduce data acquisition costs with an Arduino-compatible board

In the process of investigating new ways of data acquisition for a course, Educator Jose Ives has detailed his experience with comparing an Arduino board against a National Instuments USB-6009 Data Acquisition device. From a software perspective he used the NI LabView software with their device; and the Arduino IDE with Firmata, Python and so on.


Although the NI device had a great resolution and sample rate - the entry cost per example just for the hardware is over $300. Furthermore the LabView software can be somewhat expensive, even for student pricing. From an educator's perspective that's a lot of money and certainly an investment for something that can possibly be damaged or go missing in a classroom environment. 

Thus using an Arduino-compatible board for data acquisition in an education setting can save a lot of money, reducing expense and also allow many other uses. A perfect solution - as long as the sampling speed and resolution meet the needs of the experiment. And with the use of data logging software such as MegunoLink, an inexpensive data acquisition system can be had for less than $40 per head when used with a sturdy Arduino-compatible board such as our Freetronics Eleven:


Fore more information about Jose's research and his results, visit the blog here

July 02, 2012

Playing Pong with Arduino-based "Cansole"

 John Graham-Cumming has used an Arduino-compatible board, simple circuitry, and two metal cans to create a simple games console that plays Pong. Programming for Arduino video out is simple using the tvout library, and the code for many games is freely available around the Internet. Here is a short demonstration of the Cansole at play:


It just goes to show once again what you can do with Arduino and some imagination. To get started with your own Arduino-embedded projects, use the Freetronics LeoStick - one of the smallest a on the market with full USB interface, a piezo and onboard RGB LED:


And for more information on the Cansole including code and circuitry, visit John's blog here