July 13, 2012

Convert an Electric Wheelchair to a Robot

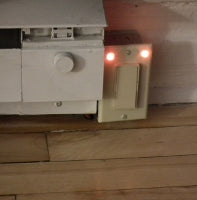
 Software programmer and technology enthusiast Nick Fryer decided to convert his old electric wheelchair to a type of robot by using some Arduino-compatible hardware and external circuitry to interface with the wheelchair control panel. After using some exisiting plans Nick discovered that his controller had two x- and y-axis control feeds each. Nevertheless this was overcome easily by using two twin digital to analog converters and associated circuitry.


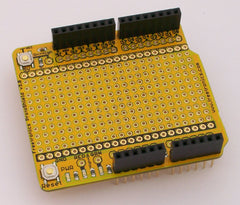
The wheelchair robot is a work in progress and we look forward to following the project as it take shape. For more information, check out Nick's blog here. To get started with your own Arduino-based project, consider our Freetronics Eleven - the Arduino-Uno compatible with low-profile USB socket, onboard prototyping space and easy to view LEDs:


July 13, 2012

Electric Heater Control with X10 and Arduino

 Finding themselves with electric heaters with useless thermostats, the people at foulab needed a better way to keep the heaters on and control the temperature. Instead of running mains leads around their apartment, they modified an X10 protocol wireless controller with some Arduino-compatible hardware and an external temperature sensor to build an intelligent thermostat that can control the heater in place. 


For more information including the hardware, code and design diary visit their site here. To get started with your own temperature-controlled projects, consider using our TEMP: DS18B20-based temperature sensor module:


... or our HUMID: Humidity and Temperature sensor module based on the popular DHT22 sensor unit. Both modules are fully documented and easy to get started with. These are only two of over a dozen of our sensor and outputs modules

July 13, 2012

Control your hifi over the web with Arduino

 From Ken Shirriff - the man who brought us the incredibly useful Arduino IR library comes another excellent project idea. Using a PC running the Python web server, a web page with graphical remote control is available on his home network. Clicking on the web page accessible by any web-enabled device (such as the phone below) sends a code to the web server, which sends it over the serial port to the Arduino, which sends it to the IR LED, which controls the hifi (or other IR-controlled device).


This is another successful Arduino integration of two technologies to make life easier. Using this method on a wifi-enabled web device allows control of any IR devices anywhere within wifi range, offering a much larger radius of control. What a great idea! For more information and to get started, visit Ken's site here. To get started with your own Arduino-embedded projects, consider using the Freetronics LeoStick - one of the smallest Arduino-compatibles  on the market with onboard USB, RGB LED and piezo:


July 13, 2012

Ravioli - the Arduino-powered Laser Painter Project

 And now for something completely different is the "Ravioli" Laser Painter. In summary, a laser pointer is fitted to a tilt/pan head controlled by two servos via an Arduino. The laser beam is then controlled to draw words on a wall. The text to display comes from a PC running a Python script. Furthermore the Arduino also controls the exposure time of a digital camera - when set to a long time, it can capture the entire writing of the laser pointer. For example:


This is a very inventive project and would be a lot of fun to make party or event souvenirs, or just as another form of random interactive art. For more information including code and design, check the project page. When creating projects with external circuitry to work with anArduino-compatible project - consider our range of ProtoShields. From the tiny LeoStick to the Mega range, we offer a complete range for you to work with


July 13, 2012

Using Arduino and CueCat scanners to read barcodes

During the dot-com boom , one of the "next best things" was the CueCat - a type of personal scanner that could read coded URLs in advertising and feed them to a web browser. Freetronics customer 'damcave' retrieved a CueCat and has documented neatly a way to make it read standard bar codes using some Arduino hardware and ingenuity. 


You can see in the image above that connecting external hardware to an Arduino-compatible board is very simple with the terminal shield, our solid protoshield that still allows more shields to stack on top. The matching Arduino sketch outputs the barcode number and type to the serial monitor, as shown below:


Once again, this is a prime example of how you can use Arduino-compatible hardware to interface with a wide variety of objects. For all the theory and details, check here. To get started with your own Arduino-based project, consider our Freetronics Eleven - the Arduino-Uno compatible with low-profile USB socket, onboard prototyping space and easy to view LEDs:


July 13, 2012

Play Atari 2600 with NES Controller via Arduino

 If you are a vintage video game conoisseur and Arduino enthusiast - here's the project for you. 'danjovic' found himself with a bunch of Atari 2600s but no working joysticks, but he did have something else ... so using an Arduino-compatible board and some simple circuitry, he designed a method to command an Atari 2600 with an original Nintendo Entertainment System controller. 


You have to congratulate someone for having such a high level of tenacity to build such an interface. The project could also lend itself to automated Arduino-control of the Atari game - you could program in a set of 'perfect moves' and just sit back. Either way, check out the designs here. When you need to fit an Arduino-compatible board inside a small controller - there's only one solution: the Freetronics LeoStick - one of the smallest Arduino-compatibles  on the market with onboard USB, RGB LED and piezo:


July 12, 2012

The Arduino-powered Mousetrap

 Scott Metoyer like many of us has a mouse problem, and turned to an Arduino for another solution to the constant problem of making a better mousetrap. His design is a mix of old and new technology - when entering a container which is propped up by a small piece of wood,  the mouse trips a wire which commands the Arduino to turn a servo which removes the prop. For example:


Simple yet effective. The only hurdle is tricking the mouse into the container! So for more information, code and details, visit Scott's page here. To get started with your own mousetrap or Arduino-based project, consider our Freetronics Eleven - the Arduino-Uno compatible with low-profile USB socket, onboard prototyping space and easy to view LEDs:


July 12, 2012

Build your own automatic pet water dish

 One of the possible problems with pet ownership is ensuring they have a constant supply of water, and are trained to return to the water bowl when thirsty. The team at AVBrand have solved the water supply problem with an Arduino-controlled water pump and valve system. Not only does it simply fill the dish, it waits until it is truly empty before refilling, to minimise the growth of bacteria due to still water. You can see it in action here:


Another problem solved with an Arduino and some imagination. Now to train the dog! In the meanwhile, to make your own follow the instructions here. To get started with your own Arduino-embedded projects, consider using the Freetronics LeoStick - one of the smallest Arduino-compatibles  on the market with onboard USB, RGB LED and piezo:


July 12, 2012

The Autonomous Cat Laser Toy

 Technology enthusiast and cat fancier 'joe' has described a project to amuse the cat without too much interaction on his part. By mounting a laser pointer on a servo-controlled tilt/pan unit, his Arduino board can point the laser beam in various directions to amuse the cat. This project also has other applications - just add a more powerful laser beam and your imagination. In the meanwhile, here's a demonstration of the toy in action:


The instructions and Arduino code can be found here. To get started with your own Cat Laser or replica laser weapons, consider our Freetronics Eleven - the Arduino-Uno compatible with low-profile USB socket, onboard prototyping space and easy to view LEDs:


July 12, 2012

DIY OATH OTP Generator with Arduino

 Just to clear things up, the title for this article should be "Do It Yourself Open Authentication One-Time Password Generator with Arduino" - but it doesn't fit in the allowed space... Moving forward, Jose Damico has created this OTP generator using an Arduino and LCD module. It's function is to creating time-based OTPs, and once generated the user has 30 seconds before it expires. You can see it in action below:


For more information, links and source code, visit the project page. To  get started with your own OTP generator, use our Freetronics Eleven - the Arduino-Uno compatible with low-profile USB socket, onboard prototyping space and easy to view LEDs - and our Freetronics LCD and Keypad shield. It contains a bright 16x2 character LCD module as well as five buttons that are read with only one analogue input: