July 12, 2012

Make your own Arduino-based Polygraph Machine

 Whether you need to double-check if your flatmate drank all the milk, re-enacting the CIA interrogation scenes from "Night Flight to Moscow", or just for fun - having your own polygraph machine could be very useful. Naturally a real one would cost thousands, however as always you can make your own version with an Arduino board and some tin foil (for the sensors, not a hat). The design is quite simple as it measures the conductivity of skin (and sweat...) and returns the value via analog inputs, which can then be graphed on a PC using Processing:


The theory is that conductivity is proportional to the level of deceit. Your milage may vary. Nevertheless, you can find the instructions and Arduino code over at the Mad Science site. An ideal base for your polygraph and other projects is our  Freetronics Eleven - the Arduino-Uno compatible with low-profile USB socket, onboard prototyping space and easy to view LEDs:


July 12, 2012

Learn Morse Code with Arduino

 As a tool for helping to memorise Morse code, 'thegrendel' has designed and built a simple Arduino project to solve the problem nicely. His design is a shield comprising of an LCD module, LED, piezo and simple circuitry that works with the Arduino sketch to display and beep  the Morse characters in order, then randomly once more. The author recommends this as a method to memorise the characters. Here is his project in action:


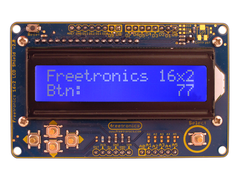
Although the instructions show making the shield from scratch, you could reproduce this much quicker using our Freetronics Eleven - the Arduino-Uno compatible with low-profile USB socket, onboard prototyping space and easy to view LEDs - and our Freetronics LCD and Keypad shield. It contains a bright 16x2 character LCD module as well as five buttons that are read with only one analogue input:


July 12, 2012

Build your own Arduino-based Light-Seeking robot

 Alex from Tinkerlog has designed and built a very simple yet somewhat intelligent light-seeking robot. It used two light-dependent resistors to measure light levels which are converted to values via the Arduino-compatible board. Servos that have been modified to rotate at 360 degrees drive the wheels, and the direction is a function of the light levels. You can see the robot in action below:


Building the robot is very easy, and would also make a simple classroom or weekend project for younger children to demonstrate the technology. Instructions and design tips can be found at Alex's page here. To get started with your own Arduino-embedded projects - consider using the Freetronics LeoStick - one of the smallest Arduino-compatibles  on the market with onboard USB, RGB LED and piezo:


July 11, 2012

Build a simple Arduino-controlled Sunrise Lamp

 By modifying a simple LED lamp, 'PKM' has created a simple 'Sunrise Lamp'. These types of lamps turn on slowly, starting from darkenss and slowly increasing brightness until operating at full power - emulating the effects of the rising sun. Using these is said to be relaxing and help people wake up in a natural method - without having to deal with the "shocks" of turning lights on early in the morning. Here is his example in action:


... however other forms of LEDs could be used.  Unfortunately the original design relies on an external time switch, but the design could be easily modified with a real-time clock module to allow for accurate internal timekeeping and control. For more information visit the instructions here. To get started with your own Arduino-based projects, consider our Freetronics Eleven - the Arduino-Uno compatible with low-profile USB socket, onboard prototyping space to add the real-time clock module and easy to view LEDs:


July 11, 2012

Pranking Apple Mac users with Arduino

 Computer enthusiasts generally fall into three categories - Windows, Mac or Linux-based. To generate some short-lived and hopefully good-natured pranks on the Mac users, the following project may be of interest. It's a small Arduino-controlled infra-red transmitter that over a random period of time can send a variety of random controls or random button presses to a desktop Mac. Once hidden on a bookshelf or begind the user, some very frustrating mayhem could ensue. 


To get started, see the code and instructions here. To build your own version is easy, and as size is important - consider using the Freetronics LeoStick - one of the smallest Arduino-compatibles  on the market with onboard USB, RGB LED and piezo:


... then mount the infra-red LEDs onto a matching ProtoStick:


July 11, 2012

Hacking toy EEG readers with Ardiuno

 As a base for another project - Eric Mika, Arturo Vidich, and Sofy Yuditskaya deconstructed a Mattel "Mind Flex" game in order to use the EEG reader for their own purposes. This device reads the electrical activity around one's scalp, which can be classed as a measurement of the brain's activity. They have created enough hardware to extract the data from the EEG, and also published a Processing sketch to help visualise the data. For example:


To get started with your own EEG project, and for their code and designs - visit here. To move forward with your own Arduino-embedded projects, consider the Freetronics LeoStick - one of the smallest Arduino-compatibles  on the market with onboard USB, RGB LED and piezo:


July 11, 2012

Build your own "Sigh Collector"

Whether this is a method for recording the number of sighs a person makes over a period of time, an avante-garde artform or a device to monitor one's mental state of mind, the "Sigh Collector" is an interesting example of using an Arduino to solve a problem. It works by monitoring the chest size, and wirelessly sending the data back to a control unit which inflates a bladder after each sign. For example:


For more information and design details, visit here. To get started with your own Arduino-based projects, consider our Freetronics Eleven - the Arduino-Uno compatible with low-profile USB socket, onboard prototyping space and easy to view LEDs:


July 11, 2012

Make music with a chess board and Arduino

 Two Norweigian technology enthusiasts and artists have created a step-matrix sequencer that is controlled via chess pieces and an Arduino Mega-style board. A chess board is fitted with reed switches under every position, and they are activated by magnets buried inside chess pieces. The reed switches are then monitored via the Arduino Mega, and other parameters are controlled by a customised control box. See it in action below:


Although this would seem to be rather complex, it could be recreated in a day or two. To get started, find the complete instructions and code here. You'll need an Arduino-compatible board with plenty of I/O - which means our Freetronics EtherMega - the fully Arduino Mega2560-compatible board that also includes a microSD socket and Ethernet:


July 11, 2012

DIY Internet-connected Seismic Activity Monitor

 Electronics enthusiast 'veedo' has created a device that monitors for seismic activity and other vibrations which displays the data via a simple Arduino-based local web server that can be accessed from any Internet-connected device. Using a film-tab piezo sensor and analogue circuity, the system detects frequencies of around 1 to 20 Hz. 


For more details, circuitry, code and so on - visit the instructions here. To recreate your own version - you can save time and money by using our Freetronics EtherMega - as it is a fully Arduino Mega2560-compatible board that also includes a microSD socket and Ethernet:


Furthermore the sensor circuitry can be built onto a matching Mega-sized Protoshield:


July 10, 2012

Uploading Arduino Sketches Via A Network

If you have Arduino-based devices attached to a network, it can be really annoying when you have to upload a new sketch by taking your laptop to the device and connecting up a USB lead. Well, now you don't have to!

Our newest tutorial shows how to use the network connection itself to send new sketches to Arduinos on your network, such as our EtherTen with PoE support:


The Arduino needs a special bootloader installed as explained in the tutorial:

How To Upload A Sketch To Your Arduino Via A Network

Once you have everything set up you can just push out new sketches to devices anywhere in the building, without having to be anywhere near them.

We'd love to hear if you're using this handy technique, so please post about it in the forums if you've given it a go.