July 17, 2012

Emulating a USB Joystick with the Freetronics LeoStick

 Freetronics forum member 'drake250' was wondering if he could emulate a USB joystick using the Freetronics LeoStick - and the answer was Yes. Doing so is very simple when you know how, and he has detailed the procedure which involves changing the HID descriptor code for the LeoStick and some other simple software modifications. 


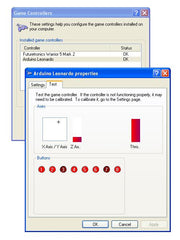
As the member notes - the little Leo' can do it all! So to replicate the joystick yourself, head over to the Freetronics forum for the notes and required files.  And we're on twitter, so follow us for news and product updates as well. 

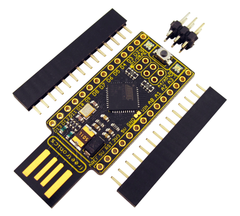
To get started with your own embedded-Arduino and USB emulation projects - look no further than the Freetronics LeoStick. Apart from being one of the smallest Arduino-compatibles on the market with USB, it also has an onboard RGB LED and piezo for sound and knock detection:


July 17, 2012

DIY Webcam Panner with Arduino

What started out to be a simple project to move a webcam on its axis soon morphed into a project that allows remote control of the webcam rotation over the Internet to allow Skype participants more freedom on watching their participants. Using some Meccano, an Arduino and other hardware 'werner.vrens' has created a device which rotates via either a thumb joystick, terminal commands via the PC or using a simple node.js webserver can be controlled over the 'net.


At each level of detailed control this is a fun and relatively simple project to liven up those Skype calls. To get started, visit the project page for code and notes here. And we're on twitter, so follow us for news and product updates as well. 

As we always say, this type of project lends itself to Arduino-based control over the Internet - and to take advantage of these features, consider the Freetronics EtherTen. Apart from being fully Arduino Uno-compatible, it has onboard Ethernet, microSD socket and supports optional Power-over-Ethernet:


July 17, 2012

Arduino-controlled PV Power Diverter

 Solar power enthusiast Robin Emley has devised a simple yet effective system that diverts excess energy from his photovoltaic (solar) power system to the water heater. However energy is only diverted once their is a pre-determined excess after every cycle which avoids leaving the household without PV energy. The power is diverted by an Arduino-controlled Motorola MOC3041 and a triac bolted to a huge heatsink:


Remember when working with mains current - even if off the grid, check the relevant local licensing regulations. For more information on the project, visit Robin's detailed page with code, schematic and other notes. And we're on twitter, so follow us for news and product updates as well. 

This type of project lends itself to not only Arduino-based control, but also monitoring over a network or the Internet. To take advantage of these features, consider the Freetronics EtherTen. Apart from being fully Arduino Uno-compatible, it has onboard Ethernet, microSD socket and supports optional Power-over-Ethernet:


July 17, 2012

Unbrick Seagate 7200.11 Hard Drives with Freetronics Eleven

 Freetronics forum member "rapslogan" had a Seagate 7200.11 hard disk drive, which is notorious for deciding it is permanently busy and then refuses to be recognised by the system BIOS - rendering all the data inaccessible. However there is a solution which involves the Freetronics Eleven to act as a USB to UART adaptor, then with some commands sent via terminal software the drive becomes less ignorant of the world around it and carries on as normal. 


For the solution and more information about the problem, visit our Freetronics Forum. And we're on twitter, so follow us for news and product updates as well. 

To get started with your own Arduino-based project or hard-drive repair sideline, consider our Freetronics Eleven - the Arduino-Uno compatible with low-profile USB socket, onboard prototyping space and easy to view LEDs:


July 16, 2012

Monitor your home electricity meter with Arduino

 As energy prices increase, an increasing number of people seriously monitor their energy consumption (and also solar feedback if connected as well). Doing so can be quite a challenge, as there are a limited number of systems available, and the cost can be prohibitive. Although based in the UK, Dave Berkeley has documented a system that uses an Arduino to receive the infrared data from his "elster" brand electricity meter and send it to a PC for analysis via Python code. Furthermore, the data can then be sent to cosm (Pachube) for further display and analysis.


Although you may have a different type of meter, Dave's instructions should help inspire the efforts to work with your own types. For more information and code, visit the project page here And we're on twitter, so follow us for news and product updates as well.

To get started with your own Arduino-based project, consider our Freetronics Eleven - the Arduino-Uno compatible with low-profile USB socket, onboard prototyping space and easy to view LEDs:


July 16, 2012

Make an animated rabbit ear with Arduino

After only having an Arduino for just over a week, after having ard for only 1 week, "Cheeriobot" has started on a project for building an animated robot rabbit. Their first stage was creating an animated ear, and this has been quite successful. By making the ear frame from solid 14 AWG copper wire, it is strong yet lightweight. The ear can rotate over almost 180 degrees, and the top can tilt up and down, for example:

A great start to what looks to be an interesting journey in animatronics. For their plans and Arduino code, visit the project page here. And we're on twitter, so follow us for news and product updates as well.

To get started with your own Arduino-based project, consider our Freetronics Eleven - the Arduino-Uno compatible with low-profile USB socket, onboard prototyping space and easy to view LEDs:


July 16, 2012

Create sound effects with a Theremin

 For something fun and different, consider building your own Theremin. This is a simple device that generates a radio wave and send the frequency to the Arduino to be converted to a simple sound matching the frequency. The term "theremin" comes from the effect that occurs when a person (or conductive material) comes close to the antenna (shown below) and causes the frequency of the oscillator to change. 


For more information, complete plans and a video demonstration, visit the project page here. And we're on twitter, so follow us for news and product updates as well.

When creating projects with external circuitry to work with an  project - consider our range of ProtoShields. From the tiny LeoStick to the Mega range, we offer a complete range for you to work with


July 16, 2012

Build your own Arduino-based fortune teller

 Using an Arduino, LCD and an accelerometer, 'alecnotalex' has created a simple and fun "Magic Eight Ball" fortune teller. By shaking the device, it randomly selects a phrase to display on the LCD, similar to the liquid "eight balls" of the past. See it in action in the following video:


Another fun and simple project made easy with the Arduino ecosystem. To get started, you can find the instructions and code here.  If you were looking to recreate this project, it could be reduced in size very well by using a Freetronics Eleven board, one of our LCD Display Keypad shields, and mounted on a protoshield - our AM3X: accelerometer module:


July 16, 2012

DIY Arduino-controlled analogue clock movement

 And now for something completely different - instructions on how to control inexpensive analogue clock movements with an Arduino-compatible board. Although the method isn't the most accurate, you can have fun creating all sorts of crazy clocks and confuse people by running too fast or slow, or perhaps a different style of analogue gauge. 


For more information and to get started, check out the project page here. To get started with your own clock designs, visit a discount store to salvage a clock module - and our online store for a Freetronics LeoStick. Apart from being one of the smallest Arduino-compatibles on the market, it has onboard USB, RGB LED and a piezo for sound and alarm effects as well:


July 16, 2012

Automate repetitive typing with an Arduino

 Using an inexpensive numeric keypad and an Arduino Leonardo-style board, Nick Gammon has created a simple USB keyboard shortcut device. The result is the ability to send a string of text with the press of a button straight to a PC, as the Leonardo (and our LeoStick) emulates a keyboard very easily. 


Although this is a simple project, it has many applications. From saving time repeating paragraphs of text (great for standard disclaimers and rejections!) to password entry or sequences for games. So to get started, check out Nick's post here. And to get started with your own  Arduino-embedded keyboard emulator, use our Freetronics LeoStick - the Arduino Leonardo-compatible with onboard USB, RGB LED and piezo: