July 24, 2012

Control Arduino digital pins via the Internet

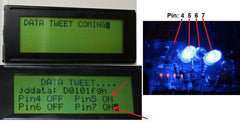
 There are many examples of controlling an Arduino board over the Internet, and almost every method seems to be slightly different. However in the following instructables, 'otaviousp' has done a great job not only with the explanation but also the implementation - they offer a simple web-based interface with radio buttons to control the pins. 


With some time and the right hardware, you'll be controlling your board from almost anywhere. So to move forward, check out the instructions here. And we're on twitter, so follow us for news and product updates as well.

To get started with your own Ethernet-controlled Arduino system - use the Freetronics EtherTen. Apart from being fully Arduino Uno-compatible, it has onboard Ethernet, microSD socket, full USB connection (no pesky FTDI cables needed) and supports optional Power-over-Ethernet:


July 24, 2012

Controlling many LEDs with Arduino via Charlieplexing

 There are some fields of working with electronics that anecdotally have been difficult for some enthusiasts to understand, and the concept of "Charlieplexing" has been one of them. However we've found a great tutorial by Riaan Cornelius that explains both the theory and practice, and after following it you'll be up and blinking in no time. In their words:

... the principle behind Charlieplexing is fairly simple. If you hook up 2 LED's between 2 micro-controller pins with 1 anode towards pin 1 and one anode towards pin 2, you turn on LED1 by setting pin 1 HIGH and pin 2 LOW. To turn LED2 on you reverse it - Set pin 1 LOW and pin 2 HIGH... 


So to get started with your own LED display projects, check out Riaan's tutorial here. And we're on twitter, so follow us for news and product updates as well.

If your display size needs can't be met by a bag of LEDs and a lot of wiring, consider firing up a Freetronics Dot Matrix Display:


They're simple to use, yet very bright for indoor and outdoor situations. Available in various colours, the 32 x 16 LED matrix can display text and graphics quite easily - and can be daisy-chained together for extended displays. For more information, see our range of Dot Matrix Displays here


July 23, 2012

DIY twitter and Arduino interaction system

 Although twitter is considered a simple push-messaging service, by combing an Ethernet-enabled Arduino board and some crafty coding you can control an Arduino board via twitter, and also display data from twitter - and have the Arduino 'tweet' back a reply with various data. This can be useful for remote control of ... almost anything, and remote retrieval of data that can be captured by an Arduino system. 


Thanks to 'xenonjohn' all this has been explained and documented well, so click here to read the instructions. And we're on twitter, so follow us for news and product updates as well.

To build your own twittering Arduino system, use the Freetronics EtherTen. Apart from being fully Arduino Uno-compatible, it has onboard Ethernet, microSD socket and supports optional Power-over-Ethernet:


July 23, 2012

Using Nokia 6300 LCD Displays with Arduino

 Arduino enthusiast Andy Brown has made a huge effort in creating a hardware and Arduino library solution to using Nokia 6300 QVGA LCD screens with an Arduino. Although the PCB connector for the LCD may be a somewhat difficult, the hardware schematic is available to download so you can design your own interface board. The matching library is well documented, and the results are quite impressive:


So if you have an older Nokia 6300 laying about, or need to build a colour LCD shield on the cheap, check out Andy's project page here. And we're on twitter, so follow us for news and product updates as well.

If your display size needs can't be met by a mobile phone LCD, consider firing up a Freetronics Dot Matrix Display:


They're simple to use, yet very bright for indoor and outdoor situations. Available in various colours, the 32 x 16 LED matrix can display text and graphics quite easily - and can be daisy-chained together for extended displays. For more information, see our range of Dot Matrix Displays here


July 23, 2012

Repurpose a HP LaserJet 4 Control panel with Arduino

 Once the workhorse printer for many offices, the hordes of HP LaserJet 4 printers are now heading off to recycling, landfill or the side of the road. If you can get your hands on one, extract the display module control board from the top-right, as they contain a VFD and keypad which can be reused with minimal effort with Arduino control. For example:


Using the display and board is made possible with the M66004Vfd library and documentation available on the Arduino website here. And  please be careful when working with the VFD display due to the higher voltages present. And for more news, product updates and information, follow us on twitter.

So if this sort of project intrigues you and you're new to Arduino, the first step is a solid board for your projects - our Freetronics Eleven - the Arduino-Uno compatible with low-profile USB socket, onboard prototyping space and easy to view LEDs:


July 23, 2012

How fast can you toggle an Arduino I/O pin?

 Arduino enthusiast Udo Klein was pondering how fast one could toggle an Arduino digital pin, and has documented the theory and demonstration code from his experiments. Instead of digitalWrite(), Udo has used port manipulation which saves time due to the bloated nature of the former function with respect to the original code. This is a prelude to main goal of determining how fast an Arduino could count 20-bit numbers without using external hardware. This has also been demonstrated by counting with Gray code and shown using the following LED shield:


For more information, code and notes visit Udo's site here. For more tutorials about Arduino port manipulation, visit here. And we're on twitter, so follow us for news and product updates as well. 

When creating projects with external circuitry to work with your project - consider our range of ProtoShields. From the tiny LeoStick to the Mega range, we offer a complete range for you to work with


July 23, 2012

DIY Motorised Antenna Tuner with Arduino

 Amateur radio enthusiast Ernest Neijenhuis has documented his experiments with creating an Arduino-controlled antenna tuner. A powerful servo is connected to the antenna rotation axis and can be easily controlled with the servo library. Over time Ernest proposes to have the Arduino monitor the SWR meter to create an automatic tuner system. For now, here is the tuner demonstration:


Although HAM radio and the Arduino development boards may seem like a world apart, many operators have found synergy between the two. In the meanwhile, follow Ernest's experiments and notes here. And we're on twitter, so follow us for news and product updates as well. 

If this sort of project intrigues you and you're new to Arduino, the first step is a solid board for your projects - our Freetronics Eleven - the Arduino-Uno compatible with low-profile USB socket, onboard prototyping space and easy to view LEDs:


July 23, 2012

The Arduino Simple Task Scheduler

 During the development of an Arduino-based balloon flight computer, the designers required a method of scheduling and queuing various functions within the sketch to keep the complex flight system running smoothly. Using their Arduino library, you can now schedule functions to run after a set amount of time, or repeat after periods of time, and so on. 


Libraries such as this can improve the longevity of an Arduino-based prototype in that it could negate the requirement for updating to a more complex development environment. For more information, library and documentation visit the project information and GitHub page. And we're on twitter, so follow us for news and product updates as well. 

When your projects outgrow the normal Arduino-compatible boards, running out of program and flash memory space, or you're stacking on Ethernet and microSD shields, or all at once - it's time to upgrade to the Freetronics EtherMega:


Quite simple the EtherMega is the fully-loaded Arduino-compatible board on the market today. Apart from being completely Arduino Mega2560-compatible, it includes full Ethernet interface, a microSD card socket, full USB interface, optional Power-over-Ethernet support and still has a circuit prototyping area with extra I2C interface pins. So if your project is breaking the limits, upgrade to the EtherMega today. 

July 22, 2012

Crack PC BIOS Passwords with an Arduino and time

 Although it may not be the fastest way of running a brute-force password attack on a PC BIOS, the theory of operation is interesting and novel. The Arduino board is programmed to become a virtual USB keyboard in order to enter keystrokes to the PC - and it also reads the VGA signal from the PC to determine what is being displayed on the monitor. This is done to determine what the PC is 'saying' and allows the cracker to determine its next move. 


Apart from cracking BIOS passwords, this project could be modified to determine PC status - if you can predetermine what is displayed on a monitor, the Arduino can read this and do your bidding. For more information, the circuit and sketch visit the AlferSoft blog here. And we're on twitter, so follow us for news and product updates as well. 

To get started with your own Arduino-embedded projects, look no further than the Freetronics LeoStick. Apart from being one of the smallest Arduino-compatibles on the market with USB, it also has an onboard RGB LED and piezo for sound and knock detection:


July 22, 2012

Control a webcam from any Internet-enabled device and Arduino

 Using Arduino-based hardware, a pan/tilt sensor, and some bridging software amccoy6 has designed and documented a method of controlling a webcam (or anything else with some application) from a web browser. If you webcam was connected to a live-streaming service - then you can make a simple remote surveillance system. With some imagination the possibilities are quite interesting. 


Although this type of project may sound complex, it isn't and could be completed over a lazy weekend. The hardest part is most likely finding a lazy weekend! Nevertheless, to get started check out the instructions page here. And we're on twitter, so follow us for news and product updates as well. 

If this sort of project intrigues you and you're new to Arduino, the first step is a solid board for your projects - our Freetronics Eleven - the Arduino-Uno compatible with low-profile USB socket, onboard prototyping space and easy to view LEDs: