


There are some fields of working with electronics that anecdotally have been difficult for some enthusiasts to understand, and the concept of "Charlieplexing" has been one of them. However we've found a great tutorial by Riaan Cornelius that explains both the theory and practice, and after following it you'll be up and blinking in no time. In their words:
... the principle behind Charlieplexing is fairly simple. If you hook up 2 LED's between 2 micro-controller pins with 1 anode towards pin 1 and one anode towards pin 2, you turn on LED1 by setting pin 1 HIGH and pin 2 LOW. To turn LED2 on you reverse it - Set pin 1 LOW and pin 2 HIGH...

So to get started with your own LED display projects, check out Riaan's tutorial here. And we're on twitter, so follow us for news and product updates as well.
If your display size needs can't be met by a bag of LEDs and a lot of wiring, consider firing up a Freetronics Dot Matrix Display:
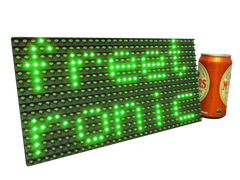
They're simple to use, yet very bright for indoor and outdoor situations. Available in various colours, the 32 x 16 LED matrix can display text and graphics quite easily - and can be daisy-chained together for extended displays. For more information, see our range of Dot Matrix Displays here.


