August 08, 2012

Build your own Arduino OctoSynth

 Technologist Joe Marshall was considering a first music device for his young daughter, and decided to go one better than commercially available units and make his own. Instead of a simple eight-button tone organ, Joe has used eight bolts as capacitive touch sensors - making a simple and relatively child-proof input system. The Arduino sketch falls towards the more complex end, using some assembler and allowing for concurrent chords. The result is shown below:


As you can hear the sound quality is quite good considering the simple hardware used. For more information and the sketch (read this for hardware notes) visit Joe's page here. And we're on twitter and Google+, so follow us for news and product updates as well.

If you are new to Arduino, join in with our range of Arduino-compatible hardwareprototyping shields and module range. A good start is the Freetronics Eleven, the Arduino Uno-compatible board with onboard prototyping space:


August 07, 2012

Controlling door locks with secret knocks

 Technologist Rob Hemsley has documented a method of creating a different yet fascinating type of door lock control. By turning the metal door handle into a capacitive sensor, an Arduino board measures the pattern of  'taps' or 'knocks' made on the handle. If the pattern matches the numerical equivalent stored in the EEPROM, the door is unlocked using a servo. For example:


To reproduce this system yourself, head over to Rob's website here. And we're on twitter and Google+, so follow us for news and product updates as well.

To get started with your own embedded-Arduino and USB emulation projects - look no further than the Freetronics LeoStick. Apart from being one of the smallest Arduino-compatibles on the market with USB, it also has an onboard RGB LED and piezo for sound and it's own form of knock detection:


August 07, 2012

DIY Huge RGB LED Clock

 Arduino enthusiast Burak has created a wonderful LED clock that uses three rings of individually-addressed LEDs along with the usual numbers to create what could be classed as a work of art. There is also temperature and humidity display with the time. It's also good to see him using a real-time clock IC for accuracy instead of using internal Arduino functions. 


Furthermore, you can download all the design files to make your own PCB and rendition of the clock. So to get started, head over to the project page here. And we're on twitter and Google+, so follow us for news and product updates as well.

The most important part of any clock project is the inclusion of an accurate real-time clock IC. Here at Freetronics we have the Maxim DS3232 real-time clock IC module:


Apart from keeping accurate time for years due to the temperature-controlled oscillator and having a tiny coin-cell for backup, it is very simple to connect to your Arduino project. A driver library allows your program to easily set or read the time and date. Perfect for clock projects, dataloggers or anything that needs to know the date and time. Furthermore it contains a digital thermometer and 236 bytes of non-volatile memory to store user settings and other data. For more information, check out the module page here


August 07, 2012

Control Ethernet-enabled TV via LAN

 Arduino forum member 'goofball' has documented his work in progress which is the control of a Sharp LCD television via his home network. Using an Arduino Mega and custom RS232-interface circuitry, he can control the TV via a web interface. Following this is an Android app to control the TV instead, and the code is included for your perusal. 


For more information, code downloads and notes visit the Arduino forum. And we're on twitter and Google+, so follow us for news and product updates as well.

When your projects outgrow the normal Arduino-compatible boards, running out of program and flash memory space, or you're stacking on Ethernet and microSD shields, or all at once - it's time to upgrade to the Freetronics EtherMega:


Quite simple the EtherMega is the fully-loaded Arduino-compatible board on the market today. Apart from being completely Arduino Mega2560-compatible, it includes full Ethernet interface, a microSD card socket, full USB interface, optional Power-over-Ethernet support and still has a circuit prototyping area with extra I2C interface pins. So if your project is breaking the limits, upgrade to the EtherMega today. 


August 06, 2012

Build your own Humanoid Robot

 Sometimes you can create what seem to be complex things with only simple electronics and an Arduino board. One example of this is Guilherme Martins' humanoid robot. He took a wooden doll and fitted it with eight small servos. These are then controlled by eight potentiometers read by an Arduino Mega board. Each potentiometer returns a value to an analogue input which is convert to an angle for the matching servo. Simple yet effective, for example:


This simple humanoid could also be a form of output for various types of input based on user control, artificial intelligence, or even dance when a new email arrives. Many possibilities ... so check out Guilherme's project page to get started. And we're on twitter and Google+, so follow us for news and product updates as well.


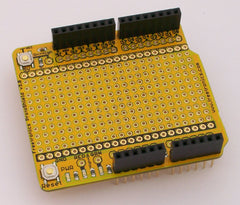
When working on your own projects based on an Arduino Mega or EtherMega that require external circuitry or wiring, consider using a Freetronics Protoshield Mega. It includes the male header pins and a reset button to fit, and is also a little shorter to allow space for the RJ45 socket on an EtherMega. For more information and to order, visit the product page

August 06, 2012

Backup Sega Mega Drive cartridges with Arduino Mega

 After his experimenting with reading the data from Sega Mega Drive console cartridges, Lee has now documented the methods for backing up the contents of an entire game cartridge to a PC. Using an Arduino Mega-style board, and a PC running a python scipt you can blast the whole ROM over to the PC, and save the contents as a personal backup. 


So if you need to backup your old Mega Drive games - now is the time. Head over to the project page for the Arduino sketch and python code. And we're on twitter and Google+, so follow us for news and product updates as well.

To follow Lee's project you'll need a Mega-compatible board such as the Freetronics EtherMega:


Quite simple the EtherMega is the fully-loaded Arduino-compatible board on the market today. Apart from being completely Arduino Mega2560-compatible, it includes full Ethernet interface, a microSD card socket, full USB interface, optional Power-over-Ethernet support and still has a circuit prototyping area with extra I2C interface pins. So if your project is breaking the limits, upgrade to the EtherMega today. 


August 06, 2012

How to make "not space invaders"...

 After some experimenting with a Freetronics Eleven board, Australian technologist Julius Roberts rose to the challenge of making something more than a blinking light display and instead came up with his "TINY" game. Using a 5 x 5 LED matrix as a display, you can play a game that involves moving your player left and right and shooting objects that appear at the top of the display. Considering the resolution of the matrix, the game plays very well. For example:


Kudos to Julius for such a playable game using such a small amount of external hardware. For more information and the Arduino sketch, head over to Julius' project page here. And we're on twitter and Google+, so follow us for news and product updates as well.

If you're working with Arduino projects like Julius' that require some external circuitry, consider one of our range of Protoshields. From the tiny LeoStick to the Mega range, we offer a complete range for you to work with


August 06, 2012

Simple and inexpensive oscilloscope with Arduino

 Over at the Mitchtech blog are the instructions for making a very, very simple oscilloscope using an Arduino and a host PC. How it works is easy - the values measured by analogue pin zero are sent to a host PC via the serial output, which are then interpreted by a processing sketch which displays the value over time. Note that you can only read DC waveforms between zero and just under five volts DC, but it could be useful as a simple logic analyser or just for fun. 


For more information, including the Arduino and processing sketches, head over to the mitchtech blog. And we're on twitter and Google+, so follow us for news and product updates as well.

If you are new to Arduino, join in with our range of Arduino-compatible hardwareprototyping shields and module range. A good start is the Freetronics Eleven, the Arduino Uno-compatible board with onboard prototyping space:


August 06, 2012

Build a "Magic: The Gathering" Life Counter

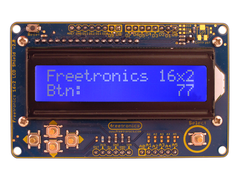
 Freetronics forum member eturnerx has used our LCD Keypad Shield to make a simple yet useful life counter to be used when playing the card game "Magic: The Gathering". As there are five included buttons on the shield, a simple user interface has been created which simplifies the hardware required down to the shield itself and an Arduino or compatible board. You can see it in action with a great demonstration in the following video:


It's great to see our products put to good use, and you can check out the code used from here. And we're on twitter and Google+, so follow us for news and product updates as well.

For your own projects that require user input and an LCD - save time and move forward with the Freetronics LCD & Keypad shield which contains a bright 16x2 character LCD and five buttons that can be read from only one analog input pin:


August 06, 2012

DIY Binary-Analogue Clock

 Instructables member Dennis Cwik has published details about his "Cwik Clock" - a fascinating mix of a binary and analogue-meter display clock powered by the Arduino platform. Although binary clocks aren't anything new, Dennis' version is finished nicely and has a sensible user interface. Furthermore, the seconds are displayed using the analogue panel meter on the top, for example:


Another great project with purpose and a great result. To get started with your own version, check out Dennis' instructions here.

And we're on twitter and Google+, so follow us for news and product updates as well.

Although some clock designs rely on internal timing in software, for accuracy and reliability include an accurate real-time clock IC. Here at Freetronics we have the Maxim DS3232 real-time clock IC module:


Apart from keeping accurate time for years due to the temperature-controlled oscillator and having a tiny coin-cell for backup, it is very simple to connect to your Arduino project. A driver library allows your program to easily set or read the time and date. Perfect for clock projects, dataloggers or anything that needs to know the date and time. Furthermore it contains a digital thermometer and 236 bytes of non-volatile memory to store user settings and other data. For more information, check out the module page here