August 15, 2012

Monitoring a Continuous Integration Server with Traffic Lights and an Arduino

 The team at Isotope|11 have created an interesting solution to the problem of real-time project status monitoring by using a traffic light display to show the progress with their continuous integration server. This is great for a quick glance of the status, or a way to keep the team working hard to avoid a red light. Either way, they've made a demonstration video below: 


Apart from sourcing a traffic light head, the rest is pretty easy. Ruby and Arduino code is provided along with the required schematics, so visit the project page to get started with your own. And we're on twitter and Google+, so follow us for news and product updates as well.

When creating more complex circuitry to work with an Arduino-compatible project - consider our range of ProtoShields. From the tiny LeoStick to the Mega range, we offer a complete range for you to work with.


August 15, 2012

Programming your Arduino with Atmel Studio v6

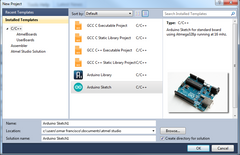
 Seasoned AVR programmers or those who aren't so keen on the minimalist Arduino IDE will find this tutorial interesting. Omar Francisco has simplified a tutorial on how to use Atmel's Studio 6 IDE to program Arduino boards by creating an installation script that takes care of most of the setup for you. Then he continues to describe how to create new projects and Arduino libraries in the IDE. Using Studio 6 is also a good idea if you're looking to transition from the Arduino to raw AVR or ARM Cortex work, as you can gain familiarity with the software now and reduce your learning curve when changing platforms. 


So to get started head over to Omar's blog here. And we're on twitter and Google+, so follow us for news and product updates as well.

If you are new to Arduino, join in with our range of Arduino-compatible hardwareprototyping shields and module range. A good start is the Freetronics Eleven, the Arduino Uno-compatible board with onboard prototyping space:


August 14, 2012

Duelling twitter lights

 Technologist Andrew Fisher has created a way of displaying complex data in a very simple form. The project consists of two RGB-capable lights that will change colour based on some information, and in this case trending topics on twitter which are predetermined in the code. In the following video Andrew explains the whole project:


These lights would be a great tool for someone who constantly monitors twitter but still needs to get on with normal work. For more information including the code and notes, visit Andrew's page here. And we're on twitter and Google+, so follow us for news and product updates as well.

When recreating Andrew's project or building your own networked Arduino project, consider using our Freetronics EtherTen. Apart from being fully Arduino Uno-compatible, it has onboard Ethernet, microSD socket, full USB connection (no pesky FTDI cables needed) and supports optional Power-over-Ethernet:


August 14, 2012

Computer-controlled electric wheelchair

Software programmer and technology enthusiast Nick Fryer has updated us with his progress towards making a computer-controlled wheelchair. In this update he has completed the Java software running on a PC which will control the chair, and also the wireless Arduino-controlled  circuitry that interfaces with the chair's joystick controller. The project is a success and an interesting version of large scale computer-controlled robotics. 


This is a pretty cool project, in that Nick has succeeded in interfacing a computer and Arduino board with something that was most definitely not designed to be hacked into. Click here to visit his project blog for more information. Kudos to Nick and we look forward to his updates. And we're on twitter and Google+, so follow us for news and product updates as well.


In his project Nick used an Arduino Mega-style board, and if you're needing one we have the most feature-packed Arduino Mega 2560-compatible board on the market. Quite simply the EtherMega is the fully-loaded Arduino-compatible board on the market today. Apart from being completely Arduino Mega2560-compatible, it includes full Ethernet interface, a microSD card socket, full USB interface, optional Power-over-Ethernet support and still has a circuit prototyping area with extra I2C interface pins. So if your project is breaking the limits, upgrade to the EtherMega today.


August 14, 2012

DIY Pentax SLR Intervalometer

 Technologist Randy Sarafan has documented how to make a useful yet simple intervalometer for Pentax SLR cameras. The purpose of an intervalometer is to automatically release the shutter regularly over fixed periods of time. Randy's model can also control whether or not the auto-focus reoccurs before every exposure. The whole project is made possible with an Arduino board and simple external circuitry, which makes the project accessible for almost everyone. 


To get started with your own intervalometer, click here for Randy's instructions. And we're on twitter and Google+, so follow us for news and product updates as well.

When creating more complex circuitry to work with an Arduino-compatible project - consider our range of ProtoShields. From the tiny LeoStick to the Mega range, we offer a complete range for you to work with.


August 14, 2012

Make your own Strobe Algae Bioreactor with Arduino

 For those of you with a biological bent and have an interest in generating different types of algae, the following project should be of interest. Jared Bouck has documented not only the electronics side using an Arduino board but the construction details for the bioreactor as well. 


According to Jared

each algae species reacts differently in many ways to its environment and a light frequency that affects one algae may have no effect at all on another. So I have created an easy to build microcontroller platform that can be variably set and allows for easy configuration to any bioreactor. The LEDS can be swapped out to experiment with different colors and even UV for some hydrogen producing species. The platform is flexible enough to add other features like relay control for lighting, pumps, agitation and cooling and heating. While you may not be an algae fan like I am there is tremendous potential in this simple organism ...


Certainly something different, yet achievable. So to get started visit the project page here. And we're on twitter and Google+, so follow us for news and product updates as well.


If you're looking to make your own projects that could use different light effects, consider the Freetronics RGBLED: module. It includes a bright RGB LED on the top of the board and a WS2801 constant-current, addressable, multi-channel LED driver on the back. This smart module can be daisy-chained, so you can connect a number of these together in a string and drive each of the module colours individually from your microcontroller. For more information and to order, visit the product page.


August 14, 2012

Interface a rotary telephone dial with Arduino

 If you have a few rotary phone spare that can't be restored, you can always use the dial for a different form of user input. Instructables user guidomax has done just that, by documenting how to remove the dial and measure the pulses generated from the mechanism when dialled with an Arduino. From this point you can then do almost anything depending on your requirements and imagination. For example, sending tweets


So once you have a phone to hack up, head over to the instructions and get started. In the meanwhile, we're on twitter and Google+, so follow us for news and product updates as well.

An interesting hack might be to embed the board inside the telephone and get up to some mischief. To do this, consider embedding the Freetronics LeoStick. Apart from being one of the smallest Arduino-compatibles on the market with USB, it also has an onboard RGB LED and piezo for sound effects and knock measurement:


August 14, 2012

The "Xtreme Buzzwire" Game

 For the purposes of an Arduino jam session, Kristof van Opstal made an electronic version of the "buzzwire" game. This is an electronic version of the loop around the curly wire game - where you win by moving the loop from one end to the other without bumping the wire. Kristof's version added two servos which were used to alter the wire for the opponent if you made a mistake, adding a twist to the game. Not a bad effort considering the time constraints involved. Here's a short demonstration of the game in play:


This is an idea project for beginners or something to do on a rainy weekend with the young ones. For complete notes and instructions, visit the project page here. And we're on twitter and Google+, so follow us for news and product updates as well.

If you are new to Arduino, join in with our range of Arduino-compatible hardwareprototyping shields and module range. A good start is the Freetronics Eleven, the Arduino Uno-compatible board with onboard prototyping space:


August 13, 2012

DIY Weasley Clock with Arduino

 John McKerrell used an Ethernet-enabled Arduino board, stepper motor, old clock and some clever coding to check the mapme.at service to create a Weasly Clock. This is not a clock as such, but a clock-like device that shows the location of a person using the hands of the clock. Instead of attempting to modify the clock mechanism a continuous-rotation servo was fitted instead. The concept is from the series of movies about a young boy with magic properties. Here is a short demonstration of the clock:


Certainly something different and a novel use for an old clock and an Arduino board. For more information, check out John's interesting blog, and examine the code from here. And we're on twitter and Google+, so follow us for news and product updates as well.

When making your own project that requires an Arduino board and Ethernet shield, don't double up! Instead, use a Freetronics EtherTen. Apart from being fully Arduino Uno-compatible, it has onboard Ethernet, microSD socket, full USB interface (so you don't need a costly FTDI cable just to upload a sketch!) and supports optional Power-over-Ethernet:


August 13, 2012

Wii and Arduino-controlled LEGO turret

 Jonathan Robson has found great synergy between LEGO, Star Wars, Nintendo Wii and the Arduino development platform. The result of this is his LEGO turret controlled by a Nintendo Wii nunchuck. Although such a project will amaze onlookers, it's quite easy to make and can be completed in a lazy afternoon. For a demonstration watch the following video:


Even if you're not interested in making a turret, it's a great demonstration on how to use the nunchuck controller and interpret the commands coming from it. So to get started check out Jonathan's instructions page here. And we're on twitter and Google+, so follow us for news and product updates as well.

When creating more complex circuitry to work with an Arduino-compatible project - consider our range of ProtoShields. From the tiny LeoStick to the Mega range, we offer a complete range for you to work with.