August 17, 2012

Create a simple DAC for your Arduino

 Unfortunately the Arduino specification doesn't include a true digital-to-analogue converter, however we do have the pulse-width modulation with analogWrite(). You can, however, create a more accurate rendition of a DAC using external discrete components. The people at 'provideyourown' have demonstrated how to do this quite easily. Using a simple resistor-capacitor circuit a reasonable result can be generated.


For more information about this handy tip, visit the project page here. And we're on twitter and Google+, so follow us for news and product updates as well.

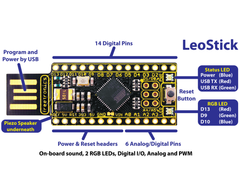
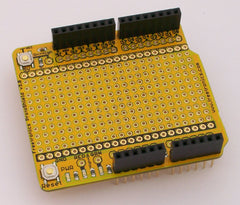
When creating more complex circuitry such as a digital-to-analogue converter for your Arduino - consider our range of ProtoShields. From the tiny LeoStick to the Mega range, we offer a complete range for you to work with.


August 17, 2012

The Intervaluino - Canon EOS Intervalometer

 Photographer Tim Suess rediscovered his love of electronics and found synergy between photography and electronics with his project. He has used an Arduino board to create a simple intervalometer to use with his Canon EOS 400 camera system. It also works with any Canon camera that has a 2.5mm remote shutter release socket. Using the Intervaluino you can control the shutter release, autofocus and allows an interval between exposures up to 24 days and 20 hours. Furthermore the instructions are quite clear including how to make the remote cable:


Apart from being a useful project it's also a demonstration of how people can use an Arduino to solve a problem. To get started with your version head over to Tim's project page here. And we're on twitter and Google+, so follow us for news and product updates as well.

When making your own intervalometer you can increase exposure delay accuracy or set an alarm for a certain exposure time using a real-time clock module. Here at Freetronics we have the Maxim DS3232 real-time clock IC module:


Apart from keeping accurate time for years due to the temperature-controlled oscillator and having a tiny coin-cell for backup, it is very simple to connect to your Arduino project. A driver library allows your program to easily set or read the time and date. Perfect for clock projects, dataloggers or anything that needs to know the date and time. Furthermore it contains a digital thermometer and 236 bytes of non-volatile memory to store user settings and other data. For more information, check out the module page here


August 16, 2012

Build your own Capacitance Meter with Arduino

 Over several posts Daniel Min Hyuk Jang has described how to build your own capacitance meter with an Arduino. Although it is a work in progress, the theory behind using RC time constants to determine the C value and Daniel's take on the project is quite interesting. Furthermore there are some other interesting related posts on his website. In the meanwhile, here's an example of the C-meter:

To get started, visit here for the project main page, here for the code. And we're on twitter and Google+, so follow us for news and product updates as well.


 When making your own Arduino projects with a character LCD - save time and move forward with the Freetronics LCD & Keypad shield which contains a bright 16x2 character LCD and five buttons that can be read from only one analog input pin:

August 16, 2012

DIY Concussion Alert Helmet

 Ice hockey players can be quite susceptible to concussion due to the rigours of the game, and can often be unaware of receiving it until the dangerous effects occur later on. Canadian Michael Vaughn has created a possible solution to the problem of not detecting the immediate signs of concussion with a special helmet. Containing a force sensor that is read by an Arduino-style board, the level of shock is displayed using LEDs on the side of the helmet. Then it is easy for the team coach to determine which players have received a dangerous shock and pull them from the game. For example:


For more information and plans, visit Michael's page here. And we're on twitter and Google+, so follow us for news and product updates as well.


When developing your own Arduino-embedded projects, consider the Freetronics LeoStick. Apart from being one of the smallest Arduino-compatibles on the market with USB, it also has an onboard RGB LED and piezo which can be used a knock sensor, perhaps removing the need for the external force sensor in this project. 

August 16, 2012

Rixrover - the hacked RC Car with Arduino

 Pierric Gimmig has found an inexpensive remote-controlled toy car and modified it in order to allow control via Arduino and a PC. The interface is simple enough - by using optocouplers each button from the remote transmitter can be activated by the Arduino digital output pins. The car then supports a larger frame with the electronics and notebook computer, which will then receive commands from the Internet and relay them to the car. For example:


For more information and code, head over to the Rixrover page. And we're on twitter and Google+, so follow us for news and product updates as well.


As you can see from the RixRover project, some external circuitry was required and this can be housed nicely on our Freetronics Terminal Shield for ArduinoThe Terminal Shield breaks out all the Arduino headers to handy screw terminals, making it really easy to connect external wires to your motors without using a soldering iron. Ideal for quick experiments or for robust connections!


August 16, 2012

Make your own electromagnetic field meter

After receving complaints about possible electromagnetic interference affecting medical machines, Adam Outlet made a simple EMF detector with an Arduino board and some LEDs. It is quite effective and can show the results easily, for example:


For more information including the Arduino sketch, head over to the project page hereAnd we're on twitter and Google+, so follow us for news and product updates as well.

If you are new to Arduino, join in with our range of Arduino-compatible hardwareprototyping shields and module range. A good start is the Freetronics Eleven, the Arduino Uno-compatible board with onboard prototyping space:


August 15, 2012

Play N64-emulator games using the original controller and Arduino

 Instructables member and NIntendo64 fan 'quasse' has described how to use the original Nintendo64 controller with a PC running an N64 emulator via an Arduino. Naturally the Arduino board is the bridge between the PC's USB port and the N64 controller, and the process to do this is quite simple. He also includes the Processing sketch which interprets the signals from the controller via the Arduino, and converts them to the relevant key presses for the emulator software. 


So if late 1990s video games take your fancy, or you'd like to play one more game of "GoldenEye", check out the instructions here. And we're on twitter and Google+, so follow us for news and product updates as well.

When creating more complex circuitry to work with an Arduino-compatible project - consider our range of ProtoShields. From the tiny LeoStick to the Mega range, we offer a complete range for you to work with.


August 15, 2012

Binary clock using "Connect-4" game and Arduino

 Instructables user 'Emacheen22' has started making things with his Arduino and has documented his binary clock. In this version of the Arduino users' rite-of-passage, he has fitted the LEDs inside a classic "Connect 4" game vertical board, so as to illuminate pieces in the board with LEDs. For example:


Although a simple project it's a good one for the beginners or those short on time but needing fast results. To get started with your own visit the project page here. And we're on twitter and Google+, so follow us for news and product updates as well.

Many beginners fall into the trap of making their own clocks and relying on the Arduino's internal timing systems - then become unhappy due to the lack of accuracy. This can be avoided by using a real-time clock IC. Here at Freetronics we have the Maxim DS3232 real-time clock IC module:


Apart from keeping accurate time for years due to the temperature-controlled oscillator and having a tiny coin-cell for backup, it is very simple to connect to your Arduino project. A driver library allows your program to easily set or read the time and date. Perfect for clock projects, dataloggers or anything that needs to know the date and time. Furthermore it contains a digital thermometer and 236 bytes of non-volatile memory to store user settings and other data. For more information, check out the module page here

August 15, 2012

Simple font generator for Graphic LCD and Arduino

 Over at the microintegrate website is a very simple yet useful tool that will help create font files for use with the Arduino graphical LCD library. You can upload  a .gif file containing the character set you'd like converted to a font file, and the tool will output the header file that you include with the GLCD library. What a great time-saver!


So to get started with your own fonts, head over to the font generator page here. And we're on twitter and Google+, so follow us for news and product updates as well.

If you don't need something as complex to display text for your own projects - save time and move forward with the Freetronics LCD & Keypad shield which contains a bright 16x2 character LCD and five buttons that can be read from only one analog input pin:


August 15, 2012

Control brushless DC motors with Arduino

 Brushless DC motors are different to 'normal' motors found in cheap toys and stores in that they require a three-phase DC square-wave to operate. However these sorts of motors can be scavenged from old media drives and other forms of dead technology. Not surprisingly an Arduino board can be the foundation of a brushless motor controller by generating the required signals and switching it through a bank of transistors to deal with the higher current requirement. The people at Filear have done just that and documented the process over two parts. Here's an example from part one:


For more information, code and schematics visit the tutorial parts one and two. And we're on twitter and Google+, so follow us for news and product updates as well.


As you can see from the motor tutorials, some external circuitry was required and this can be housed nicely on our Freetronics Terminal Shield for Arduino. The Terminal Shield breaks out all the Arduino headers to handy screw terminals, making it really easy to connect external wires to your motors without using a soldering iron. Ideal for quick experiments or for robust connections!