August 21, 2012

DIY Arduino-powered LED calculator

 Technologist Keith has documented his LED calculator - based around an Arduino, a rotary encoder, LCD and other circuitry. With it the user can set the LED parameters with the required data being displayed on the LCD. Purists will say nothing beats simple arithmetic and a data sheet, but it's fun to make an electronic version, for example:


For more information, code downloads and design history - check out Keith's blog here. And we're on twitter and Google+, so follow us for news and product updates as well.

When making your own Arduino projects with a character LCD - save time and move forward with the Freetronics LCD & Keypad shield which contains a bright 16x2 character LCD and five buttons that can be read from only one analog input pin:


August 21, 2012

Add louder audio to Arduino projects

 Sometimes you want your Arduino-based projects to make a loud noise, much louder than what is possible with a piezo or small speaker. To do this, you need to build a small external circuit based around the popular LM386 speaker amplifier IC. The team at RC Car-Arduino have described a simple circuit to allow you to create loud sounds with your Arduino and said circuit, for example:


Not too bad for a small circuit, that can be easily modified for fun and annoying others. To get started head over to the project page here. And we're on twitter and Google+, so follow us for news and product updates as well.


When creating more complex circuitry such as a multiple-servo controller as described above for your Arduino - consider our range of ProtoShields. From the tiny LeoStick to the Mega range, we offer a complete range for you to work with.


August 20, 2012

The Multixylophoniomnibus

 As part of a project three students created a machine, based around an Arduino board, that will create a series of unusual sounds using unusual methods. Using the Arduino, many piezo elements, a toy xylophone, and much more - they have created a sound-effects machine that not only looks interesting but also works very well. You can see it in action below:


For an excellent description of the Multixylophoniomnibus, visit the project page hereAnd we're on twitter and Google+, so follow us for news and product updates as well.

When developing your own Arduino-embedded projects, consider the Freetronics LeoStick:


 Apart from being one of the smallest Arduino-compatibles on the market with USB, it also has an onboard RGB LED and piezo which can be used a knock sensor and various tune and sound effects. For more information and to order, click here


August 20, 2012

Real-time audio frequency analysis with Arduino

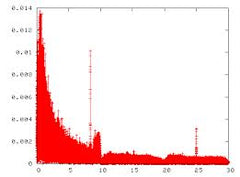
 The people at the Open Music Labs have just released a new Arduino library that allows real-time audio frequency analysis via fast-fourier transformations. It can update at a rate of one data group per 7 milliseconds. According to the library site:

The Arduino FFT library is a fast implementation of a standard FFT algorithm. It can give you up to 256 frequency bins at 16b depth, at a minimum of ~7ms update rate. It is adjustable from 16 to 256 bins, and has several output methods to suit various needs. It can be set to 16b linear, 8b linear, 8b logarithmic, or 8b octave output. All of these different modes are detailed in the read_me file (inside the FFT library folder). Since it takes in 16b, fixed point numbers, it has a noise floor of around -72dB in the low frequencies, and -78dB in the high frequencies. When using the onboard ADC, the ADC's noise floor is on the same order as the FFT's noise floor, giving somewhere between a 9b and 10b SNR (-55dB).


Kudos to the Open Music Labs, and for more information and the library download, click hereAnd we're on twitter and Google+, so follow us for news and product updates as well.

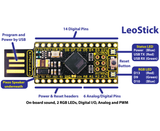
If you're interested in capturing audio and working with the data using your Arduino board, consider our MIC: microphone sound response and sound pressure level sensing module:


An integrated dual signal amplifier converts the sound to separate channels for pulse / frequency measurement, and sound volume (pressure) level. Designed to connect straight to an Arduino compatible microcontroller, Analog to Digital converter, or many other circuits. For more information and to order click here

August 20, 2012

Burning the Arduino bootloader using another Arduino

 Sooner or later you're going to destroy the microcontroller in your Arduino board, and to save money you can buy the ATmega328s directly without the Arduino bootloader. Therefore the next step is to upload the bootloader software which makes the "Arduino" world possible with your hardware. Although the procedure isn't new, instructables user 'frollard' has made a great video which explans the process very clearly, as shown below:


For more information and other items of interest, check out the instructables page. And we're on twitter and Google+, so follow us for news and product updates as well.

If your projects have outgrown your Arduino Uno-style board, consider moving up to a Freetronics EtherMega:


Quite simple the EtherMega is the fully-loaded Arduino-compatible board on the market today. Apart from being completely Arduino Mega2560-compatible, it includes full Ethernet interface, a microSD card socket, full USB interface, optional Power-over-Ethernet support and still has a circuit prototyping area with extra I2C interface pins. So if your project is breaking the limits, upgrade to the EtherMega today. 

August 20, 2012

Measure the Vcc voltage applied to an Arduino

 Scott Daniels has published an interesting tutorial on making use of the ability of an AVR to measure the internal 1.1V reference voltage. The resulting value can then be used to determine the voltage at Vcc - which is ideal for monitoring the project supply voltage, and also used to improve the accuracy of analog input readings and therefore any measurements following this. Very useful indeed - as when running from 5V the analogRead range falls below 5V and accuracy can suffer. 


For more information, visit Scott's tutorial pagesAnd we're on twitter and Google+, so follow us for news and product updates as well.

If you are new to Arduino, join in with our range of Arduino-compatible hardwareprototyping shields and module range. A good start is the Freetronics Eleven, the Arduino Uno-compatible board with onboard prototyping space:


August 20, 2012

Control ten servos with an Arduino using two pins

 Normally to drive a servo from an Arduino you use a digital pin for each servo (plus 5V and GND). However using a method and Arduino library published at the RC Arduino blog, you can control up to ten servos using only two digital I/O pins and an external 4017 logic IC. It's much easier than you think, and really saves on I/O pins. The only warning to heed is that you don't exceed the current ability of your Arduino, and therefore power the servos separately.


To get started, head over to the explanation page here. And we're on twitter and Google+, so follow us for news and product updates as well.

 When creating more complex circuitry such as a multiple-servo controller as described above for your Arduino - consider our range of ProtoShields. From the tiny LeoStick to the Mega range, we offer a complete range for you to work with.


August 20, 2012

Romantic "beating" heart shows distance between people

 For those with a more romantic bent comes a great project from instructables user 'ghostbust555'. Using an Ethernet-enabled Arduino board it determines the distance between the project and another person using an Android phone running a custom app. The project contains a laser-cut acrylic heart illuminated by bright LEDs - which increase their blink rate when the person with the Android phone comes closer. 


For complete instructions, Arduino sketch and the Android code head over to the project page here.  And we're on twitter and Google+, so follow us for news and product updates as well.

When recreating your own beating distance heart or building a networked Arduino project, consider using our Freetronics EtherTen. Apart from being fully Arduino Uno-compatible, it has onboard Ethernet, microSD socket, full USB connection (no pesky FTDI cables needed) and supports optional Power-over-Ethernet:


August 17, 2012

Make your own OSC controlled decorative Bird Box

 'kazimier' in the Arduino forum has released the information required to make some great electronic decorative bird boxes. Containing a variety of speakers, LEDs and stepper motors - a decorative bird box for a pop-up garden was made possible. Furthermore they can be controlled via Ethernet and the ArdOSC library. Here's a great demonstration of the boxes in action:


 An imaginative and interesting application of an Arduino board. For more information head over to the Arduino forum to get started with your own. And we're on twitter and Google+, so follow us for news and product updates as well.

To recreate your own version of the bird boxes, you'll need an Arduino-compatible board with Ethernet, such as our  Freetronics EtherTen or EtherMega boards - complete with onboard Ethernet, microSD card and optional POE support:


August 17, 2012

Using DC printer motors as a servo with Arduino

 Josh Kopel has written a detailed series of articles on using DC motors pulled from inkjet printers. They can be used as servos, as they often have optical encoders attached due to the original purpose of the motors - to move and track the motion of print heads and paper through the printer. Therefore by using the encoder you can create a servo-like device with reasonable success. Watch the following video for a quick demonstration:


If you find success with one then all those cheap inkjet printers may have a second life once the ink runs out. So to get started head over to Josh's project pages here. And we're on twitter and Google+, so follow us for news and product updates as well.

If you are new to Arduino, join in with our range of Arduino-compatible hardwareprototyping shields and module range. A good start is the Freetronics Eleven, the Arduino Uno-compatible board with onboard prototyping space: