September 03, 2012

The Arduino-controlled Dishwasher

 When the controller board in their Maytag dishwasher died  - instead of forking out for the factory replacement part at over $150, they turned to Arduino to solve the problem. After some analysis and working out the logic of the controls between the controller and the functions, it was simple enough to create the Arduino-based controller. Furthermore they can also create customised wash cycles - for example longer rinse or hot wash times. Interesting stuff. Here's a quick demonstration video:


It just goes to show what you can do with existing commercial applicances - they are often much simpler than we expect. For a full description of the process, click here. And we're on twitter and Google+, so follow us for news and product updates as well.

When working with the dishwasher above, the hacker created their own relay bank. You can control relays in a much easier way using our new RELAY8: 8-channel relay driver shield:


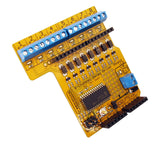
You can drive up to 8 relays from your Arduino using just 2 I/O pins with this shield. It communicates with your board using I2C, so you can even stack several shields together to drive 16, 24, or more outputs! Includes back-EMF protection and works with a wide range of relays. Perfect for home automation projects! For more information and to order, click here

September 03, 2012

Wifi spectrum analyser project

 Extraordinary Arduino forum member bilbo has published details of his wifi spectrum analyser. Based around a minimalist Arduino, wifi module and Nokia 3310 LCD it is an interesting project to follow and even use yourself. The purpose for creating such a device is to locate local interference to the area of radio spectrum around 2.4 GHz - which is used by 802.11b/g/n wifi equipment. Like most projects on the Arduino forum it's a work in progress - however the following video shows what the creator is up to:


For more information, check out the Arduino forum posts here. And we're on twitter and Google+, so follow us for news and product updates as well.

Thinking of embedding an Arduino-compatible board in your next project? Consider using the Freetronics LeoStick:


 Apart from being one of the smallest Arduino-compatibles on the market with USB, it also has an onboard RGB LED and piezo which can be used a knock sensor and various tune and sound effects. Plus you can add extra circuitry with the matching protostick! For more information and to order, click here.


August 31, 2012

DIY twitter-controlled message display

 Although originally designed to be an automated way of leaving messages on your office door, this project can be used anywhere that an Ethernet-enabled Arduino board can be installed. Using some nifty coding, the Ardiuno can parse an RSS feed from your twitter account and display messages on an LCD module when the appropriate sequence of characters has been detected in the feed. This could be considered a one-way paging unit where the message comes from the twitter world. Furthermore it can also read the temperature from an external service and display this as well. Neat.


Although this may sound complex, it's pretty easy. So click here to get started. And we're on twitter and Google+, so follow us for news and product updates as well.

Looking to do this for yourself? Then you need an Ethernet-enabled Arduino board. We have two, the Freetronics EtherTen:


... the Arduino-Uno compatible with onboard Ethernet, microSD socket and optional PoE. Or if you need an Arduino Mega2560 board, consider the Freetronics EtherMega:


Quite simply the EtherMega is the fully-loaded Arduino-compatible board on the market today. Apart from being completely Arduino Mega2560-compatible, it includes full Ethernet interface, a microSD card socket, full USB interface, optional Power-over-Ethernet support and still has a circuit prototyping area with extra I2C interface pins. So if your project is breaking the limits, upgrade to the EtherMega today. 


August 31, 2012

Make your own simple Kitchen Timer

 And now something for those just starting to experiment with their Arduino boards - a great little kitchen timer project brought to us by Instructables user 'anonymouse197'. By using their Arduino, ten LEDs and other simple hardware along with a piezo buzzer - a customisable timer can be made. The LEDs are used to show the time left during operation, and also form part of the user interface. Watch the following video for more notes and a demonstration:


As always this project is open for modification, such as reducing the time periods represented by the LEDs or having it play a tune when the alarm activates. So to get started, click hereAnd we're on twitter and Google+, so follow us for news and product updates as well.

When making your own projects that require a buzzer or the ability to play a reasonable tune - use the Freetronics SOUND: sound and buzzer module:


This versatile piezo-element module can be used for both input or output! It can be used as a noise-maker driven by your microcontroller for audible feedback of events, and it can also be used as a knock-detector input to sense events and react to them. Includes a built-in 1M resistor to allow the piezo element to detect shocks. For more information and to order, click here


August 31, 2012

Thoughts about Arduino and Finite State Machines

 Over at the 'hacking majenko' site, Matt has articulated his thoughts on different methods of programming an Arduino. Not different as in language, different as in the algorithm created to solve the problem. In his article Matt proposes thinking about a project in the terms of a finite state machine (FSM). In doing so, this increases the structure and reduces the need to rely on if, then, else, while and the delay functions. Furthermore by thinking of your project as an FSM, it is easier to add more functionality to the code later in following updates, as you're just introducing more actions that can happen upon an event. 


Apart from theoretical discussion Matt has included examples of an Arduino sketch to demonstrate his points. For more information click here. And we're on twitter and Google+, so follow us for news and product updates as well.

If you're interested in more detailed and useful projects based around an Arduino board - read a copy of "Practical Arduino" by Jonathan Oxer and Hugh Blemings:


Create your own Arduino-based designs, gain an in-depth knowledge of the architecture of Arduino, and learn the easy-to-use Arduino language all in the context of practical projects that you can build yourself at home. Get hands-on experience using a variety of projects and recipes for everything from home automation to test equipment. For more information and to order, click here


August 30, 2012

Make a typewriter with an old keyboard, dot matrix printer and Arduino

 Francisco Reinoso has found a fun way to use technology that ordinarily would probably be left on the footpath for the garbage collection. He has used an old PC keyboard with the original DIN-interface, a dot-matrix POS printer with a Centronics interface and connected the two with an Arduino. This results with a project whereby the user can simply type something on the keyboard, press enter - and the text is printed. For the non-believers, check the following video where Francisco runs through the entire project:


This is one of those projects that show how easily you can control something with an Arduino. For the sketch, notes and schematics download Francisco's pdf file. And we're on twitter and Google+, so follow us for news and product updates as well.


Although working with a Centronics interface is easy with Arduino, there are some devices that use a 3.3V line voltage instead of 5V. When you're faced with this situation - don't panic! Make sure you have some of our LEVEL: bidirectional 5V-3.3V level converters in stock. For more information and to order, click here.

August 30, 2012

Control a RC Car via a PC and Arduino

 Almost any inexpensive remote-control car or toy has a simple remote control that consists of normal buttons. Taking advantage of this, the remotes can be opened and connected to digital outputs of an Arduino board to allow control via the sketch. The people at the JBprojects blog have taken this one step further by writing Java software to create a control panel which can then forward commands to the car via the Arduino and the USB-serial connection on the board. Here is a quick demonstration of it in action:


The hardware required to complete this project is incredibly easy, and would make a fun afternoon tooling around. So to get started, click here for the detailed instructions, Java code and Arduino sketch. And we're on twitter and Google+, so follow us for news and product updates as well.


When recreating the car control project, you'll need a protoshield to mount the external circuitry. In doing so, consider our range of ProtoShields. From the tiny LeoStick to the Mega range, we offer a complete range for you to work with.


August 30, 2012

Display PC CPU and memory load with analogue meters

 From "The mad science of an insane ginger" blog comes a simple project of interest to the PC performance enthusiasts. Using an Arduino and two analogue panel meters, the CPU load and memory usage can be displayed using information sent from a python script running on the PC. Analogue panel meters can be driven quite easily using pulse-width modulation and this is also the case in this project. And by making your own background images for the meters and a nice housing, you can turn this into a professional project.


For more information, the Arduino sketch and python code head over to the article here. And we're on twitter and Google+, so follow us for news and product updates as well.

If Arduino is new to you, a great start is our Freetronics Eleven - the Arduino-Uno compatible with low-profile USB socket, onboard prototyping space and easy to view LEDs:


August 30, 2012

Improved Arduino timer library

 Arduino enthusiast and author Simon Monk has created his own version of the Arduino timer library in order to overcome some shortcomings of using the delay() function - as it holds up everything. With his library you can create multiple events that can be activated within a sketch and operate on their own timings. It's a clever library and worth investigating further. 


To do so, visit Simon's blog for more examples and to download the library. And we're on twitter and Google+, so follow us for news and product updates as well.


For longer timing events that require working with real time and date - consider using our super-accurate real-time clock module. Based on the DS3232, it has a temperature-controlled crystal oscillator for accurate time keeping, battery backup and 236 bytes of non-volatile memory for user data. For more information, see our modules page


August 30, 2012

Make your own coffee bean roaster with Arduino

 Instructables user 'nightlife31' has modified a simple popcorn make to instead roast coffee using some imagination, Arduino and external hardware. By controlling the speed of the fan in the popcorn maker, the temperature of the beans inside can be controlled - and an excellent candidate for automation. The results are effective and you can also control and calibrate the system with a PC as they're using the PID library. Please note that this project involves working with mains current which is dangerous to say the least, and that all work must be completed by a licensed electrician. 


So if you're a coffee fiend and enjoy your own roast, head over here to get started. And we're on twitter and Google+, so follow us for news and product updates as well.

When making your own version of the coffee roaster, consider the Freetronics LCD & Keypad shield which contains a bright 16x2 character LCD and five buttons that can be read from only one analog input pin: