September 05, 2012

Make a giant electronic organ with an Arduino

 Although there are many variations on the Arduino-powered electronic organ and other sound generators, this project takes the cake for being tiny and huge at the same time. How? By using an Arduino and an ultrasonic-distance sensor, an organ has been created that detects how far an object is from the sensor and plays a tone relative to the distance. By mapping out the distances equally, the project can simulate an organ that can be played one note at a time - for example:


If you made or drew up a map or plan of the areas, and used another Arduino and sensor - more notes could be played in the same length of field. Nevertheless, for complete instructions click here. And we're on twitter and Google+, so follow us for news and product updates as well.

If you're interested in working with piezos for various reasons we have a neat little SOUND: sound and buzzer module:


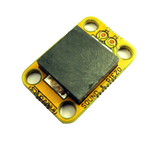
It can be used as a noise-maker driven by your microcontroller for audible feedback of events, and it can also be used as a knock-detector input to sense events and react to them. Includes a built-in 1M resistor to allow the piezo element to detect shocks. For more information and to order, please visit the product page here


September 05, 2012

Learn about counter ICs with Arduino

 Although many beginners enter the world of electronics through experimenting with Arduino and other development boards, then can miss out on the fun and education that comes with digital electronics - that is, using the ICs that would make up computers and other devices in the past. An instructables user 'laserjocky' has found the old technology interesting and in doing so written a great tutorial on how to use 74LC161 counter ICs  - and then how to extract the value from the IC into an Arduino for further computation. 

Although using an external counter IC might seem redundant - it isn't. For example, if you wanted to count four different pulses simultaneously then work with the results - reading external counters would be easier then programming the code. 


Click here for the tutorial and more information. And we're on twitter and Google+, so follow us for news and product updates as well.


The tutorial in the link uses 74HC595 shift registers, and instead of working with fragile DIP-package versions - consider our EXPAND: shift  register module. Containing the 74HC595, nifty blue power LED and labelled pinouts, it's easier to use and physically stronger for constant prototyping. For more information and to order, visit the product page

September 04, 2012

Automatic hifi amplifier power control with Arduino

 Technology enthusiast and instructables member zmashiah has created a nifty project that can help save energy and equipment wear and tear. By monitoring the audio feed going to an amplifier, an Arduino can then turn the power off when the amp hasn't received a signal for a set period of time - in effect, making an automatic shut down. Furthermore - when the amp is off and a source starts playing, the Arduino can turn the amp back on. Finally no mains current wiring is required as the control is via infra-red. 


For more information, the schematic and Arduino sketch click here. And we're on twitter and Google+, so follow us for news and product updates as well.

Thinking of embedding an Arduino-compatible board in your next project? Consider using the Freetronics LeoStick:


Apart from being one of the smallest Arduino-compatibles on the market with USB, it also has an onboard RGB LED and piezo which can be used a knock sensor and various tune and sound effects. Plus you can add extra circuitry with the matching protostick! For more information and to order, click here.


September 04, 2012

Home-made three phase motor controlled by Arduino

 Electrical engineer 'glmory' was experimenting with an Arduino board and some generators, and came up with the idea of driving one as a motor using the Arduino to control the phases and power circuitry. His generators were also home-made, with coils of over 400 turns of wire, and these were used as the motor coils for each phase. You have to congratulate the builder for going to the effort of making them himself and learning how they work, as the switching circuitry can be quite tricky. Evidence of this success is shown in the video below:


You can follow the project and related spin-offs (!) on the Arduino forum and project page. And we're on twitter and Google+, so follow us for news and product updates as well.

If you're making a similar project and need to control large currents with your Arduino digital outputs - you'll need a MOSFET. We've got you covered with out NDRIVE: N-MOSFET driver/output module:


This high-power N-MOSFET module lets you switch high-current loads using a tiny microcontroller. Perfect for controlling that set of traffic lights mounted in your living room! Works brilliantly for automotive projects such as switching high-power 12V lights and high wattage LEDs. For more information and to order, visit the product page

September 04, 2012

Experimenting with pinball machine matrix displays

 Software engineer Adam Preble has summarised his experience with interfacing the dot-matrix display from a pinball machine and an Arduino board. After having to research how the display was driven, he used the SPI bus on the Arduino to rapidly send the required data to the display to keep it updated. Getting it to work was a challenge, however a success as you can see in the following video:


There has to be any easier way to find a dot-matrix display to use with an Arduino, however to find out more about Adam's efforts, click here. And we're on twitter and Google+, so follow us for news and product updates as well.


If you're looking for a dot-matrix display and don't have the time or resources to search for an old one - use a Freetronics Dot Matrix Display instead. Available in a variety of colours, they consist of a 32 by 16 matrix of LEDs. Included with the DMD is a cable to directly connect with an Arduino-compatible board, and at low brightness (which is still fine to read indoors) you can power one DMD from the Arduino. However by connecting 5V at 2.5A for each board they operate at a brightness which is visible anywhere. Furthermore you can daisy-chain (with the included cable) six or more displays for great effects. So for more information head over to the DMD pages today


September 04, 2012

Make your own Arduino-based Waveform Generator

 The staff over at Instructables have designed and published their plans on how to make a nice Arduino-controlled waveform generator. Although you won't be replacing commercial equipment with it, the project is very easy to work with and they have also included plans for laser-cutting an enclosure to help move the project from the breadboard to a usable tool. You can generate sine, sawtooth, pulse and triangle waves of between 1 and around 50 kHz. Apart from the Arduino the rest of the circuitry fits nicely on an protoshield.


For more details and the instructions, visit the project page. And we're on twitter and Google+, so follow us for news and product updates as well.


When recreating the waveform generator project, you'll need a protoshield to mount the external circuitry. In doing so, consider our range of ProtoShields. From the tiny LeoStick to the Mega range, we offer a complete range for you to work with.


September 04, 2012

Tutorial: Pulse-Width Modulation

 Technology enthusiast Mike Cook has written an excellent guide describing the theory, basics and operation of pulse-width modulation with regards to an Arduino board. As we don't have any onboard digital to analogue converters, PWM is often used as a reasonable substitute - especially when creating simple tones and sound effects with piezo buzzers


Towards the end of the tutorial Mike also explains how to increase the ability by explaining the theory of analogue filters and how to design your own. Very useful indeed - so to get started, click here. And we're on twitter and Google+, so follow us for news and product updates as well.

If Arduino is new to you, a great start is our Freetronics Eleven - the Arduino-Uno compatible with low-profile USB socket, onboard prototyping space and easy to view LEDs:


September 03, 2012

DIY Atomic-synced Pinball Machine Clock

 If you can lay your hands on a Bally WIzard-type pinball machine - the score displays can be converted and display the time, date, year and alarm time for a clock which will be added to the machine. But don't panic - this isn't a permanent modification. Instructables user alanamon demonstrates how to mod the pinball machine with an Arduino, GPS shield (to receive the time data) and some relays which the Arduino controls to turn the machine on and off at certain predetermined times. See it in action in the following video:


So if you can access a pinball machine, here's a new way to make use of it when not playing a game. And we're on twitter and Google+, so follow us for news and product updates as well.


If your pinball machine is in the basement or other fun, dank place - a GPS clock won't cut it. Instead consider using our super-accurate real-time clock module. Based on the DS3232, it has a temperature-controlled crystal oscillator for accurate time keeping, battery backup and 236 bytes of non-volatile memory for user data. For more information, see our modules page

September 03, 2012

An open-source bee-hive monitoring system

 Apiarists Glyn and Clive Hudson needed to conduct experiments with regards to the temperature and humidity and their bee hives, and turned to Arduino technology to get things moving. The aim of their experiments was to monitor the temperature inside the cluster of a honey bee colony and to compare this with other temperatures outside the cluster, as well as inside and outside the hive. 

Using four DS18B20 sensors for temperature and DHT11 for humidity, the data is collected and logged to a microSD card via the Arduino board. They've also included code for data analysis in MATLAB and an LCD for real-time monitoring. 


For a complete rundown on the project, plus an interesting view into the next web-enabled revision - click here. And we're on twitter and Google+, so follow us for news and product updates as well.


If you're looking for a sensor to measure temperature and humidity - check out ourHUMID: humidity and temperature sensor module. Designed around the DHT22 sensor, it only requires one digital pin and power - and is easy to use with out Quick Start guide. With a temperature range of -4°C to +125°C with +/-0.5°C accuracy, and humidity at 0-100% with 2-5% accuracy you're ready to measure. For more information and to order, click here


September 03, 2012

Arduino-based Letterbox Notification System

 Instructables user gwrome has a letterbox which is quite far from his home, so needed a way to check once the mail had been delivered without walking out to check. As many people have done, he has used an Arduino and hacked existing commercial products to solve the problem. In this case an extra button for an existing wireless doorbell system was modified to be triggered by an Arduino board. 

A light sensor is connected to the Arduino and detects the change in light when the letterbox is opened - which triggers the doorbell, which triggers the user to walk over and check the mail. Hopefully it isn't junk!


For complete instructions and notes, check out the instructable here. And we're on twitter and Google+, so follow us for news and product updates as well.


Looking to detect changes in light levels? Don't fool about with irregular light-dependent resistors. Instead use our LIGHT: light sensor module with the TEMT6000 light sensor which gives consistent and repeatable readings even between different units. Simple to use and versatile for many applications. For more information and to order, click here