August 13, 2012

Make a remote-control RGB Candle

 Although making a mood light with RGB LEDs, or embedding them inside a candle has been done, Kapil Gupta has gone all out and described how to make your own candle, then embed the electronics required for a remote-controlled RGB LED based around the Arduino platform. This is a great idea as the entire candle can glow nicely instead of just the sharp LED light, for example:


And with some forethought and clever coding, all sorts of effects are possible with the LED and could be changed with the TV remote control. To get started with your own, visit Kapil's instructions here. And remember to take care when making your own candles. Furthermore, we're on twitter and Google+, so follow us for news and product updates as well.


If you're looking to make your own RGB LED projects, consider the Freetronics RGBLED: full colour module. It includes a bright RGB LED on the top of the board and a WS2801 constant-current, addressable, multi-channel LED driver on the back. This smart module can be daisy-chained, so you can connect a number of these together in a string and drive each of the module colours individually from your microcontroller. For more information and to order, visit the product page.

August 13, 2012

Interface a Raspberry Pi to Arduino via SPI

 Recently a few people have been working on various methods of interfacing their Raspberry Pi computer with the Arduino boards - for control of the GPIO, interfacing with other objects using the Arduino as the medium and so on. One interesting example of this is from the Mitchtech blog, where they demonstrate sending data from the Raspberry Pi to the Arduino via the SPI bus. The Arduino is set as a slave SPI device and the code demonstration is written in C for the RPi. 


For more information including the code for both platforms, head over to the project page. And we're on twitter and Google+, so follow us for news and product updates as well.

If you're looking to embed an Arduino-compatible board in your projects driven by Raspberry Pi or other computers, consider embedding the Freetronics LeoStick. Apart from being one of the smallest Arduino-compatibles on the market with USB, it also has an onboard RGB LED and piezo for an alarm clock, and it's own form of knock detection to use as a snooze button:


August 13, 2012

Automatic IP camera and sprinkler with Arduino

 Phil Tucker had a problem with a local dog and his front lawn with regards to solid waste disposal on the grass. He has come up with a clever solution that relies on an IP camera and an Arduino. When the camera detects motion in a certain area of its' view, it activates a digital output which is read by the Arduino. This in turn activates a relay which powers a solenoid water valve - and turns on the water sprinkler. For example:


Simple yet effective. Hopefully over time this will persuade the dog to do it's business elsewhere. You can read more about the project and design over at Phil's page here. And we're on twitter and Google+, so follow us for news and product updates as well.

If you are new to Arduino, join in with our range of Arduino-compatible hardwareprototyping shields and module range. A good start is the Freetronics Eleven, the Arduino Uno-compatible board with onboard prototyping space:


August 10, 2012

Try out Metric Time with Arduino

 For something different, preparing for a future industrial society, a wacky gift or if you're a Seymour Skinner fan - consider making a metric clock. Metric you say? Yes - one day = ten hours, six AM is 2:5:0:000, and so on. Using it might be difficult, but making it won't be using an Arduino and LCD module.


So to get started, head over to the project page here. And we're on twitter and Google+, so follow us for news and product updates as well.

If the metric clock is a little far-out, you can still make a variety of clocks and timepieces based around an Arduino-compatible board. And the most important part of any clock project is the inclusion of an accurate real-time clock IC. Here at Freetronics we have the Maxim DS3232 real-time clock IC module:


Apart from keeping accurate time for years due to the temperature-controlled oscillator and having a tiny coin-cell for backup, it is very simple to connect to your Arduino project. A driver library allows your program to easily set or read the time and date. Perfect for clock projects, dataloggers or anything that needs to know the date and time. Furthermore it contains a digital thermometer and 236 bytes of non-volatile memory to store user settings and other data. For more information, check out the module page here


August 10, 2012

Make your own Beat Sync

Or by full definition, a single frequency audio spectrum volume meter. This is made possibly in a simple way, using an Arduino, eight bright LEDs and an audio socket wired into the analogue input. The Beat Sync can isolate a certain frequency, and display the level using the eight LEDs. For example:


 To get started on your own Beat Sync, click here for the instructions and code. And we're on twitter and Google+, so follow us for news and product updates as well.

When making projects that require various LED effects and simple LEDs just aren't enough - consider using a Freetronics Dot Matrix Display


Available in a variety of colours, they consist of a 32 by 16 matrix of LEDs. Included with the DMD is a cable to directly connect with an Arduino-compatible board, and at low brightness (which is still fine to read indoors) you can power one DMD from the Arduino. However by connecting 5V at 2.5A for each board they operate at a brightness which is visible anywhere. Furthermore you can daisy-chain (with the included cable) six or more displays for great effects. So for more information head over to the DMD pages today


August 10, 2012

DIY Li-Ion capacity tester and discharge monitor with Arduino

 By using some simple hardware and the Arduino analogue input pin, Darius has completed a simple device that can monitor the discharge rate of a lithium-ion battery pack. The data is sent back to a host PC via serial to allow constant monitoring. If you're making your own version, note that the maximum raw input voltage from the battery pack is 5V!


For more information, notes and the Arduino sketch head over to the project page here. And we're on twitter and Google+, so follow us for news and product updates as well.

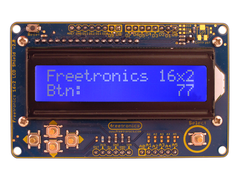
A simpler and more conveinent way of monitoring data generated by your Arduino projects is using an LCD. Here at Freetronics we have the LCD & Keypad shield which contains a bright 16x2 character LCD and five buttons that can be read from only one analog input pin, perfect the battery monitoring project:


August 10, 2012

Create your own 3D printed Minecraft binary clock

 A perfect project for the fans of Minecraft is this binary clock with a 3D-printed housing. Designed to resemble an object made during the game, the clock is filled with LEDs to allow the display of time in binary fashion. Although building your own binary clock isn't the most original idea - the housing for this one is. And if you don't have a 3D printer - use LEGO instead!


For more information including the Arduino sketch click here. And we're on twitter and Google+, so follow us for news and product updates as well.

The designers of the Minecraft clock used an external Arduino board, however to make a completed clock consider embedding the Freetronics LeoStick. Apart from being one of the smallest Arduino-compatibles on the market with USB, it also has an onboard RGB LED and piezo for an alarm clock, and it's own form of knock detection to use as a snooze button:


August 08, 2012

Build your own capacitive touch sensor game controller

 There are many, many ways of accepting user data and controls into an Arduino board, and the foloowing method is certainly novel. Using a lot of foam, some aluminium foil and various hardware along with an Arduino, the people at Treehouse projects have made a huge, soft-touch game controller. As it is powered by an Arduino, it can be used in various Processing games - and this is demonstrated in the following video:


For more information, instructions and code visit the Treehouse Projects site here. And we're on twitter and Google+, so follow us for news and product updates as well.


If you're looking to embed a full-sized Arduino-compatible in your project but would like to save some money, consider the Freetronics KitTen. This has all the features of an Arduino Duemilanove-compatible without the USB interface and is in kit form, saving you money while staying true to the Arduino form. For more information and to order, check out the KitTen page.

August 08, 2012

Prototype Adobe Flash and Arduino integration

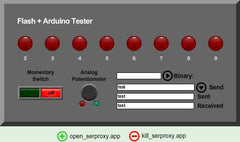
 University student James Khazar has created a simple way of interfacing between a Flash application and and Arduino board. With it you can demonstrate control of the digital outputs, reading digital input status, analogue values and so on. The software interacts with the Arduino via data along the serial line, such as commands to the Arduino, and data such as the potentiometer value is returned to the PC. 


For more information, including all the code and notes visit James' project page here. And we're on twitter and Google+, so follow us for news and product updates as well.

To get started with your own embedded-Arduino projects - look no further than the Freetronics LeoStick. Apart from being one of the smallest Arduino-compatibles on the market with USB, it also has an onboard RGB LED and piezo for sound and it's own form of knock detection:


August 08, 2012

DIY Sun or Light tracking device

For an interesting project with younger people or just for fun, you can build a device that tracks the sunlight outdoors or any other strong source of light. By using an Arduino that measures the levels from five light-dependent resistors, it can determine from which direction the light is the strongest. It then controls two continuous-rotation servos to move the device in the direction towards the light source. Although the creators used a ... lot of cardboard, you can recreate it from anything spare. For example:


To get started with your own sun tracker, check the instructions out here. And we're on twitter and Google+, so follow us for news and product updates as well.

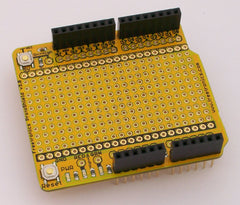
If you're working with Arduino projects like  the sun tracker that require some external circuitry, consider one of our range of Protoshields. From the tiny LeoStick to the Mega range, we offer a complete range for you to work with.