June 20, 2012

Emulating a Kenbak-1 Computer

 Mark Wilson was looking to emulate an original piece of computer history, and decided on the Kenbak-1. From Wikipedia:

The Kenbak-1 is considered by the Computer History Museum and the American Computer Museum to be the world's first "personal computer". Only 40 machines were ever built and sold. It was designed and invented by John Blankenbaker of Kenbak Corporation in 1970, and was first sold in early 1971. The system first sold for US$750. Only around 10 machines are now known to exist worldwide, with various collectors. In 1973, production of the Kenbak-1 stopped as Kenbak Corporation 
folded.

Although it is not a exact replica, Mark has done a fine job and included a few extras, such as a real-time clock. However the casing and input method is fantastic, and makes you realise how far technology has evolved in the last few years. Here is a short demonstration:


For mroe information, including wonderfully-documented code and images - visit Mark's website. With plenty of I/O for LEDs and switches, combined with an easy to use language - an Arduino can be used to emulate all sorts of things. For maximum possibilities, consider using our Freetronics EtherMega - with 51 digital I/O pins, onboard Ethernet, microSD card socket and optional PoE you'd be off to a powerful start:


June 20, 2012

Arduino-controlled Interactive Art

 Nirzaree has created colourful piece of art work that uses a very simple form of touch-sensor as input, and illuminates various parts of the external art as output. Although a simple use for an Arduino board, the project is a good example of something that can be built with younger children or absolute beginners to the craft. Here it is in action:


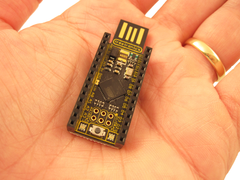
Although a normal-sized Arduino compatible board was used for the project, something smaller would be advantageous - such as our Freetronics LeoStick. It is one of the smallest Arduino-compatible boards on the market with full USB, an RGB LED and a piezo:


For more information and design guidelines, visit Nirzaree's notes here

June 20, 2012

Interfacing an Arduino and an electronic gyroscope

 Another example of beginners doing interesting things with an Arduino is interfacing an electronic gyroscope and measuring the results. Michael (VK5ZEA) did just that with a MuRata Gyrostar that was removed from an old satellite phone. You can see his explanation in this detailed video:


... and follow along with the sketch that Michael posted on the Arduino forum

In his video you can see that our Freetronics Eleven has been used - the Arduino Uno-compatible with onboard prototyping area and easy to view LEDs:


June 20, 2012

Build your own true battery capacity tester

Moris_zen has created a simple yet versatile battery tester using an Arduino, LCD module and external circuitry. It can display various parameters of the battery under test, and also send the data to a PC for further analysis. It can also detect the type of battery and perform a controlled discharge. Not bad considering this was one of the author's first projects.


Once again this type of project shows that you can do more than just play games or blink an LED with an Arduino. To build your own version of the battery tester, consider using the Freetronics Eleven - the Uno-compatible with onboard prototyping space:


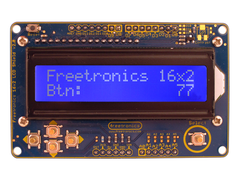
... our LCD Keypad shield for data input and output:


and a protoshield to carry the external circuitry. For more information, instructions and the Arduino sketch visit here

June 20, 2012

TorrentMeter - A steampunk bandwidth meter

By connecting an Arduino board and using some simple circuitry and a vintage voltmeter, 'skytee' has created a bandwidth meter that certainly falls into the steampunk category of devices. Here it is in action:


By using a perl script, the incoming torrent speed is sent to an Arduino board which then drives the meter using a simple pulse-width modulation circuit. To recreate this meter from a hardware perspective is quite simple - with one of our Freetronics LeoStick boards and a matching ProtoStick for the PWM circuitry. 


Finally, for more information, circuitry and the required software, click here

June 19, 2012

Build your own Arduino-based pH meter

Carlos Neves has documented an open software and open hardware pH meter based on the Arduino system. Roughly speaking, the pH level of a liquid determines the acidity or basic/alkaline levels of a liquid - and in some situations the value is very important. For example, certain types of fish require water that falls within a set range of pH levels. Carlos has designed and published plans for a custom Arduino shield that, in his words:

It seems inferior and a little bit more expensive compared with a pH meter bench instrument. However, it is interfaceable, programmable, expansible, and, the more important, open and free!

Kudos to Carlos, and here is an example of his work the pHduino:


As always, you can achieve a lot with the Arduino system. By using freely available design tools for schematic capture and PCB layout, anyone can design their own shields and share the work with others. However for first prototypes, we have a range of Arduino prototyping shields to suit standard and Mega-type boards - and also shorter ones that don't bump into large Ethernet or USB sockets. 


However to get started on your own phduino, and more information and the design files, code etc. - visit the phduino github page


June 19, 2012

The SAMSA II Hexapod Robot

 Many people have designed and built their own Arduino-powered robots, tanks and so on - however Pablo Gindel and Jorge Visa have created an advanced hexapod robot. It has six legs each with three degrees of freedom, which allows for movement in various directions as well as diagonals, and can be controlled via infra-red remote control. See the following video for an amazing demonstration:


Based on an Arduino Mega. the SANSA II is a real work of art and technology. As a base for your own version, consider the Freetronics EtherMega - the Arduino Mega-compatible with onboard Ethernet, microSD socket and optional PoE support:


To find out more, including design notes and Arduino sketch, check out the designers posts here

June 19, 2012

A small box with a large vocabulary - the "Loquino"

 Mark Wilson was tasked with making something by hand and developed the "Loquino" as a result. The purpose of the Loquino is to display words from the Grandiloquent dictionary, which contains the most obscure and rare words in the English language. Interestingly the designed has used some interesting coding techniques to compress the required amount of words into memory. Here it is in action:


You see something new every day, and the Loquino is no exception, and proves that with some imagination and Arduino hardware you can build almost anything. To get started with your own version, consider using our Freetronics Eleven - the Arduino-Uno compatible with onboard prototyping space:


And our LCD Keypad shield for display output:


However to learn much more about the Loquino, including the Arduino code and well-documented images, visit Mark's website


June 19, 2012

Extremely Low Frequency Electromagnetic Field Sensing

 An Arduino board can do many things, and Didier has described in detail methods for measuring extremely low frequency electromagnetic fields using just an Arduino board, some wire and a few special libraries.


You could also display the results using a grapic LCD unit to make a portable version of this simple test equipment. For more information, descriptions and the Arduino sketch, visit Didier's blog. To get started with your own measurements, consider our Freetronics LeoStick - one of the smallest Arduino-compatibles on the market which also includes an onboard RGB LED and piezo buzzer:


June 19, 2012

Arduino-powered Ball Maze Game

David has constructed a huge circular ball maze that is 1.2m in diameter, as a contribution to a school's "Creative Games" section. And it is certainly creative, taking what is normally a pocket-sized game and bringing it to life. It can either be controlled using an Android phone that has an accelerometer, or a wired controller. For example:


With some neat woodwork and construction skills, this project can become a reality for anyone with the inclination and time. To get started with this project or Arduino in general, a good start would be with our Freetronics Eleven - the Arduino-Uno compatible with onboard prototyping space:


You will also need some accelerometers, and our AM3X fits the bill, in module form it is easy to mount and connect:

And to get started with your own huge ball maze, check our David's instructions here