June 22, 2012

Long Term Time-Lapse Photography with Arduino and CHDK

 The team at Lab3 in Germany have created a unique method for making ultra-long term time-lapse photography a reality. Their goal was to leave a camera unattended for as long as possible, and have solved it using an Arduino, real-time clock, servo and some interesting hardware. The camera used is a Canon that has been modified with the Canon Hack Dev Kit to allow scripting. 


The camera is physically turned on by an Arduino-controlled servo by pressing the power button. Then the scripting captures the required images, and shuts down the camera. Using sleep watchdog code, the Arduino will check the time against a real-time clock IC against a database of required time and dates for images - and then activate the camera when required. A simple yet very inventive solution to a problem has once more been solved with an Arduino board and some imagination. For more information on this project, visit the Lab3 site

When working on your own projects that required a real-time clock and an Arduino board (or any other system with the I2C bus), consider using our super-accurate real-time clock module. Based on the DS3232, it has a temperature-controlled crystal oscillator for accurate time keeping, battery backup and 236 bytes of non-volatile memory for user data. For more information, see our modules page


June 22, 2012

Convert vintage nixie-tube mV meter to a clock with Arduino

 James Hartnett came across an older millivolt meter with a nixie tube display and sensibly kept it for further use. In doing so, he has used an Arduino board to create a simple clock. Using PWM digital outputs and and some resistors, the Arduino can create a voltage that is related to the actual time. For example, an output of 12.37 mV would be 12:37. 


Instead of using an accurate real-time clock IC, James has used the simple Arduino time library. However it is interesting to read the trials of making this successful, and take heed of his notes with regards to calibration and resistor values. For more information, circuitry and notes visit James' page here


When working with time and Arduino (or any other system with the I2C bus), consider using our super-accurate real-time clock module. Based on the DS3232, it has a temperature-controlled crystal oscillator for accurate time keeping, battery backup and 236 bytes of non-volatile memory for user data. For more information, see our modules page

June 21, 2012

DIY Arduino-based Garage Door Trigger

 After being caught outside of the house in the rain and without the keys, Paul from blue leaf software solved the problem very well using one of our Freetronics EtherTen boards, simple circuitry and some clever coding. The EtherTen acts as a local webserver - and can trigger a relay to control the garage door once a password has been entered via the web browser of a mobile device. Furthermore, the access time and date is recorded to provide an access log for the door.

The time data for the access log is retrieved from an Internet time server using their customised clock library, and the Webduino library takes care of the web server side of things. Another point of interest is the use of their MegunoLink software, a more advance method of communication between an Arduino and PC. For more information on this excellent project and complete, detailed documentation - visit the project website

To get started with your own web-enabled projects, use our Freetronics EtherTen - the Arduino Uno-compatible with onboard Ethernet, microSD socket and optional PoE:

... or for more program space, I/O ports consider the Freetronics EtherMega - the Arduino Mega2560-compatible with onboard Ethernet, microSD socket and optional PoE:

June 21, 2012

Interfacing Commodore 64 Printers with Arduino

 Next in our series of reusing old Commodore 64 items is the following method of using a C64-compatible printer with an Arduino. Recently there has been some interest in generating hard copy from an Arduino, and the only affordable and simple methods have often been with underwhelming thermal receipt printers, or wasting other forms of paper. Thanks to the "Northern Nerd", and a simple circuit - you can now drive a useful printer with an Arduino.


Doing so is much simpler than expected, and the results speak for themselves. A quick scan of eBay shows a few printers out there, so hopefully some of our readers can take advantage of this project. For complete instructions, including the external circuitry and Arduino sketch, visit here

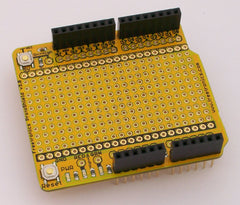
When recreating a project such as this, it is easy to breadboard the external circuitry and leave it be. Instead, consider building the circuit on a ProtoShield - it makes your project all the more professional, and easier to enclose. We have a range of shields including basic PCBs, short versions and our ProtoShield Pro with SMD LEDs:


June 21, 2012

How to beat Super Mario Bros. with an Arduino

 Although the method to accomplish this is somewhat complex, pjgat09 on Instructables has found a way to combine some PC software and an Arduino board via processing to control a NES game console. In doing so, the sequence of keypresses to play the game can be sent from the PC in order to win each level. For example:


You'd have to be a hard-core NES enthusiast to pull off something like that. However as we say, with the imagination and an Arduino you can do a lot more than people realise. For more information and detailed design information, visit here. To get started with your own version, consider one of our Arduino-compatible boards such as the Freetronics Eleven - the Arduino Uno-compatible with onboard prototyping area:


June 21, 2012

DIY Remote Control Car with Bluetooth, Android and Arduino

As a learning exercise, Daniel Garrote wanted to become familiar with Android and Arduino - and in doing so has modified a remote-control car that is controlled by an Android phone and an Arduino via bluetooth. Using this method much more can be controlled, and this includes the car lights and headlights. For example:


Furthermore Daniel has published the Arduino sketch, car circuitry and Android code for you to examine and build upon. For more information, visit his site here. When building your own projects that are embedded with an Arduino board, consider using our Freetronics LeoStick - one of the smallest Arduino-compatible boards on the market that also includes onboard piezo, RGB LED and full USB:


June 21, 2012

Build your own Arduino DDS Sine Wave generator

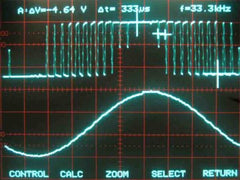
 Martin Nawrath has documented how to make a sine wave generator with an Arduino that uses the digital direct synthesis method. Using a standard Arduino board and some external circuitry, signals of up to 16 kHz can be generated. Considering the cost of doing so, building this example is a fun an educational project. Here is an example of the output:


Once more it's interesting to see what sort of test and measurement equipment can be created, and this is another inexpensive solution. For detailed instructions including the circuit, Arduino sketch and notes - check Martin's website here. To get started with Arduino and projects like this, consider using a Freetronics Eleven - the Arduino Uno-compatible with onboard prototyping area that would be perfect for the DDS circuitry:


June 21, 2012

The Pr0JCL0C - a simple project time tracker

If you have ever wondered how much time you have used on a project, Mark Wilson has the project for you - his Pr0JCL0C. It is a simple timer and clock that will record elapsed time between pressing a start and finish button - ideal for logging total time spent on a particular project. It is simple to build, and only uses an Arduino board, a real-time clock and display. Here it is in operation:


Simple, yet effective. For more information, including detailed photos, circuit and the Arduino sketch - see Mark's page. If you are building your own project clock - consider using one of our Arduino-compatibles such as the Freetronics Eleven, and our highly accurate real-time clock module:


June 21, 2012

Build your own Atari 8-bit Disk Drive emulator

 For those of you still using the Atari 1050 disk drives for your 800/XL/EX computer, the people at Whizzo software have made open source the hardware and Arduino sketch required to build a disk drive emulator. If you don't remember what an Atari 800 was ...


(image - oldcomputers.net)

Unfortunately I only had access to a 400 at the time, with that membrane keyboard... But I digress. Using an Arduino Uno or Mega2560-compatible board and a microSD card shield, you can now use that hardware to load disk images for the aforementioned systems. For more information, including the wiring details and Arduino sketch, visit the Whizzo software webpage

If you are going to move forward with this project, consider our Freetronics EtherTen or EtherMega boards - the Arduino Uno and Mega2560-compatibles with onboard microSD socket, Ethernet and optional PoE support. 


June 20, 2012

The "Hysterical Bubble" interactive wearable project

 From Anja Hertenberger and Jeroen Meijer in Europe comes the "Hysterical Bubble" - a wearable project consisting of four suits, each one with an embroidered textile bubble that inflates or deflates in reaction to the proximity of the group members to each other. From the project site:

‘Hysterical Bubble’ is a piece for four performers  who have the assignment to behave as a group. In the moment, when one of the performer steps out of the rules of the group, a new situation will be created and the group is not a group any longer. The person stepping out of the group shows his or her identity by the bubble blowing up. This refers to a form of a Hysterical symptom. When this person respects the proximity of the group members to each other, the bubble deflates back to its original form.

In common speech someone who is excessively expressive can be called hysterical. In psychology hysteria is manly distinguishes by two types of disorder: Conversion disorder (physical symptoms) and Histrionic personality disorder. ‘Hysterical Bubble’ is an artistic translation of the physical symptoms. The physical symptom, the bubble, can be seen as an underlying conflict.

Here is a demonstration of the project at work:


Certainly an avante-garde mix of technology, art, and psychology. Although the underlying theory may be unexpected, the implementation was quite simple - using Arduino-compatible boards, impellers to inflate and deflate the bubbles and miscellaneous circuitry. For more information about this project and other demonstrations, visit their website

Wearable technology is simple to implement once the concepts and designs have been determined. For an Arduino-based project, consider using our tiny Freetronics LeoStick - one of the smallest Arduino-compatible boards on the market: