June 14, 2012

C-Cubed - the Arduino-based camera intervalometer

 Professional photographer Kevin Lewis, like many others, has built his own intervalometer (a device to count intervals of time) in order to control a digital camera. His intervalometer is designed to release the shutter after a period of time, and also control the amount of time the shutter is open. Although this isn't a new idea, what attracts us to this particular project is the quality of the finished work, for example:


Furthermore the entire projects is documented well, including the Arduino sketch and other circuitry - allowing you to move forward and build you own. The sketch in itself is quite clever in that you can make adjustments to the settings while waiting for the next exposure. 

Kevin used an Arduino Mega for this project, and to recreate it you can do one better by using our Freetronics EtherMega - the Mega2560-compatible with onboard Ethernet, microSD card socket and optional PoE support:


Using such a board you could even consider Internet-control or feedback of the intervalometer. And to keep track of time, use our real-time clock module with the super-accurate DS3232 RTC IC:


However to find out more and get started, visit Kevin's website here

June 14, 2012

Solar Hot Water temperature monitoring with Arduino

One of the more popular Arduino-based projects is measuring and collating various forms of external data, and Rick has done just that by building a system that monitors the temperature of his solar hot water as well as the external temperature. This data is then sent to the ThingSpeak Internet service to allow the data to be monitored from other places, for example:


Although the project sounds complex, it is quite simple and Rick has documented it well including schematics and Arduino code. From a hardware perspective, you need an Ethernet-enabled Arduino and the best solution for this is our Freetronics EtherTen - the Arduino-compatible board with Ethernet, microSD card and optional PoE support:


To measure the temperature the project uses DS18B20 1-wire temperature sensors, and these are easily implemented using one of our sensor modules, the TEMP:


So to find out more and get started with your own monitoring solution, visit Rick's website here


June 14, 2012

Backup your vintage Nintendo Game Boy cartridge data

 Alex found himself needing to backup the saved game contents of his Nintendo Game Boy cartridges, and solved this problem neatly with an Arduino. Apart from documenting the process very well, he also explores the technical details of the cartridges and how to read the contents of the memory chips. You can watch the process in his demonstration video:


As time progresses the problem of safekeeping data from older forms of media starts to rear its ugly head. Although this is 'only' a video game, it is an interesting catalyst to consider doing the same for more important forms of data. 

In the meanwhile, to backup your own cartridges you can do well with our Arduino-compatible hardware such as the Freetronics Eleven - the 100% Arduino Uno compatible with its own prototyping space right on the board:


To get started with the project or just review the excellent instructions, visit Alex's website here


June 14, 2012

Bringing the "Crazy People" Game into the 21st century

 Mike Cook in the UK fondly recalled the childrens' flip books that involved building characters with three horizontal sections and decided to recreate this on his computer using a very different form of interface. He built a device with three RFID readers (one for each third of the 'body') and used a series of RFID card to represent different characters. His PC is running Processing code which accepts the card data - when each card is read, the 'character' is redrawn on the screen of an attached PC. You can see the demonstration here:


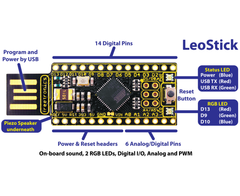
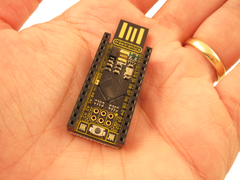
Although to some this may seem like overkill, Mike's dedication to the task and excellent documentation make this project a success. When recreating this project, money and space can be saved by using one of our Freetronics LeoStick boards - which are tiny, still have USB and are perfect for embedding in various permanent projects:


However to learn more and read Mike's excellent documentation, visit his site here.


June 13, 2012

The World's first digital Foosball table

 Not being content with a simple foosball table, the team at Sinnerschrader in Germany have literally dragged the game into the 21st century. Using Arduino hardware and some photosensors to detect when a goal has been succesful, the game statistics are then sent real-time to an Internet service to collate the data and also display it using mobile apps. Watch the following video for a brief introduction:


This project has to be one of the most amazing examples of updating a game to the 21st century. Furthermore, Sinnerschrader have made the software and designs open-source so you can recreate or modify the project with your own foosball table. 

To get your own foosball table or other project connected to the Internet, consider the Freetronics EtherTen - the Arduino Uno-compatible board with onboard Ethernet, microSD card and optional PoE support:


However to get started and for detailed information, inspiration and instructions, visit their website here

June 13, 2012

Compact Arduino-powered Gas Detector/Sniffer

 Here is another small yet useful Arduino-based project... a device that can be used to measure gas levels in the area and display for easy monitoring. The author has used a simple gas sensor and a small Arduino-compatible board with a 7-segment LED display for output as shown in the following video:


This is the kind of project that illustrates you don't need to use the full-sized Arduino hardware for every project. This would lend itself nicely to the use of our Freetronics LeoStick - perhaps using the onboard piezo to make different sounds depending on the gas level:


The extra circuitry could be mounted to the LeoStick with a matching ProtoStick, helping keep things neat and compact:


However to get started and for more information and the Arduino sketch, visit here

June 13, 2012

Tracking stolen video game consoles with Arduino

 Wayne Truchsess in the US had a relative whose Sony PS3 was stolen, and decided to modify his own console with a wide array of "extras" - which can be used to track the position of the console using an accelerometer, GPS module and a GSM board. 


Now if Wayne's PS3 goes for an unexpected journey, the accelerometer will trigger an Arduino board - which polls the GPS and starts sending the position data as an SMS text message. The data can then be plotted on Google Maps to determine the position of the console:


Although this seems like a lot of effort for a piece of consumer electronics, the additional Arduino-based hardware in itself is an excellent example of solving a problem and could be fitted to other items such as vehicles or other expensive large items that could be targeted by thieves.

When considering such a project, you can save space with the Arduino hardware by using the Freetronics LeoStick - one of the smallest Arduino-compatible boards on the market today:


as well as our AM3X accelerometer module:


However for more information and design instructions, check out Wayne's descriptive article and sketch download here.

June 13, 2012

Porting the "Taipan" Game to an Arduino

 For what can only be described as an almost-masochistic challenge, asciimation are in the process of porting an Apple II version of the game "Taipan" to the Arduino platform. It certainly seems like a challenge, but with the original C code and some recoding work it can be done. By using one Freetronics board as the game board and another for taking care of the graphics using the Arduino tv-out library, progress is being made:


We look forward to following their progress, and hope that they follow up with more details in the future as the project moves forward. As you can see in the image above they're using a Freetronics Eleven - the only Arduino-Uno compatible with an onboard prototyping area:


To follow the project, and some other interesting things check out asciimation's website

June 13, 2012

The "JEEPuter" - an Arduino-powered Jeep Wrangler

The Arduino system also lends itself nicely to controlling automotive electrical systems, as it is easy to control relays using digital outputs and some basic circuitry. Ed in the USA has taken this many steps further by controlling many functions inside his Jeep via an Arduino and various control circuitry. Watch his detailed video here:


Considering this was Ed's first real Arduino project he has done very well. When recreating his project, there is a lot of scope for miniaturisation, especially with the external hardware. The use of a Freetronics Eleven, some protoshields and our super-accurate real-time clock module would be a great start: 


... as well a new upcoming product... In the meanwhile, for more information and construction details, visit Ed's site here. Also, check our Geek My Ride with details of other automotive projects.

June 13, 2012

DIY Arduino-powered Tree Climbing Robot

 Yes... a tree-climbing robot. After being introduced to the Arduino, Ben Katz used his imagination and metalwork skills to build a device that grips onto a tree and propels itself up the trunk. You can see it in action here:


After watching that a few times it still seems almost-impossible - but it worked. Amazing. A fair amount of metalwork has taken place and some revisions with the electronics, however you'd have to agree that this is an cool project. Once again it is great to see younger people use their imagination and learning to create such an imaginative device. 

If you were looking to recreate this you could save space with one of our Freetronics LeoStick boards - one of the smallest Arduino-compatibles on the market today:


Furthermore, to Ben's credit he has documented his work very well, and you can follow along with it here