June 13, 2012

DIY Ball Maze Labyrinth Game Control with Android and Arduino

 From our friends in New Zealand is this great use of Arduino, Android SDK and a couple of servos. Paul Huthison has modified an old wooden ball labyrinth game so that the tiliting is controlled with two servos. These are then interfaced with an Arduino-based USB board and controlled via the Android phone. Watch Paul's detailed video here:


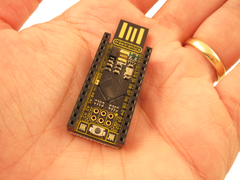
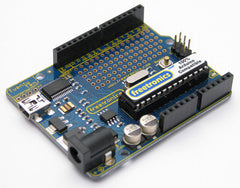
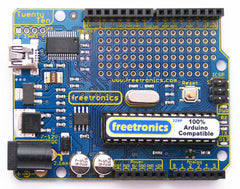
Although the demonstration is simple, once again it shows how easy you can interface various technologies with an Arduino as a common base. In his example the Google boards are used, however to recreate this and also interface your Android device you can use our Freetronics USBDroid board, which includes a full Arduino Uno-compatible device, a microSD card socket along with the necessary USB hardware required for connection of  Android devices:


Finally, for more information and excellent instructions, check Paul's work here

June 13, 2012

Twittering Laser Tripwire with Webcam Capture

 Here's another novel use of an Arduino board, a laser pointer, and a Linux machine - a system that tweets when a laser beam is broken, and also triggers a webcam on the host PC to record what just happened. Although it sounds complex, it can be done with the included code and a Linux machine. Here it is in action:


Not bad at all for a prototype, there could be a lot of possibilities with such a system. The use of the cassette box as an Arduino stand is neat as well. Remember when working with laser pointers to take care about looking into the beam or reflecting it on others. 

To get started with such a project you could use some of our Arduino-compatible hardware such as the Freetronics Eleven - the Uno compatible board that has a circuit prototyping area right on the board:


For more information, the code and inspiration see the website here

June 12, 2012

DIY Arduino Punched card reader

Punched cards were one of the first methods of entering data into computational machines and early computers. Each card would have holes punched through in a certain sequence to represent a form of data, which was then fed into a machine and "read" as input. Although we don't deal with those today, the following project is an excellent reproduction of the theory in simple form, and would be great to use in an educational context to show people how "it used to be done" - as well as general project construction. For example:


To recreate this is quite simple, the Arduino is just reading two digital inputs which are triggered by the punch card and a simple reader. This could also be used to create simple electronic voting systems for fun in the classroom situation. 

To get started with your own reader you will need an Arduino-compatible board such as our Freetronics Eleven, the Arduino Uno-compatible board with onboard prototyping space:


For more information, the Arduino sketch and further inspiration visit this site

June 12, 2012

Build a natural-interaction device for your music player

 The team at Digital Habits in Italy have designed and built one of the most beautiful and amazing devices - an "open mirror" device that holds a music player, which is then controlled by various hand movements. The movements are detected by infra-red sensors that work with an Arduino board and external circuitry to interface with an iPod. The final results are stunning:


The designers have not left us in the lurch, instead offering the required physical parts available for sale as a package - or you can download all the files required to recreate the device yourself, including 3D CNC files for the parts, Arduino sketch and more. 

This is the kind of embedded project our Freetronics LeoStick was designed for, as it is one of the smallest Arduino-compatible boards on the market:


To get started with an Open Mirror, visit the detailed instructions on their website here.

June 12, 2012

An alternative IDE for Arduino development - CodeBlocks

 Stanley from arduiodev is working on modifying the open-source C++ IDE "Code::Blocks" to work with our Arduino environment. His reasons for doing so includes:

 It provides more demanding software developers with a more powerful IDE for writing,  navigating around, building and managing source codes for Arduino development. By adding a dedicated project wizard, it’s very easy create an Arduino project that is ready to be built. The distribution integrates Arduino 1.0 core files, libraries, toolchains, firmware downloader, serial terminal and some other useful utilities.

It is always great to have options, and although a work in progress, the Code::Blocks IDE offers a familiar environment to those coming from other platforms and development environments:


If you are new to Arduino, join in with our range of Arduino-compatible hardwareprototyping shields and module range. A good start is the Freetronics Eleven, the Arduino Uno-compatible board with onboard prototyping space:


For more information about Stanley's work and to download the latest implementation, visit here

June 12, 2012

Make your own Arduino-based Luna Mod Looper

Time for something different, but what is a "Luna Mod Looper" anyway? It is a device that in the designer's words "lets you record a sequence using a potentiometer to control the pitch of the note, and then play it back and add affects". Great for making sound effects, annoying people or scoring a science-fiction video. You can see the looper in action here:


Watching this video it's great to see younger people learning how to design their own versions of projects originally based on other platforms. Using some simple electronics hardware, a small Arduino-compatible board such as our LeoStick:


... and some time you too can also recreate such a project. To do so, visit the instruction page here

June 12, 2012

Updating a driving simulator with a real instrument cluster

 Using the real instrument cluster from an Opel Corsa, an Arduino and associated circuitry, "herctrap" has made a realistic addition to his car simulator. You can't beat using the real thing, and the gauges certainly match the readings shown in the computer displays (!), for example:


Once again an imaginative person has used an Arduino board and some time to make a fascinating idea come to life. You too can join in with our range of Arduino-compatible hardware, prototyping shields and module range. A good start is the Freetronics Eleven, the Arduino Uno-compatible board with onboard prototyping space:


For more information, Arduino sketches and insight visit the forum post here

June 12, 2012

Illuminating Facebook "Like" lamp

If you know someone who is hung up on receiving "likes" on their Facebook page - this will be the project for them. Constructed out of Lego, and housing some Arduino with Ethernet hardware and circuitry - the people at Red Pepper Labs have constructed a huge Lego "like" logo that lights up when a "like" is received. Watch their excellent video time-lapse of the project:


Watching them order a customised Lego set has also sparked out imagination as well. However to get started with this type of project you'll need an Arduino-compatible board with Ethernet, such as our  Freetronics EtherTen or EtherMega boards - complete with onboard Ethernet, microSD card and optional POE support:


Visit the Red Pepper Labs' blog for complete details, code and inspiration here

June 12, 2012

DIY twitter typewriter with an Arduino

 Once again it is always interesting to see how people connect forms of technology from two different centuries. The people at tinkerlog have done exactly this by using an old electric typewriter, Arduino with ethernet and some analysis to create a typewriter that prints out incoming tweets. On the surface it seems complicated, but with a few hours of time anyone could do it. See the results in this short video:


Now the search is on for used electric typewriters on eBay... but to get a project like this moving you'll need an Arduino board with Ethernet. Our Freetronics EtherTen or EtherMega boards solve this part nicely - complete Arduino-compatible boards with onboard Ethernet, microSD card and optional POE support:


To get started, follow the design guidance in the blog here

June 12, 2012

Hacking an optical mouse into a camera

 By deconstructing and analysing a typical optical mouse, Conor Peterson has converted it into a very simple camera. This is accomplished with some light soldering, an Arduino board, and some Processing code at the PC side of things. Conor has detailed the process well in this video:


Quite ingenious - and unsurprising considering what can be accomplished with an Arduino-style board, some research and imagination. For those getting started with Arduino, consider our range of hardware including the Freetronics Eleven, the Arduino Uno-compatible board with onboard prototyping space:


Fore more information and the required code, visit Conor's blog