June 06, 2012

Arduino-based Automated Alert system for drivers and cyclists

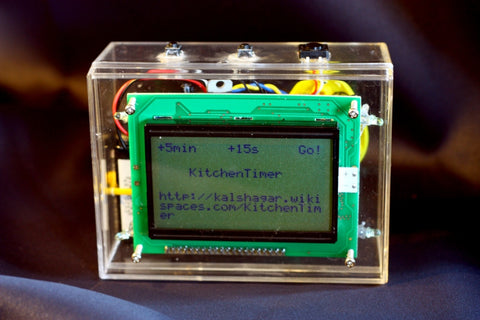
 As every cyclist will know, sharing the road with motorists and other moving objects can range from challenging to downright dangerous. A maker with the screen name "Hammock Boy" has created an ingenious little warning device to fit on the rear of his bicycle that should help the situation, especially at night. He has created a device with an ultrasonic distance sensor that is surrounded with a range of LEDs. 

The LEDs will blink in various patterns depending on the distance measured by the ultrasonic sensor. Therefore the closer the device behind the bike, the more intense the display. For example:


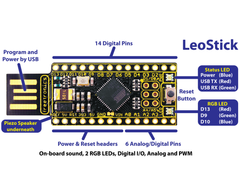
This is a fantastic use of Arduino-based hardware and a great solution to an often dangerous problem. When recreating the sensor, much space can be saved by using one of our Leostick boards - one of the smallest Arduino-compatible boards on the market:


For more information on how to make the sensor, visit Hammock Boy's instructions here


June 06, 2012

Control your Arduino board over the Internet with Teleduino

 A new service called "Teleduino" allows control of various functions of an Arduino-compatible board over the internet with simple URL-based commands. What can you do with it? From their website:

Using the Teleduino platform, you can perform the following tasks with your Arduino via the simple web service:

  • Reset, ping, get uptime, get free memory.
  • Define pin modes, set digital outputs, set analog outputs, read digital inputs, read analog inputs, or read all inputs with a single API call.
  • Define up to 2 'banks' of shift registers. Each 'bank' can contain up to 32 cascaded shift registers, giving a total of 512 digital outputs.
  • Shift register outputs can be set, or merged, and expire times can be set on merges (you could set an output(s) high for X number of milliseconds).
  • Define, and read and write from serial port.
  • Read and write from EEPROM.
  • Define and position up to 6 servos.
  • Set preset values for the above functions, which get set during boot. Preset values are stored in the first 160ish bytes of the EEPROM.

Note that you will need to be using Arduino IDE v1.0 or later to make use of the Teleduino library. It is worth noting that the service is new so keep that in mind when working with them. 

The easiest way to take advantage of Teleduino is to use our Arduino-compatible board with inbuilt Ethernet - the EtherTen:

For more information about Teleduino, visit their website - or check out the tutorials here

June 06, 2012

Build your own Arduino-based Fortune Teller

 Although we can't predict the future (if you can, let us know!) it is fun to make something to entertain those in such a manner. Pauly has described in detail on how to make his own version, using an Arduino board, 16x2 character LCD display unit and miscellaneous hardware:


One of the most important aspects of a fortune-telling device is the physical enclosure, the more weird and wonderful it is the better. The Arduino sketch in the article contains a multitude of messages which are randomly displayed on demand. When downloading the sketch, you will need to change the file extension from .tmp to .txt to extract the code. 

When recreating this project you will save time and effort by using our Eleven Arduino-compatible board in conjunction with our LCD display shield, which also contains five buttons you can make use of, for example:

So to start your journey of oddball fortune telling, check out the instructions detailed here, and our range of hardware here

June 05, 2012

DIY Board Game Clock

 Matias Rodriguez was looking for a clock to be used in chess, go and other board games but couldn't find one to his liking. Instead he met the challenge of making his own using Arduino-based hardware - and in our opinion succeeded very well. For example:


The clock has a simple user interface and performs well. Matias has completely documented the design process, starting with his prototypes and continued right through to the finished product. Furthermore the Arduino code and attachments are available from his github repository. 

This sort of project that embeds Arduino hardware can be accelerated through the use of our tiny Freetronics Leostick - one of the smallest Arduino-compatible boards on the market today:


For more information on the clock, visit Matias' website here. If you have made something similar, or an interesting project to share with the world, please consider letting us know in the "Project Showcase" section of our active support forum.

June 05, 2012

Arduino and Magnetic Levitation

 Once again the ease of using Arduino-based hardware to create a wide range of projects is demonstrated by Norbert Požár - as he created a magnetic levitation system with an electromagnet, hall-effect sensor and an Arduino board. Here is a quick demonstration of his system in action:


Thankfully Norbet has also posted the required Arduino and Mathematica code for anyone to examine and make use of. Furthermore as the concept of electromagentism is somewhat complex, a description and tutorial for the more technical reader has been made available as well. 

Kudos to Norbert for his efforts and another use of Arduino hardware. This project lends itself to the use of our Freetronics Eleven Arduino-compatible board, and perhaps experimenting with our sensor module:


For the project description visit here, detailed explanation here, and the code is available here

June 05, 2012

The Laundruino - Internet-connected washing machine

Over at the fellowship of free software foundation europe's blog, a solution to a common domestic problem has been solved using an Ethernet-connected Arduino and some simple hacking. The author was tired of walking down to their basement to check if the washing machine had finished it's cycle. So instead, they monitored the washing machine's "finished" LED with an Arduino:


... which then published the status to a simple web page:


We love this project as it is so simple to create, and introduces the user to the "internet of things" concept of connecting everyday devices to a network. In doing so the author has used an Arduino and seperate Ethernet shield, however to recreate this you should use our Freetronics EtherTen:


which combines an Arduino-compatible board with Ethernet connectivity and optinal power-over-Ethernet support. To follow the design and also download the Arduino sketch, visit the fsfe blog here


June 05, 2012

Musical Kitchen timer with Super Mario sounds

 Alan from Japan had too much spare time, spare parts and the need for a new kitchen timer - so he created a large unit with a graphic LCD module that is easy to use, unique and memorable. His design brief was to have the timer play music, and be turned on and off without a physical button, so he used a tilt-switch instead - however the time durations are set with buttons on the top:


For the sound effects, Alan hacked a simple keyring that plays a tune at the press of a button - perfect for hacking into an Arduino-based system. Although he has uploaded the code to a raw ATmega328, the code is first compiled in the Arduino IDE and works for out platform. Thankfully Alan has released the Arduino code for everyone's use, and is available for download here

Once again examples such as Alan's clock show how you can create professional and interesting devices with Arduino-based boards and some basic electronics knowledge. To build such a device, you could use our Freetronics LeoStick which lends itself to embedding into almost any device. To find out more, visit Alan's website here

June 05, 2012

Detecting model railway track occupancy with photodetectors and Arduino

As in real life railways, model railways also lend themselves to being controlled with computerised solutions for many aspects, including train control, signalling, and wayside effects. In his series of articles, Steven has described multiplexing photodetectors to in order to monitor track block status - in other words, detect if a train is in a certain section of the track. 

Although some of you may think this is overkill for a model railway, one of the goals in building one is to simulate the real thing as much as possible, and this includes the underlying operational systems as well. As you can see in the following image, once the detectors have been installed they are hard to notice:


However by following Steven's detailed instructions, you can understand how his system works and see the results displayed on an LCD module. For those of you using Arduino systems and needing more than the Uno and compatible boards can offer, consider our EtherMega - with almost eight times the program space, sixteen analog inputs, fifty-four digital pins and onboard Ethernet for network connectivity:


This project is one of many that make use of Arduino and model railways, and if you are using the technology for this purpose - we'd love to hear about it! Let us know in the "Project Showcase" section of our active support forum. For more information on the project, visit Steve's website here

June 05, 2012

Build an Arduino-based Crazy Golf Hole

 Mike Cook in the UK was tasked with creating a sound and visual effects device for a hole in a "Crazy Golf" course as part of a festival for sound and art in his local area. He came up with a professional and easy to construct example of a device that will play a range of sound effects and also a motorised wheel that rotates upon the hole being used. 

It is interesting to see that Mike 'outsourced' the sound effects to a seperate device, which has various buttons for the sounds. Therefore the effects are simply controlled by the Arduino's outputs instead of having to generate the sounds internally in the sketch - a great use of hacking two technologies to solve a problem. View the results in the following video:


Furthermore Mike has documented the project completely, including illustrated construction images, circuit schematics and the Arduino sketch. Although he used a barebones Arduino circuit, you can save a lot of time by using one of our Arduino-compatible boards such as the LeoStick:


... which lends itself nicely to embedding into other products. For more information on Mike's project, visit here

June 04, 2012

Arduino-controlled elevator simulation panel

Necessity is the mother of invention, and this project is no exception. The designer's children always enjoyed pressing the buttons in an elevator, so to keep them satisfied he designed and built the following panel for home "use":


The panel is quite simple, and just involves digital inputs and outputs, as well as using 74HC595 shift registers. The plans lend themselves to use with any design of panel, you could make an retro 1950s style through to a more contemporary look. All the design requirements have been published as well as the Arduino sketch for you to work with. 

Here at Freetronics we can get you started with your own simulator by offering a range of Arduino-compatible boards, as well as our shift register, sound and RGB LED modules. However for more information about the project visit Lloyd's blog.